CCTV Camera Installation: 2026 Professional Guide
CCTV camera installation process can be a daunting task, but with the right instructions, it can be a breeze. In this article, we will provide you with step-by-step instructions on how to install both wired and wireless security cameras at your home.
So whether you are looking to keep an eye on your property or just want some added security, read on for the best way to do it!
Where To Install A CCTV Camera?
Where to install a CCTV camera is important because the position of the camera determines how well it can surveil an area. Most burglars enter through the front door, window, or back door, so it is important to place cameras in these areas.
Additionally, it is important to place the camera high up(about 9 feet above the ground) so that it can cover as much area as possible and avoid vandalism.
If you're living in areas with frequent bad weather, make sure your camera's IP rating is high enough to withstand elements. For example, an outdoor surveillance camera with an IP66 rating can withstand the impacts of solid matter like dust and liquid-like rainwater, which could be rendered completely water-proof.
Which Type of Home CCTV Camera to Install?
The process of installing CCTV at home varies among different types of CCTV cameras and systems.
Here's one thing to note: CCTV cameras mentioned in this article are IP cameras that transmit data via a network cable or WiFi connection, instead of traditional analog cameras. The installation ways of these two kinds of cameras are different, so you must figure out which kind your camera is before keep reading on.
Below is a list of different kinds of security cameras, categorized by their power source and network connection method.
Two categories: wired & wireless
IP security cameras can be simply divided into two categories: wired cameras and wireless cameras.
- Wired cameras include PoE cameras that can transmit data and get power from only one Ethernet cable, which allows you to enjoy a fast and simplified installation
- Wireless cameras include WiFi cameras that transmit data through a wireless connection to a router, but they also need power cables. Compared to PoE cameras, wireless WiFi cameras can offer you flexible and easy installation.
Wired or wireless security camera, which one to choose? It all depends on your specific security needs.
Battery-powered security camera
Battery-powered security cameras are a great choice if you want to avoid messy cabling and drilling, especially when installing cameras outside an apartment door/window. If the outside is brick, this is definitely your best option.
The 100% wire-free feature means no cords and no wiring needed from top to bottom. You are free to place it on a shelf or table, or mount it on the wall without running wires.
Step-by-Step Guide of CCTV Camera Installation at Home
Setting up a do-it-yourself CCTV surveillance system at home is not as complicated as you thought. Prepare the installation tools & materials and follow the steps below, you can install the cameras quite eaisily even if you are a beginner.
Generally, household tools needed for CCTV installation include:
- screws
- screwdriver
- electric drill
- ladder
- hammer
- fish tapes
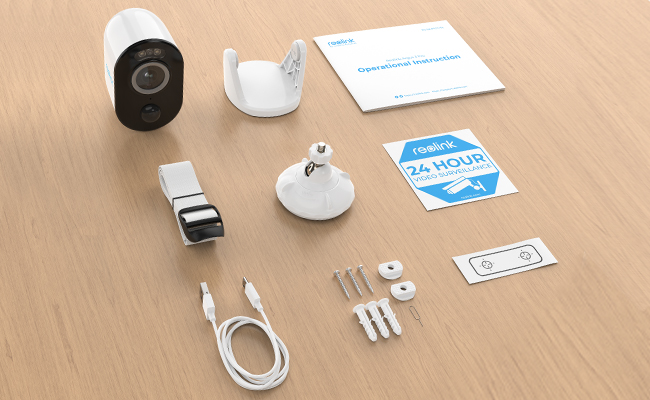
If you get an all-in-one security camera (system), screws-kind-of necessary installation materials are usually included in the camera box.
Now that you've got everything prepared, it's time to do it yourself!
Step 1. Check for Spots
This is the first important step in the DIY installation of home surveillance systems. Pay attention to the following details when you decide on the areas where you'd like to place the camera:
- Mount your camera up high, to make sure it gets a clearer and wider view. Cover as many entries as possible by using the least number of cameras to save cost.
- Keep your security cameras out of reach of intruders and thieves, or naughty kids.
- Avoid pointing your camera directly to a light source, or it will result in a slight underexposure of videos and images captured by the CCTV camera.
- Put cameras near a power source. Even a wireless CCTV camera may need a power supply.
- Place the required mounting bracket for the camera under the eave. This helps protect outdoor security cameras from harsh or extreme weather.
- Do not install a security camera behind the windows. Or else, the IR reflection may lead to overexposed images and videos.
- Avoid installing security cameras in your neighbors’ properties or other places where people shall enjoy a reasonable expectation of privacy.
Step 2. Mount Cameras on the Wall
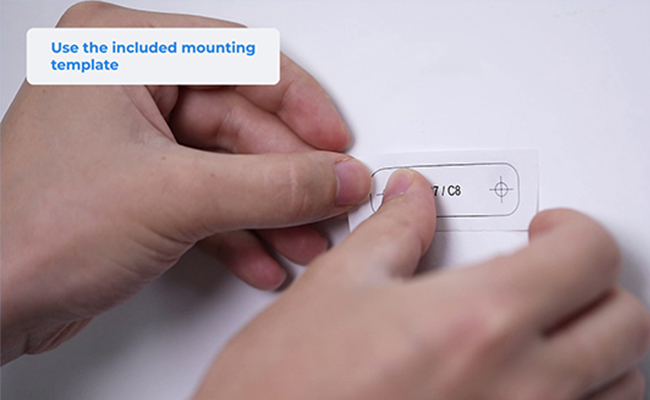
Some security cameras coming in an all-included package, such as Reolink PoE dome/bullet IP cameras, provide mounting brackets and screws. You can also use the mounting hole template to make your first-time video security installation much easier.
Here's how you can use the mounting template inside the camera box.
First decide where you want to place the camera and then attach the mounting template to it, for example to the wall.
Then use a drill bit the same size as the screws that came with your camera to drill pilot holes in each of the marked locations on the template.
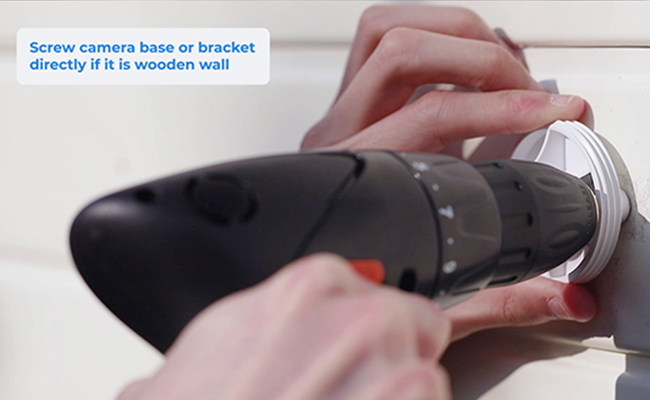
If it is a wooden wall, you can drill the holes directly. If it is a drywall, use a power drill with a wood bit to create a starter hole, then switch to a metal bit to make the final hole.
Put the camera in your desired spot and make markers for drilling. Drill holes and screw your camera tightly on the wall, ceiling, and other spots you've determined for the camera mounting. And then point your camera in the right position and right angle.
Step 3. Arrange Wires and Cables
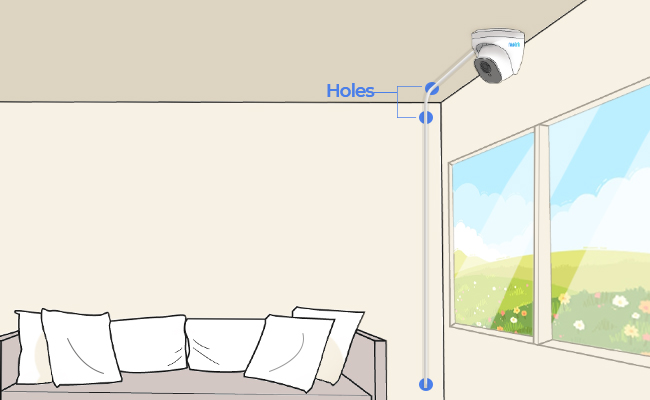
It seems that the most difficult part of DIY CCTV installation is to run wires and cables.
Before you get started, you should plan the security camera wire route, especially when you plan to install cameras in multiple spots, such as in hallways, the basement, the garage, through the attic, under the eave, or in the ceiling soffit.
Drill holes where the wires will go through, and consider the nearest route if you are doing the installation in a two or three-story house. Push all of the ends of the camera cables on the holes you have drilled. In this process, you can use a fish tapes to make wires go through holes easily.
To keep the wires neat and prevent them from wearing out, you can use wire protection cover or conduit. You can also choose a room wherein you want all your cables to be placed.
Check the article on how to run security camera wires for every detail on installing security camera wiring in the house and outside. It's definitely a good help for both experienced CCTV camera installers and green hands.
Step 4. Connect Wires and Power On
After the wiring process, the next step is to connect your home CCTV security camera and check if it can get power supply. Here we will share wire diagrams about how to connect the camera, including wired and wireless cameras.
PoE security camera connection diagram:
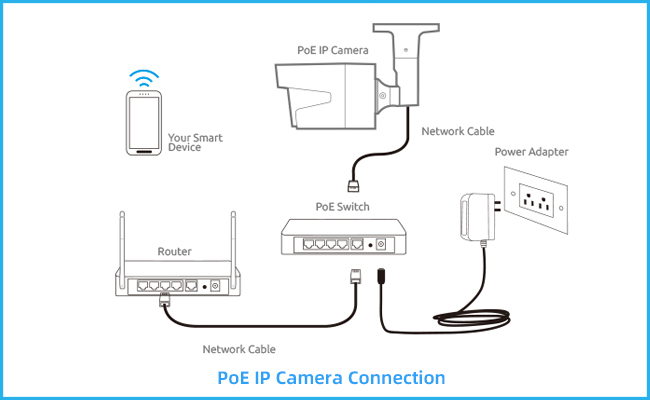
The diagram shows a camera, a router, a Poe switch, and a power adapter. The camera is connected to the router with a signal cable. The router is connected to the Poe switch with a LAN cable. The Poe switch is connected to the power adapter with a power cord.
Wireless IP camera connection diagram:
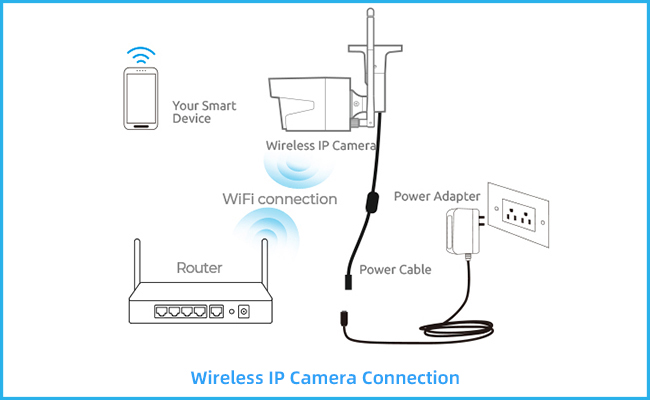
The diagram displays a wireless security camera connected to a router via a wifi connection. The camera is able to connect to the router wirelessly and does not require any cables. The power adapter is used to provide power to the camera.
Do not forget that if you are using an NVR and a monitor, both devices need to be wired and powered up correctly. You may wish to plug them into the same specific socket to facilitate your wiring and cable management.
In addition, you must take into account sudden power cuts. A sudden power failure can occur when an intruder tries to cut the power to your home. We recommend that you purchase a portable high-capacity battery backup for home use, such as a UPS, or use a generator and ensure that your home security system is connected to it. This way, your security camera can work continuously in such an emergency.
How to Set Up the CCTV Camera (System) at Home
Before you can say that your installation job is done, it is recommended for you to recheck the views of each camera. Check whether the cameras are working or recording. Also, check how far the camera can cover.
Some self-install home CCTV camera manufacturers offer an mobile App and desktop software, for accessing your camera remotely from smartphones, computers and tablets. Get these surveillance features set up on the app/client, including live view, motion detection, video recording, and more to suit your needs.
Here are 3 simple steps for you to set up the IP camera for remote viewing within less than 2 minutes.
- Download the App or Client to your phones or computers.
- Launch the app and enter a unique ID number (UID) to add the camera device.
- Click the camera on the App or Client and you can view live streams over the Internet outside the home network.
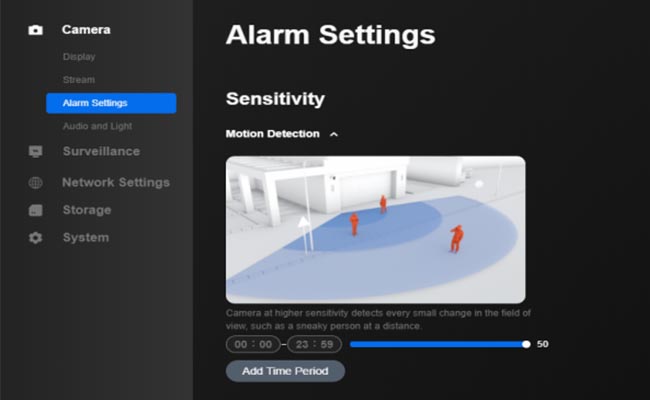
Here is how you can set up your security camera for motion detection in the Reolink client software. If you are using a camera from another manufacturer, you will see a different setup screen.
CCTV Camera Installation costs
There are pros and cons to both installing security camera systems at home by yourselves and leaving it to installers. If you want to install the cameras by yourselves, you can save some money, but if you're not comfortable drilling holes and running wires, it might be worth paying for a professional installation.
Check out how much you will spend on professional installation before making up your mind.
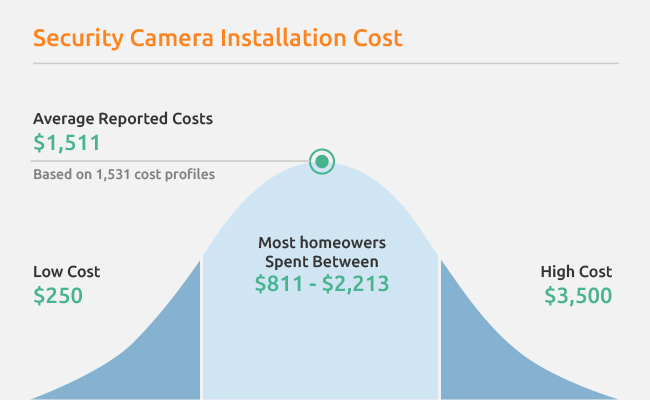
Generally speaking, if you ask a professional to do the installation job, they may charge you up to $3,500 as installation fees for a whole set of wired or wireless security system at your home.
In some cases, the professional installer may even charge you extra activation fees to turn the surveillance equipment on.
However, if you decide to install security cameras at home on your own, the installation cost will be zero. Also, the CCTV installation process will go smoothly with the detailed guide above.
So, to reduce the unnecessary cost, it is best to choose DIY home surveillance systems and install them on your own.
Tips and hacks for CCTV camera installation
Better selection of CCTV camera and gear
1. PoE camera is a great option
When installing a wired security camera for your home, a PoE camera is a great option. PoE stands for Power over Ethernet, and refers to a technology that allows both video and power transmission over a single network cable.
This makes installation of a wired PoE IP camera much easier, as you only need to run one cable to the camera.
2. Use a power extension cable
When installing a home security camera, if your security camera uses a DC power adapter, this means you will need to have a power outlet close to the camera. A power extension cable can help you out greatly in this situation.
By using an extension cable, you can avoid having to reinstall a power outlet in the camera's place. Experienced CCTV installers do it this way - all you need is a DC power extension cable. Connect one end of the extension cable to the power source location and lead the other end to the camera location. This will make your installation much easier!
How to avoid blind spots?
While installing CCTV at home, you must pay attention to the angle of the security camera. Make sure your camera cover as many essential areas as possible and avoid creating blind spots.
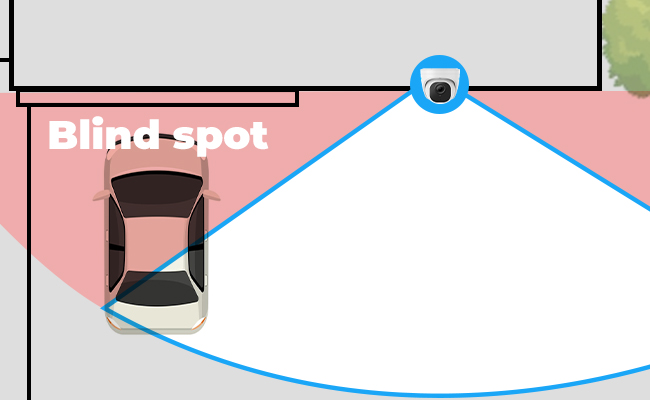
Here is a great tip for you to know whether there exist blind spots: take photos of the areas you want to cover from the exact locations where you anticipate installing a security camera. Take a look at those photos you'll know what lens you need for maximum coverage and which angle is the best when mounting the camera.
But if you have a large property to monitor, there are two ways to help you avoid blind spots. If you have enough budget, you can invest in a security camera system that has multiple cameras. You can put those cameras in different places to cover every corner of your property.
Or you can consider choosing a wide-angle security camera to avoid blind spots. A 180° panoramic dual-lens camera, 360-degree fisheye security camera, or a PTZ (pan-tilt-zoom) surveillance camera are all good choices. With only one camera in place, you can enjoy a super wide view!
How to hide security cameras?
When installing a security camera, it is important to be aware that a CCTV camera does not ensure 100% security. Many people keep their security cameras visible so as to deter those less-motivated thieves. However, determined intruders may try to damage a camera in advance for further action.
So, it's necessary to hide your security cameras if you want to keep them from being disabled by burglars. Hidden security cameras are more likely to capture the face of burglars when they haven't realized that they're monitored.
Here are a few tips you can take to hide your cameras.
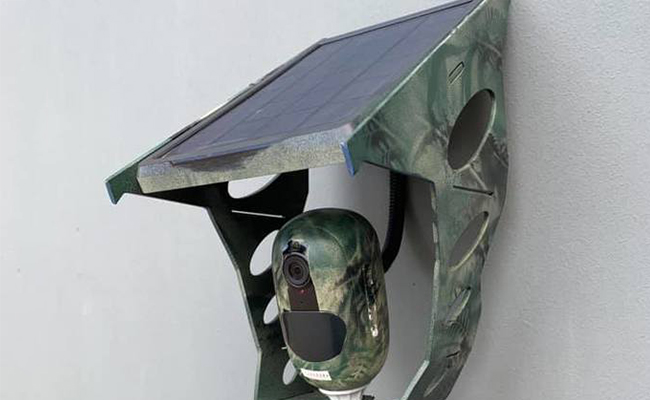
- Camouflage your security camera. Paint the camera and make it blend into the surroundings. A perfectly camouflaged camera can be nearly "invisible" in plain view.
- Put the security camera in a birdhouse and leave a hole for its lens. The whole body of the camera is hidden in the birdhouse and no one will find it.
- Disguise your security cameras with things around. If you put the camera outside, you can use branches or leaves to cover its body. If you put the camera inside the house, you can hide it within everyday objects such as bookshelves, smoke detectors, desk plants, tissue boxes, and so on.
Hiding your cameras can be fun and helpful. But you should always make sure that the camera's lens isn't blocked.
Conclusion
When installing a home security video surveillance system, always keep in mind that there are many to choose from, and that it can be a fun and easy experience. Start by choosing a camera designed for DIY users, and then read home security system reviews to get a sense of what might be the best fit for your needs. Once you've made a decision, be sure to share your installation story with us - we'd love to hear about it!
Search
Subscribe for the Latest Updates
Security insights & offers right into your inbox