How to a Wire Security Camera Outdoors and Indoors: Step-by-Step Guide & Videos
There are two different ways to install security camera wiring: POE security camera wiring and wireless security camera wiring. This post is a step-by-step detailed installation guide on how to run wires for security cameras to help you install security camera wiring for both indoors and outdoors. You can install your security camera for your front/back door, reception room, front/back yard, shop floor, bedroom, garage, warehouse, basement, parking lot, farm, entrance, even upstairs, etc. quickly and easily.

🎉 Exclusive Limited-Time Security Deals
- Save Up to $300 on Bundles & Multi-Packs
- Upgrade your home protection with our daily offers!
Preparations for Security Camera Wiring Installation
When you are about to run security camera wires outside or inside, you should prepare the below necessary items.
For PoE security cameras:
- Cat 5/6 security camera wires
- Drill
- Fish tape
- PoE injectors
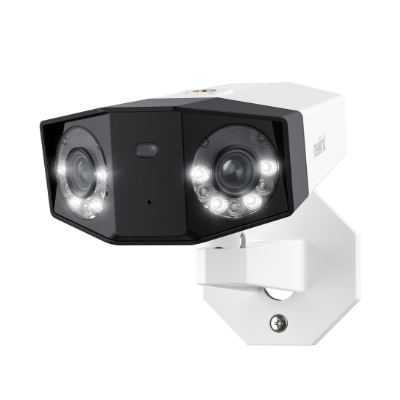
Groundbreaking 16MP Dual-Lens PoE Camera
16MP UHD, Dual-Lens, Motion Track, 180° Wide Viewing Angle, Power over Ethernet, Color Night Vision.
For plug-in wireless security cameras (without battery):
- Electrical wires
- Drill
- Fish tape
- Security camera wire extension
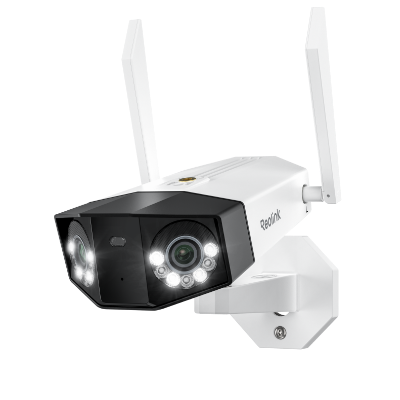
Groundbreaking 16MP Dual-Lens WiFi Camera
16MP UHD, Dual-Lens, Motion Track, 180° Wide Viewing Angle, Plug-In WiFi, Color Night Vision.
For analog security cameras:
- RG-59 BNC connectors
- RG-59 crimping tool
- RG-59 stripping tool
- RG-59/syv-75-5 coaxial wires
- BNC barrel
- Wire cutter
- Standard wire crimp tool
- Electrical tape
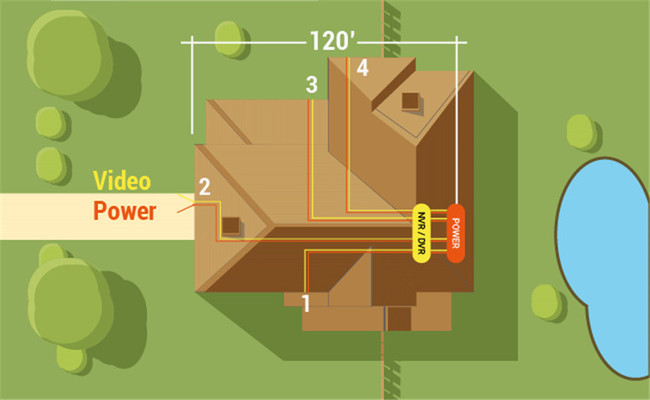
You can take a look at the security camera wire diagram below before running cables.
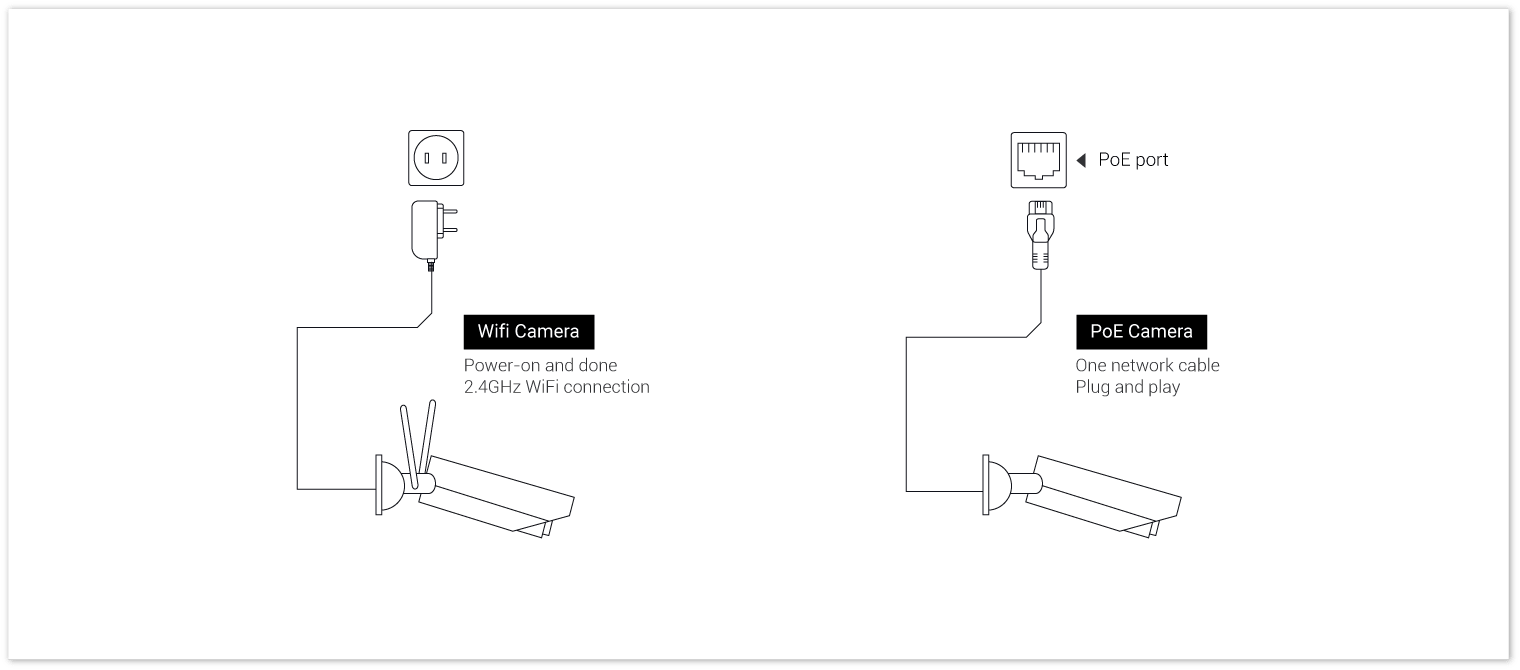
WiFi & PoE IP security camera connection diagram
Note: Some detailed tools are not mentioned here. If you need to run underground wires for security cameras to monitor your garden, driveway, etc. PVC/metal conduits are necessary.
How to Wire Security Cameras Through Walls?
Installing security camera wires inside of your house, such as the attic, soffit, siding, etc. is much easier than the outside job. You can follow these installation steps on how to run security camera wires through walls.
Step 1. Design the central surveillance hub before snaking security camera cabling. The place where you place your NVR/DVR --- the central surveillance hub ---in your house determines the route of wiring. Placing your NVR/DVR smartly in your house can help you get rid of messy wiring disaster.
The place should be easy to access so that you can hardwire your security camera comfortably from anywhere in your house. Attics and your Internet router are ideal places for NVR/DVR.
Step 2. Turn off the power when running security camera wires, which can protect your personal safety and avoid damaging your devices.
Step 3. Drill a hole in the position where the outlet will be (for wireless security camera & analog security cameras), and use a straightened metal coat hanger to feel inside the wall for any unforeseen obstructions.
Drilling is undoubtedly one of the best and easiest ways to run security camera wires through walls, soffit, vinyl siding, etc.
If you run a Cat 5/6 Ethernet cable of your security camera, you can just drill a hole to run the Ethernet cable from the camera to your home router or NVR. If the distance between your camera and router/NVR is too far away, you can add a PoE injector.
Step 4. The gap/hole should be larger than the maximum amount of wires you expect to ever run. Allow a few feet of extra wire inside for both termination, and future reorganization if needed. Labeling the ends of the cables will help you figure out which security camera works with which cable.
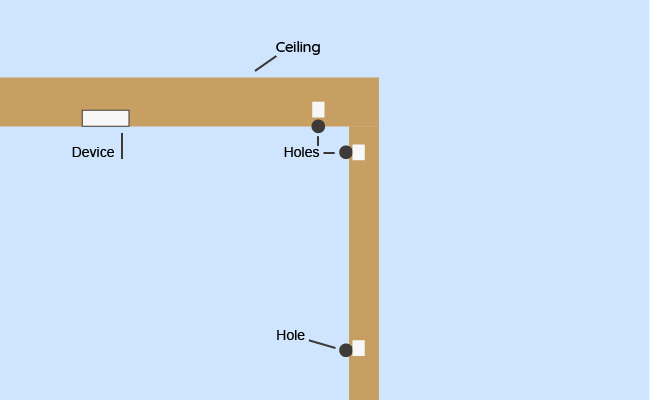
Step 5. Go to where you want to install your security cameras, such as attic, soffit, basement or crawlspace, and drill a hole in the top or bottom wall plate in the same wall cavity.
Step 6. Attach the wires with the fish tape to fish your security camera wires.
Step 7. Run security camera wires or cables to the destination (you may need a partner to feed the wires for you). Remember to use the security camera wire protection cover or conduit to protect the cables.
Hope the above step-by-step guide has answered the questions like How to run home security camera wires through the attic/wall? How to run security cameras for my two-story house?
How to Wire a Security Camera in Outdoor Spaces?
When you need to mount IP cameras outdoors, the outdoor security camera cabling job is the key process. You can check the following guide on how to wire outdoor cameras, from your house to a far-away property, like your driveway, isolated garage, front garden, etc. and the steps to install CCTV camera cables from inside of your house to the outside, such as your front porch.
1. How to Run Security Camera Wires Outside: Long-Distance Project
When running security camera wires outside (especially the long-distance job), you can bury the cables to protect the wires from being tempered.
Step 1. Plan the security camera wire route. Find a rather short and easy route to bury your conduits so that the burial job could be easier.
Step 2. You need to use the wire guard, PVC or metal conduits to protect the home security camera wires from tampering by both humans and animals – squirrels, birds, etc.
Note If you don’t use conduits outside or bury security camera wires, remember to leave drip loops to prevent water from running to the power outlets through the hole.
Step 3. If you need to power your PoE security camera outside, you can just fish a CAT5/6 cable, since PoE cabling can provide both data connection and electric power for your PoE security cameras. In terms of wireless security cameras, you just need to run wires for the outlet providing power for wireless security cameras. (The outlet should be waterproof and weatherproof.)
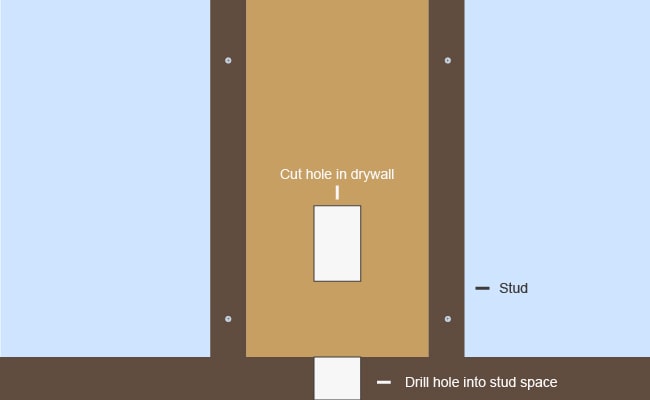
Step 4. Mark the place where you want to cut the hole.
Step 5. Drill a hole to run security camera wires from your house. Once the hole is cut in the wall, insert a drill bit to drill a hole so that you can run wires through it. Remember to use a right angle drill with a hole saw bits for boring large holes.
Keep the holes centered on the studs. Drilling a hole in the wall is much easier than drilling in the floor. All you need to do is to drill slowly and not press too hard. Stop when you feel the drill penetrates the wall.
Step 6. Bury electrical wires/network cables. Before you need to run wires for your security cameras, you need to bury the PVC conduit at least 18 inches, while 6 inches for metal conduit according to the National Electric Code (NEC).

Step 7. Now holes are already done. Running wires comes next. Fishing the wires is quite easy when you attach them with a fish tape or a pull wire. Wrap the bare wire through the fish tape eye and twist the end of the wire around itself. Place the electrical tape over the end of the fish tape eye and wire. Now you are ready for pulling wires.
Step 8. Pull security camera wires. With one person standing to feed the wires, pull evenly on all of the wires. Keep the wires untangled. As for the person pulling the wires on the other end, pull the wires slowly, such as in 2 to 3 foot intervals. Pulling too fast would nick the wires and catch your partner’s fingers.
2. How to Install Security Camera Wires from Inside to Outside
If you just mount a security camera to the brick outside of your house, like running security camera wires to the hardboard, the setup process is quite simple.
Step 1. Decide where the camera is placed.
Step 2. Drill a hole from the position of the camera to the router or the NVR (for PoE camera cabling).
For outdoor wireless security cameras, you just need to drill the hole to run power cables for them.
Step 3. As mentioned above, you can hide the security camera wires with the wire guards.
Note: After running wires for security cameras outside, don’t forget to conceal the holes. Or else, the moisture may run along the surface of the CCTV cable and get right into the electrical connection points, leading to great trouble that requires a costly repair.
Here are some useful tips on how to cover security camera wire holes in the wall:
-
Fill the hole with waterproof materials like silicone and duct seal.
-
Apply waterproof outdoor covers or feed-through bushings to conceal the holes.
3. How to Hide Security Camera Wires Outside
One of the best ways to hide security cameras outside is running burial wires. You can try the below steps to conceal the wires for your security cameras.
Step 1. Plan the wring route for running wires for your IP camera outdoors. Make the route as short as possible, which would make the burial job easier.
Step 2. Get the pipes ready for the wiring, such as metal conduit pipe, PVC, etc.
Step 3. Mark the points where you’ll need to drill holes.
Step 4. Bury the pipes. According to the National Electric Code, the PVC conduit needs to be buried at least 18 inches, for metal pipes, 6 inches.
Step 5. It’s time to run the security camera cables. Use fish tape to pull your wires.
Now you are able to hide security camera wires outside and protect CCTV cables from harsh weather conditions and external damages like vandalism.
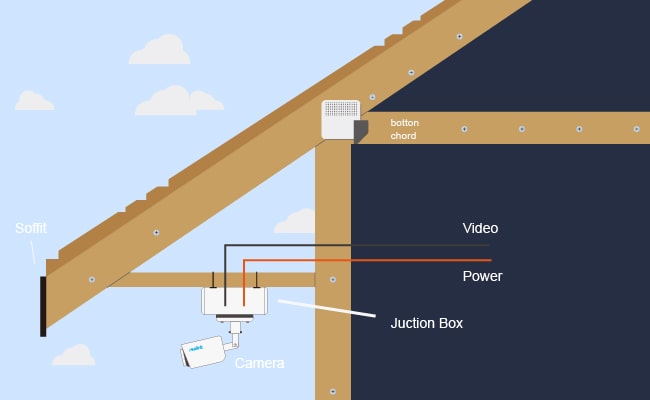
Update: A Reolink user shares how he installs a dome security camera and hides security camera wires outside in a junction box. And it looks nice!
"Run Security Camera Wires" Caution
The National Electrical Code requires holes containing non-metallic cable (often called Romex) or flexible metal-clad cable be set back 1-1/4 in, or more from the edge of a stud (Fig. A) to protect the wires from nails and screws. (The 1-1/4-in. screws and nails used to secure 1/2-in. drywall penetrate the studs about 3/4 in.)
You also have the option to bury these wires underground to prevent potential issues in the future.
How to Hardwire Security Cameras & Installation Guide: All Types Included
Security camera wiring job is the key process of installing security cameras. There are still several minor steps to finish the whole installation job. You can check the below steps to set up wire-free, PoE, wireless & analog security cameras.
1. How to Install Wire-Free Battery Powered Security Cameras
Wire-free security cameras are powered by batteries and transmit the data via WiFi, which makes this type of security camera completely wireless from the top to the bottom.
Here we take Reolink Argus 3 Pro battery-powered security camera as a typical example.
Step 1. Download the Reolink App from the App Store (for iPhone), or Google Play (for Android smartphones).
Step 2. Install the battery to the camera, and then you are gonna hear the verbal instruction to help you set up the camera.
Step 3. Pick a name and set up the password for the camera.
2. How to Install PoE Security Cameras
PoE security cameras only rely on a Cat 5/6 Ethernet cable to realize both data and power transmission, which makes this type of camera easy to configure.
Here we take RLC-510A PoE IP security camera to show you the overall setup process.
Step 1. Install the camera to the position you want.
Step 2. Run the Ethernet cable from the camera to the router or the Reolink NVR.
Step 3. Download and launch the Reolink app on your mobile phones.
When your smartphone and the camera are in the same network, simply say in LAN, the camera will be automatically added to your phone.
When your mobile phone and the camera are in different network (WAN), you can scan the QR code on the camera or enter the UID of the camera for remote live view.
3. How to Install Wireless Security Cameras
Wireless security cameras depend on WiFi signal to transmit data, while requiring a cable to get power.
You can check the below setup guide to get the complete
installation procedure for wireless security cameras.
Step 1. Mount the camera to a position that is close to a power outlet. If the power outlet is a little bit far away, you can run the power cable for your wireless security cameras.
Step 2. Plug the camera to the power outlet. You also need to connect the camera to the router with the network cable for the initial setup. You can remove the network wire after that.
Step 3. Download and launch the Reolink App on your iPhone or Android mobile phones. The camera will be automatically added to your smartphone when in LAN. Scan the QR code or enter the UID of the camera to access live stream when in WAN.
4. How to Install Analog Security Camera Systems
Analog security cameras need to connect to the DVR to function. In other words, this type of security camera cannot work standalone.
Analog security cameras would be more challenging to install compared with the IP camera type, since the cameras need cables to get power, and also need to connect to the DVR with the coaxial wires.
You can check the analog security camera connection guide below to get more details.
Step 1. Decide the position of the DVR and the mounting position of your analog CCTV cameras. The placement for the DVR should be easy close to the router and the power outlet.
Step 2. Connect the camera to the DVR with the coaxial cable. And also plug the camera to the outlet to get power.
Step 3. Connect the camera to the router so that you can get remote live streaming.
You can also connect the DVR to the monitor with the HDMI cable to get local live viewing.
You can mount security cameras to the soffit, one- or two-story houses, stucco wall, vinyl siding, etc. with the above step-by-step guides above.
Besides the above detailed step-by-step guide to run security camera wires inside and outside, you can learn more details about video security camera wire setup in the below part.
Bonus Tips: How to Hide Security Camera Wires Inside Your House
If you don’t want the security camera wires to ruin your current house decor, you can try the below tips to hide security camera wires inside.
- Solution 1. When you drill a hole to run the IP camera wiring, like wiring cameras through the ceiling, you can hide the security camera cable with the wire guards. Put the cable into the guard, and attach the guard to the wall inside of your home or trail them to the back of your furniture. So no wires are plain in sight.
- Solution 2. Paint the wires. You can staple the wires to the corner and the paint over them using the same color as the walls.
- Solution 3. Run security camera wires behind the baseboard in your room.
- Solution 4. Another feasible way to hide CCTV cables is to use a plastic tube, which allows you to conceal the security camera wires from plain sight and protect them from dust and external damages.
A DIY lover posted a video on YouTube, showing his security camera installation guide inside his house. (He hides the security camera wires under the desk. What a smart idea!) You can check the video below.
FAQs
What is the best way to run wires for security cameras?
The best way to run wires for security cameras is to plan direct, protected routes through walls, ceilings, or conduits, keeping cables hidden and secure. Use high-quality coaxial or Ethernet cables, avoid electrical lines to prevent interference, and weatherproof outdoor wiring. Label both ends for easy maintenance.
Can I install wired security cameras myself?
Yes, you can install wired security cameras yourself if you're comfortable with basic DIY tasks. The process involves mounting the cameras, running cables through walls or ceilings, and connecting them to a DVR or NVR. But if you are unsure about wiring or drilling, seeking a professional for help may be a good idea.
How long can I run security camera wires?
Well, it depends on the security camera power supply and the network connection range.
Generally speaking, you are able to run wires for security cameras within a range of 330 feet without voltage drop concerns. To ensure that wireless security cameras work with stable network connection, run CCTV cables within a recommended range of 250 feet.
After routing the security cameras wires outside, you can add a security camera wire cage to protect outdoor cameras from being tempered or stolen by the thieves.
Can security camera wire be spliced?
Yes, security camera wire splicing would be easy with the below detailed installation guide.
- Use your knife or cable cutter to split the 2 insulated wires, and remove half of an inch of the insulation from the end of the wires. Be careful not to injure your fingers when cutting the wires.
- Splice the cables together (with wire nuts), via twisting the exposed copper ends. Make sure that you twist the positive from one wire to the other (same as the negative cable).
- Splice the 2 power cables together, using the security camera wire connectors, and then insert the exposed copper wire from the positive conductor into one end of the connector. Do the same thing for the other positive wire and the 2 negative wires.
Don’t forget to use a security camera gauge to check the amount of the electric current the wire can carry to avoid the possible circuitry burnout.
Note that splicing security camera wires improperly may result in security camera malfunctions.
What are the security camera wire types?
When running wires for your security cameras, implementing the suitable cable type will save you immense amounts of headache later and calls to tech support to solve the issues that should not have happened. Security camera wire types usually include 3 main kinds: Cat 5/6 Ethernet cables, Siamese cables and plug-and-play cables.
Conclusion
Properly running security camera wires is essential for ensuring optimal performance and longevity of your surveillance cameras. By following the steps outlined in this guide, including planning the layout, choosing the right cables, and executing the installation with precision, you can minimize the risk of interference, damage, and other complications.
If you have any questions or ideas on “How to Install Security Camera Wires”, please leave them in the comment below! We will feature your questions and insights in this article!
Search
Subscribe for the Latest Updates
Security insights & offers right into your inbox