How to Use Fisheye Security Cameras Effectively: Viewing Modes & Installation Tips
Fisheye security cameras are popular among homeowners and business owners as they provide an extra level of surveillance with a 180° or 360° wide view. But if you want to enjoy peace of mind by having a full view of your home or business, simply installing the camera and leaving it to work are not enogh.
This article includes can't-miss tips on where and how to install your fisheye security camera properly. Also, it can help you use your fisheye security camera effectively and change the viewing modes to get flattened images.
Where to Install A Fisheye Security Camera
Fisheye security cameras can be applied in various scenarios due to their ultra-wide viewing angle and powerful functions. They are great choices when monitoring stores, offices, meeting rooms, warehouses, living rooms, or other wide areas.
Similar to other security cameras, it is important to choose where to install a fisheye security camera. Even though fisheye cameras have a 180° or 360° field of view, it doesn't mean you can put them randomly around your property.
Instead, you'd better consider which location can maximize the fisheye camera's effectiveness before installing it. An ideal position for a fisheye security camera is one that allows it to cover a large area with minimal obstruction.
A good placement ensures that all areas of the monitored space are well within the field of view of the camera. Most people would put the fisheye security camera in the center of a room or an entryway, which will ensure that no blind spots and that there is enough lighting to capture clear images.
Nevertheless, the mounting position of the fisheye security camera is not limited to the center. You can also adjust the camera's position to suit the actual surveillance environment, as long as the most important areas are covered by the camera.
One thing to note is that not all fisheye security cameras can be used outdoors. If you want to place the fisheye camera in the outdoor area, you must check its weather-proof capability.
Three Mounting Styles of Panoramic Fisheye Security Cameras
Fisheye security cameras can be mounted in different styles, allowing them to be placed in a variety of locations. The most common mounting styles of a fisheye camera include wall mounting, ceiling mounting, and desktop mounting. Depending on where you're going to install the camera, you can choose the most suitable mounting style.
Wall mounting
Wall mounting allows the camera to have an unobstructed view of the space and is well-suited for both indoor and outdoor applications. Wall-mounted fisheye cameras are often used to watch the hallway, front door, office room, etc.
When mounting the camera on a wall, it’s important to ensure that the wall is free from obstructions that could block the lens or interfere with its field of view. Additionally, fisheye security cameras often require power and network cables that must be routed through walls or other structures. Thus, you need to pay attention to how to run wires and conceal them for aesthetic purposes.
Ceiling mounting
Fisheye security cameras mounted on the ceiling can capture more of the area with its wide-angle lens as it gives it access to an elevated viewpoint. Ceiling-mounted fisheye cameras are preferred in retail stores, hotels, parking lots, libraries, and so on.
However, they can also be susceptible to glare from lighting fixtures or windows when placed too close to these sources of light.
Furthermore, like wall mounting, any cabling must be properly routed through ceilings or walls in order for power supply and network connections.
Bonus tip: If you want to learn more useful tips on running wires for fisheye security cameras, you can't miss this ultimate guide on security camera wiring for both indoors and outdoors.
Desktop mounting
In some cases, fisheye security cameras can be simply put on any flat surface such as tables or shelves within indoor environments. This type of installation requires much less effort than wall or ceiling mounting due to its minimal drilling or wiring requirements. Usually, desktop-mounted fisheye cameras are used in the meeting room and warehouse.
However, depending on the environment, desktop-mounted fisheye cameras may require extra protection from dust, moisture, or other environmental factors that could damage the camera. Otherwise, the camera's functionality and lifespan may be affected.
How to Install Your Fisheye Security Camera: Step-by-Step Guide
Installing a fisheye security camera is a simple, straightforward process that can be completed in just a few steps.
To get started, make sure you have the necessary materials: a fisheye security camera, the appropriate mounting hardware (depending on where the camera will be placed), and all necessary power and Ethernet cables.
Now you can follow the steps below to get your camera easily installed.
Step 1: Choose a great position
Decide on where to place hard-wired security cameras and prepare the necessary installation tools, like screws, Ethernet cables, a power adapter, mounting hole template, etc.
Reputable brands like Reolink will provide essential accessories along with the fisheye camera. But you can also prepare more tools for DIY.
Step 2: Drill holes and run wires
Once the position has been decided, you can add marks on the wall or ceiling by using the mounting template. Then you can drill holes through walls or ceilings properly and run cables to the location of your fisheye security cameras.
Tips: Most fisheye security cameras come with a base plate that can be separated from the cameras. Usually, we should first mount the base plate to the ceiling or wall before attaching the camera part to the base plate.
Step 3: Connecting cables
Connect any necessary cables to the fisheye security camera according to manufacturer instructions – such as power, Ethernet, etc. After all the cables are connected to the camera, mount the fisheye camera onto its base plate securely.
Step 4: Use the camera and make setting customizations
Ensure that all connections are secure and intact before testing out your new fisheye security camera. Once the fisheye security camera is powered on, you can set it up through the app provided by the manufacturer. Also, you can configure any features like motion detection zone, push notification, scheduled recording, etc.
Bonus Tips for Fisheye Security Camera Installation
Installing a fisheye security camera can be easy, but a few more tips can help ensure the best surveillance experience. Here are two useful tips on installing fisheye security cameras.
Mount in the right direction
Even though fisheye security cameras provide a 360° view of the monitoring area, it doesn't mean you can put them randomly. Actually, fisheye security cameras have a "right direction" to indicate which part of the camera should be facing up, which determines which area will appear on the upper part of the monitoring image.
The direction of fisheye cameras is usually indicated by an arrow on its base plate and it's especially important when you mount the fisheye camera on the wall.
To put it more specifically, if the arrow points at the front door when you mount the fisheye camera on the ceiling, you'll see the front door area on the upper part of the original fisheye view.
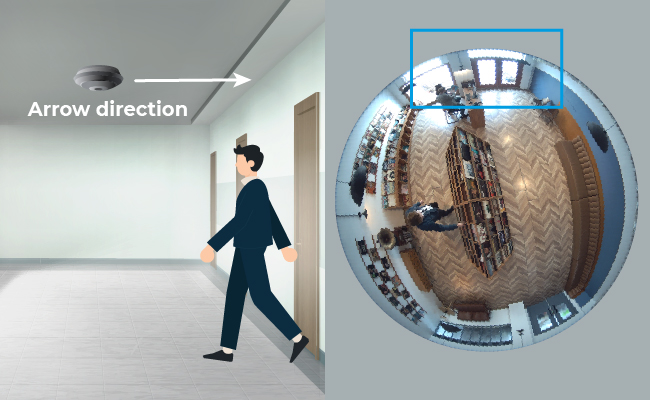
For the wall-mounted fisheye camera, if the arrow faces up directly at the ceiling, people walking in the middle of the frame will be upright. Otherwise, people in the middle of the camera's frame will seem to be slanted.
Be aware of the surrounding lights
It's important to get to know about the light sources in the area where the fisheye security camera will be placed.
Stronger light sources may create glare on the video footage, making it hard for a user to know what's happening. But insufficient light can make it difficult for the camera to pick up clear images and colors.
To avoid either of these issues, you need to measure how much light is currently available in the area and make some adjustments by putting the camera away from the light bulb or adding some light sources in the corner.
In addition, you may consider investing in an infrared (IR) illuminator to further enhance the night vision capabilities of your fisheye security camera. As a result, you'll be able to get an even clearer image of whatever is happening in the dark.
Different Viewing Modes of Fisheye Security Cameras
As is known to all, fisheye security cameras produce 180° or 360° wide-angle but distorted images by themselves. In order to offer users a better viewing experience, many fisheye cameras are equipped with de-warping technology. Via the mobile app or an NVR, users can switch between different viewing modes and check any details.
Fisheye security cameras from different brands may offer various viewing modes, but most of them are pretty much the same. Here we'd like to introduce multiple viewing modes of Reolink Fisheye Cameras as an example.
On Reolink App or Client, there are several viewing modes for you to choose from for live streams.
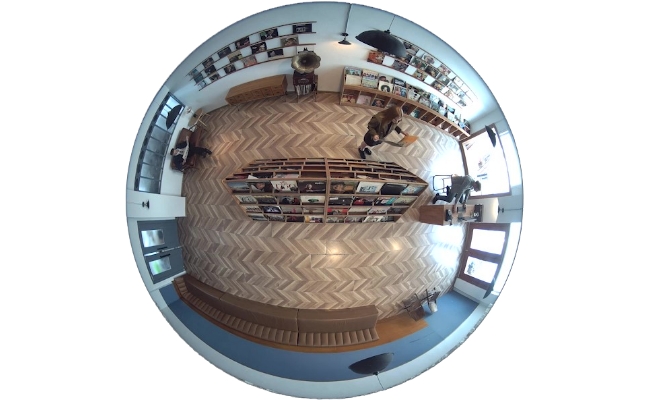
1. Original fisheye view
In this mode, you'll get a whole wide-angle view of the camera and the image is distorted. You can zoom in or out of the image or swipe the image to switch the angle as you like.
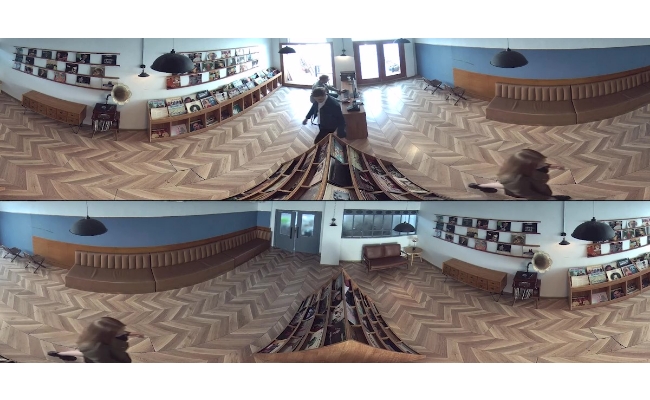
2. Dual panoramic view
The 360° view is divided into two 180° panoramic views and each of them is close to normal images, even though the corner may still remain a little distorted. You can swipe the image left and right, but you can't zoom in or out.
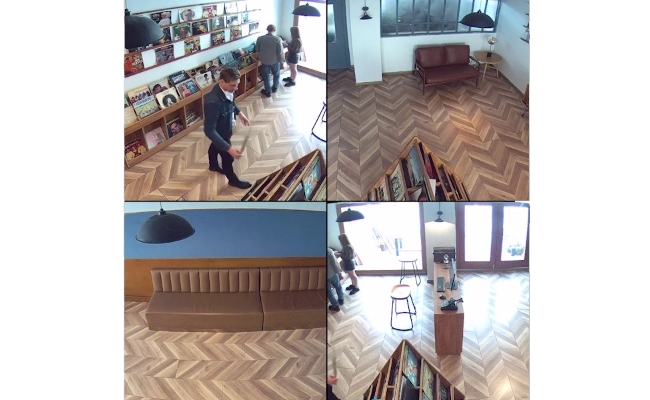
3. Quad view
You will see four de-warped images from different angles and they cover every part of the monitoring area. Also, you can zoom in/out and swipe each image to change the angle randomly.
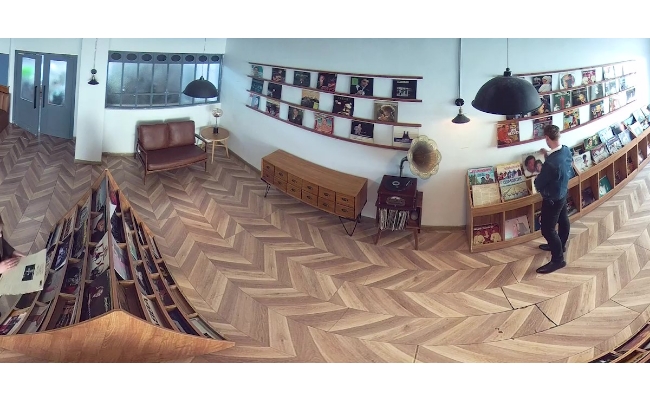
4. Cylindrical view
In this mode, you'll get a whole view of the monitoring area, which is laid out on a cylindrical surface. The image is flattened and you can swipe the image left and out.
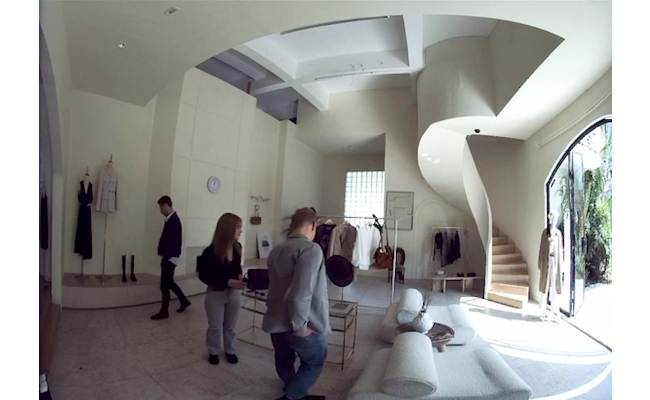
5. Defished view
A full view of the monitoring area from a fixed angle. You can pinch with 2 fingers to adjust the zoom of the image. This is majorly used for cameras mounted on the wall.
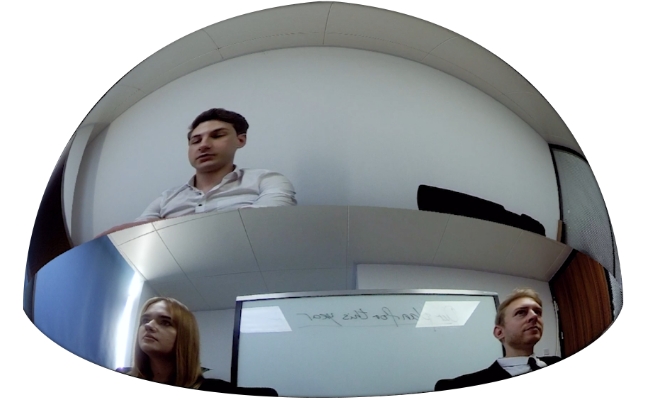
6. Hemispheric view
The whole view of the fisheye camera will be laid out on a semisphere-shaped surface. You can swipe and zoom in/out of the image to find the best viewing angle. This viewing mode is great to be used in conferences as you can see people on both sides.
As mentioned above, there are three major ways of mounting the fisheye security camera. While the fisheye viewing mode can be used in any scenario, other viewing modes are preferred when the fisheye security camera is mounted in different places.
For ceiling-mounted fisheye cameras, we recommend the dual panoramic view, quad view, and cylindrical view. For wall-mounted cameras, the fisheye view and the defished view are better. And for desktop-mounted fisheye cameras, the dual panoramic view and the hemispheric view are great choices.
Besides, if you connect the fisheye camera to a Reolink NVR, you can choose an original fisheye view or a 5-in-1 view from the monitor.

One important thing to note is that the settings of the privacy mask and detection zone will be cleared if you switch to the 5-in-1 view on the NVR. Also, the Reolink fisheye security camera can only record in 5-in-1 viewing mode and the original fisheye viewing mode. Other viewing modes only support live viewing.
Conclusion
Whether you're going to monitor a warehouse or store, fisheye security cameras are a great choice as they are able to cover the whole area. With proper installation, you can make sure that you get the full benefits of the wide-angle security camera lens by checking virtually anywhere. Also, you can choose to view flattened images as long as your camera has de-warping technology.
If you have any questions about the installation or use of fisheye security cameras, leave a comment below and we'll reply as soon as possible!
Search
Subscribe for the Latest Updates
Security insights & offers right into your inbox