DIY Home Security Cameras & Systems: Best Picks & Step-by-Step Setup Guide
We did a detailed investigation on DIY security cameras (months of tests), and finally made this security camera recommendation list.
You can buy the best DIY home security cameras & systems on CCTV camera online store with free shipping and no any hidden fees.
If you are a DIY enthusiast, you can get a detailed guide here to make a security camera with the Raspberry Pi server. You can even turn your old smartphones into a security camera ! (You can share your excellent DIY projects in the comment below!)
Content:
Part 1. Best DIY Security Cameras & Systems: Top 5 Picks
Part 2. DIY Security Camera Installation: Step-by-Step Guide
Part 1. Best DIY Security Cameras & Systems for Your Home 2017 & 2018
You'll get top 5 DIY security cameras & systems that are highly praised by top tech editors and customers, including PoE & wireless, outdoor & indoor types.
All of the DIY home security cameras and kits here can work standalone without monthly subscription fees (bonus: FREE shipping), and are extremely easy to install. Even your grandmother can install them without any difficulty!
Best Pick 1. Reolink Argus® 2 DIY Wireless Battery or Solar Powered Security Camera
Wire-Free Rechargeable Battery Security Camera
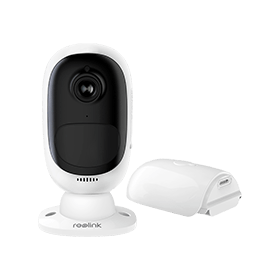
Reolink Argus 2 DIY mini smart home security IP camera is powered by a rechargeable battery, which makes it completely wireless from the top to bottom.
You can check the below video to see the clarity of Reolink Argus 2 DIY residential WiFi security camera (shared by a customer).
Reolink Argus family, got featured in over 40+ top-tier media, including Yahoo Finance, CNET, TechRadar, Tech Advisor, etc. Editors of these authorized media all gave high praise to this camera for its innovative design and invincible flexibility.
Best Pick 2. Reolink Go DIY Mobile Rechargeable Battery Powered Security Camera
Wire-Free 4G Rechargeable Battery Powered Security Camera
The perfect charm of this DIY hidden network security camera is its unlimited placement. You can install this cellular 4G security camera for your cabin in the woods, a boat docked on the lake, your remote farm, vacation house and other rural locations without power cords and WiFi connection.
You can view more impressive features of Reolink Go DIY outside security camera in the below video.
Please note that Reolink Go WiFi outdoor DIY security camera is currently available in the US, the UK, Germany, France, Spain, Italy, Canada, and Australia.
Best Pick 3. Reolink C1 Pro DIY Wireless Indoor Home Security Camera
4MP PT Smart Home Security Camera
The dual band WiFi (2.4 GHz & 5 GHz) in this DIY smart home security camera is a great feature to have since most of its competitors are still only supporting 2.4 GHz WiFi. You can switch between 2 WiFi options based on the network condition. The antennas are adjustable, so you can orient them to get the strongest WiFi signal.
The full-duplex two-way audio is great when you want to tell your pet to get down from the sofa, or shout at the intruders to scare them away.
You can check more details in this DIY security camera video review.
Reolink C1 Pro DIY WiFi home security camera is rated by VueVille as the "Great Value Pan-Tilt Camera" in the best indoor IP camera 2018 recommendation list.
You can check this DIY home security camera review here.
Best Pick 4. RLK8-410B8 Outdoor & Indoor DIY PoE Security Camera System
8-Channel 4MP PoE Security Camera System
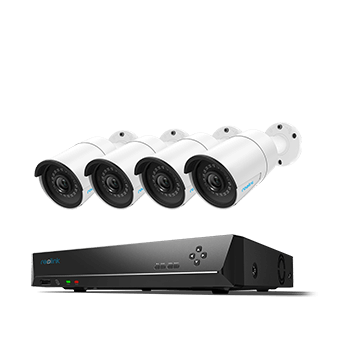
This system comes with 1 NVR and 4 bullet-type cameras, you can add another 4 DIY bullet/dome and other types of DIY security cameras later.
One of the outstanding features of this DIY security system is its 4MP (1440p) high definition. You are gonna be spoiled by such clarity. You can identify the license plates and other details from a long distance.
You can check the clear video captured by this DIY PoE motion activated security camera system (shared by a customer).
You can also check more details in this DIY home security camera system review here.
Where to Buy Your Home DIY Security Cameras & Systems
The security camera online store would be the best place for you to buy the above DIY security cameras & kits in Perth, Melbourne, Adelaide and other cities of Australia, Canada, US, UK, NZ, etc. since you can get the best after-sales services and responsive tech support.
You don't need to worry about that those DIY security camera wholesalers or dealers will raise the price to earn benefits, when buying cameras directly from the official online store.
Note: Some of you may use DIY fake security cameras to deter burglars. To truly protect your home and business, a real security camera is a big must. The DIY security camera & kit price is not necessarily expensive. There are some best picks of cheap and high-quality DIY security cameras for your reference.
When buying the best DIY security cameras, you can take the following 3 important features into consideration.
- You should buy DIY security cameras that are compliant with your country's standards.
- The DIY security cameras can withstand cold or hot weather (for outdoor DIY security cameras).
- No monthly fees. The DIY security cameras here can work totally standalone and offer you local storage without paying extra fees for cloud storage.
Off-the-shelf DIY security cameras and systems are undoubtedly the best choice, since you don't need to do complicated setup or configuration to get the cameras work.
If you are a DIY lover, you can follow the steps below to DIY a security cameras using webcam, Raspberry Pi, Arduino and other servers.
You can even build a surveillance camera with your old smartphones, and turn the indoor security cameras into the outdoor type with a DIY security camera housing.
Part 2. DIY Security Camera Installation Manual & Instructions
You can get the basic steps to DIY a security camera using Raspberry Pi, and turn your webcam, old smartphones, iPod, etc. into a security camera.
You can share anything you want in the comment below, such as your excellent DIY projects, so that more readers can learn from you!
1. How to DIY a Security Camera with Raspberry Pi or Arduino
2. How to Turn Your Laptop Webcam into Security Cameras
3. How to DIY a Security Camera with Old Smartphones
4. How to Convert Indoor Security Cameras into Outdoor Cameras
1. How to DIY a Wired & Wireless Security Camera with Raspberry Pi or Arduino
There are some essential components needed when you DIY an IP security camera with Raspberry Pi or Arduino. You're gonna prepare the below devices (we take Raspberry Pi as an example):
- Raspberry Pi module
- An IP camera
- Power supply
- WiFi adapter
Now essential items are prepared. The next step is to learn the detailed DIY security camera installation steps.
Step 1. Install Raspbian for your Pi.
Step 2. Connect your Raspberry Pi via SSH.
Step 3. Use the command: sudo reboot to reboot your Pi and test to see if your Pi is truly WiFi enabled.
Step 4. Get the user name and IP address of your IP camera.
Step 5. Choose a player as a Raspberry Pi camera viewer (the MPlayer should be OK).
Step 6. Now start access your camera via the player.
We've got a detailed post that illustrates every detail on how to make a security camera using Raspberry Pi. You can check this post here (written by Amanda, Reolink's top tech editor, who is quite experienced in home security field).
You can also watch the video below for detailed steps to DIY your own security camera with Raspberry Pi.
2. How to DIY Your Security Camera & System Using Webcam
When you want to DIY a security camera with the laptop webcam, you need to download the software first. You can download iSpy or Yawcam for your Windows PC, and SecuritySpy for Mac.
Check the basic steps to turn your laptop webcam into a security camera.
Step 1. Put the webcam to the place you want to monitor.
Step 2. Get a USB cable long enough to connect the webcam to your computer.
Step 3. Install the software on your Windows PC or your Mac. Let's take iSpy as an example to show you the detailed steps.
Step 4. Add a local webcam to the iSpy software, and name the camera. Also check the Camera Active box to turn on your webcam.
Step 5. In Edit Camera menu, you are gonna see 6 options in this panel. You can enable the functions you want based on your specific needs.
Step 6. Go back to your home screen, and turn on your camera. Now you can get live streaming!
You can get other details you need to DIY a security camera using webcam in this post here (written by Amanda, a top tech editor and a DIY lover).
3. How to DIY a Wireless Smartphone Security Camera
You can build a DIY wireless security camera with your iPhone or Android smartphones. All you need is just your smartphones and the suitable software.
How to DIY an iPhone-Controlled Home Security Camera
You can follow the detailed steps to DIY your own IP security camera or system with your iPhone, iPod, iPad, Mac or other iOS devices.
The below DIY security camera instruction takes the Manything app as an example.
Step 1. Download Manything app for both of your old iPhone and the new iOS device (your new iPhone, iPad or Mac).
Step 2. Disable Auto Lock function on your old iPhone.
Step 3. Register Manything using your email address or Facebook account.
Step 4. Select the Camera mode on your old iPhone, and Viewer mode for your new device.
Step 5. Put the old iPhone to the place you want to monitor.
Step 6. Press the red button on the old iPhone. From the new iOS device, you can get live streaming right away. Alternatively, you can get the live view from your computer via signing in at Manything.
How to DIY a Security Camera with Android Smartphones
The main steps to DIY an Android smartphone remote security camera are similar to the iOS. Check the steps below to build a DIY wireless security camera using your Android mobile phone.
The below DIY security camera installation guide takes the Alfred DIY security camera app as an example.
Step 1. Download the Alfred DIY security camera app to both of your old and new Android smartphones.
Step 2. Launch the app on both phones. Choose Camera mode for the old Android smartphone and Viewer mode for the other one.
Step 3. Sign in with same Gmail account on both mobile phones so that everything can sync seamlessly.
Step 4. The mobile phone selected to be the Camera mode will start monitoring, and then you can get live view on the other smartphone.
Important Points to Note When You DIY Home Security Camera & Kit with Smartphones
- Keep the camera phone charged if you want a 24/7 solution.
- Get a fisheye lens for the camera phone if you a wide viewing angle.
- Make sure your camera phone and your viewing devices are connected to the Internet.
You can DIY your home security cameras and kits with the above step-by-step guide. The apps mentioned in the DIY security camera mounting instructions are free to download and use. However, if you want more advanced functions and more video storage space, you need to pay monthly fees, which would be a great budget in a long run.
Those self-monitored and off-the-shelf DIY security cameras and systems would be a nice option, since you can just make them work super easily with their plug-and-play feature. Another benefit of these easy DIY security cameras and kits is that you can get all of the advanced functions with the customized software without any subscription fees.
4. DIY Outdoor Security Camera Housing or Enclosure: Convert Indoor IP Cameras into Outdoor CCTV IP Cameras
If you've got an indoor security camera, and want to put it outside, you can DIY a security camera housing to make this camera weatherproof.
Main Materials You'll Need to DIY Outdoor Security Camera Housing
- PVC pipe
- PVC coupling
- PVC end cap
- Clear plexiglass
- Zip-tie
- Plastic adjustable speaker mount
- Silicone caulk
- PVC glue
Now you can follow the below steps to DIY a security camera cover.
Step 1. Cut the pipe into 2 parts.
Step 2. Put the camera into the coupling.
Step 3. Use the one part the pipe and the plexiglass to protect the lens of the camera and seal the plexiglass to the pipe with the silicone caulk.
Step 4. Glue the end cap and the pipe.
Step 5. Use the end cap and the other part of the pipe to protect the back of the camera.
Step 6. Use the zip-tie to tie up the plastic adjustable speaker mount to the camera, and then mount the camera to the wall, eave or other places you want to monitor.
You can DIY an outside security camera with the above steps, but sometimes it would be too troublesome. Why not just buy DIY outdoor wireless or wired security cameras directly?
The home DIY outdoor security camera & NVR/DVR system price is quite favorable. You can buy a high-quality DIY exterior security camera less than 100 bucks.
Part 3. How to Install Your DIY Security Cameras
There are 3 popular types of DIY security cameras: wire-free battery powered security cameras, traditional WiFi security cameras, and PoE security cameras.
- DIY battery-powered security cameras: You can install this type of DIY security cameras simply by inserting the batteries into the camera, and then follow the DIY home security camera instructions, user manual, etc. to set up the camera.
To make this type of DIY security cameras more weatherproof, you can add a housing or enclosure to the battery security cameras. For example, a skin will be a good choice.
- DIY traditional WiFi security cameras: You'll need a cable to power this type of WiFi security cameras. Make sure your DIY security cameras are within the WiFi signal range. Thus you can access the DIY security camera with your PC, Mac, mobile phones, etc.
A WiFi extender is useful to boost the WiFi connection between your wireless DIY security cameras and your router.
- DIY PoE IP surveillance security cameras: You just need a PoE Cat 5 or 6 wire to connect the PoE security cameras to your home router — the installation process is completed. If you need to mount the cameras outdoors, you might need to drill holes to run wires for your cameras. You can get a step-by DIY home security camera wiring guide here.
You can read this post to get a step-by-step guide on how to install DIY security cameras.
WiFi & PoE DIY IP security camera connection diagram:
Let Us Know Your Thoughts on DIY Security Cameras
DIY home surveillance and monitoring market expected to grow at a compound annual growth rate of more than 20% over the next 5 years.
Unlike those ADT CCTV security cameras, DIY home security cameras and systems are off-the-shelf and super easy to install.
The positives of DIY wired and WiFi security cameras and kits mainly include:
- No monthly subscription fees. The ADT security camera companies would typically require you to sign in a contract and you are gonna pay monthly fees, which would be a huge budget in a long run. With the same amount of money, you can buy a high-quality DIY security camera system!
- Self-monitored, no worries about privacy invasion. If you install those ADT security cameras, the company staff would help you monitor your home, which means that you are being monitored. If you install DIY security cameras, you are the boss of your cameras. You can get motion detection alerts if there is anything unusual.
- Portable, flexible with life-time use. Once you buy DIY security cameras for your home, they are all yours. You can take them with you when you move to a new house. On contrast, those ADT security cameras will take the security cameras back after the contract ends.
You can share your unique insights on DIY security cameras so that more readers can read your outstanding ideas.
You can also leave your questions in the comment below or on the DIY home security camera forum. Let's have a heated discussion!
Search
Be in the Know
Security insights & offers right into your inbox