How to Connect CCTV Camera to Computer – Top 4 Solutions
Security cameras are vital for protecting homes and businesses. For some users, a CCTV camera connection can be challenging — for example, linking it to a computer. This guide will help you on how to connect security camera to laptop/computer easily. We'll cover everything from setup to troubleshooting about Reolink live view on PC. Keep reading! Keep in mind that these steps can also be used to how to connect CCTV camera to laptop.
- Can I Connect CCTV Cameras Directly to My Computer?
- How to Connect CCTV Camera to PC through Internet?
- How to Connect CCTV Camera to PC without NVR?
- How to Connect CCTV Camera System to PC with or without Internet?
- How to Connect IP Camera to PC via Network Software?
- How to Connect CCTV Camera to PC via Third-party Software?
- FAQs
- Conclusion
Can I Connect CCTV Cameras Directly to My Computer?
Yes, you can connect an IP camera directly to your computer, but you may need the help of a Wi-Fi router, Ethernet cables, or a PoE switch or injector. The specific steps vary depending on the model you are using, whether it is wired or wireless. It is also essential to know the camera's IP address and install the compatible software.
How to Connect CCTV Camera to PC through Internet?
Follow these detailed steps to connect your wired or wireless IP camera to a PC using different methods.
How to Connect Wireless CCTV Camera to PC via Router?
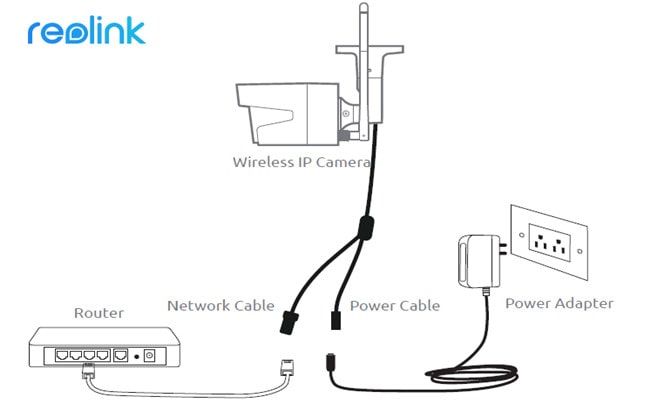
If you do have WiFi network and need to remotely see the IP camera when you're not there, you can connect your wireless or WiFi camera to computer wirelessly via your router. Please note that you need to have, at least, a power adapter for the camera, a network cable, and a router.
-
Plug the camera into the power adapter to charge it.
-
Connect the Wi-Fi camera to the router using a network cable for setup. Once the correct Wi-Fi settings are configured, disconnect the cable from the camera and the router.
-
Launch surveillance software on your computer, like Reolink Client. It will automatically detect the camera on the same network. Set up configurations for camera functions in the software. Then, configure the camera's Wi-Fi settings by selecting the network and entering the password. Finally, remove the network cable to connect the camera to the computer wirelessly.
If you have a plug-in WiFi security camera like the new Reolink Duo 3 WiFi, be sure to connect it to a reliable power outlet for continuous power. After that, you can follow the steps above to connect it to your PC. The Duo 3 WiFi offers a 16MP resolution and a 180-degree ultra-wide field of view.
Important: If you need to see the IP camera from another computer that is not in the same network, you need to input the camera's UID into the software to remotely access the camera.
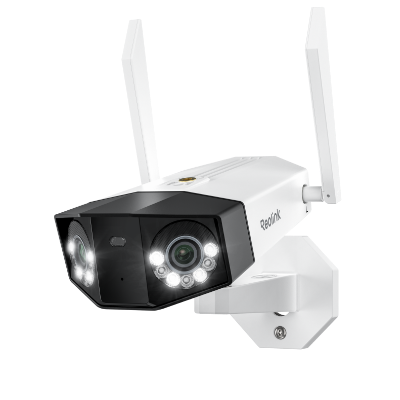
Groundbreaking 16MP Dual-Lens WiFi Camera
16MP UHD, Dual-Lens, Motion Track, 180° Wide Viewing Angle, Plug-In WiFi, Color Night Vision.
How to Connect PoE Camera to PC without PoE Injector/Switch?
Connecting a PoE camera to PC, such as the Reolink Duo 3 PoE, via the router is similar to that of a WiFi camera, and even much easier - you don't need to use a power adapter, set up the WiFi and remove the network cable. And you need at least one network cable, and a router with PoE capability to complete the setup.
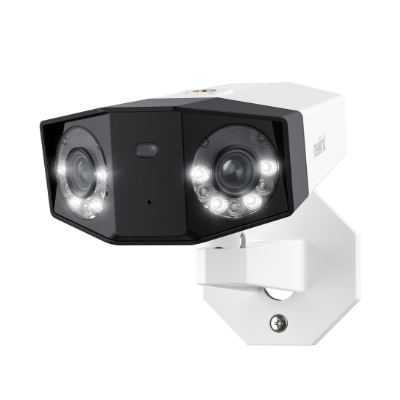
Groundbreaking 16MP Dual-Lens PoE Camera
16MP UHD, Dual-Lens, Motion Track, 180° Wide Viewing Angle, Power over Ethernet, Color Night Vision.
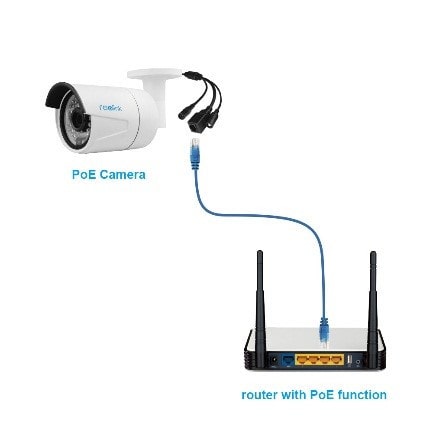
Step 1. Use the network cable to connect to the camera and the router
PoE (Power over Ethernet) means you can just use a single network cable for both video and power transmission. So just connect the camera to the router via the network cable, and the camera will get power supply and network access. Please make sure your router has the PoE feature. If not, try to connect it to your computer using PoE switch.
Please make sure your router has the PoE feature. If not, try the next method.
Step 2. Watch the IP camera on the computer
On the computer, launch the surveillance software to add the camera and watch live view directly. In our test, we open Reolink Client. Since the computer and the camera are in the same network, Reolink Client automatically searches and displays the camera directly. Click "Start" and you can view the camera on PC. And you can set up the configurations for all the functions you want the camera to have.
Important: If you need to see the IP camera from another computer that is not in the same network, you need to input the camera's UID into the software to remotely access the camera.
How to Connect a PoE Camera to PC with PoE Injector/Switch?
If your router does not support PoE, you need a PoE injector or PoE switch to help connect your IP camera to PC.In order to complete the setup you need at least a network cable, a router, and a PoE injector or PoE switch. Since the steps on how to connect a PoE IP camera to PC via PoE Injector/switch are quite the same to that of connecting without a PoE Injector/switch, we'd like to make it more simpler to understand here.
Step 1. Connect the security camera, router and PoE injector
Connect all the devices as the picture showed below, make sure your wireless IP camera is connected to a power supply. 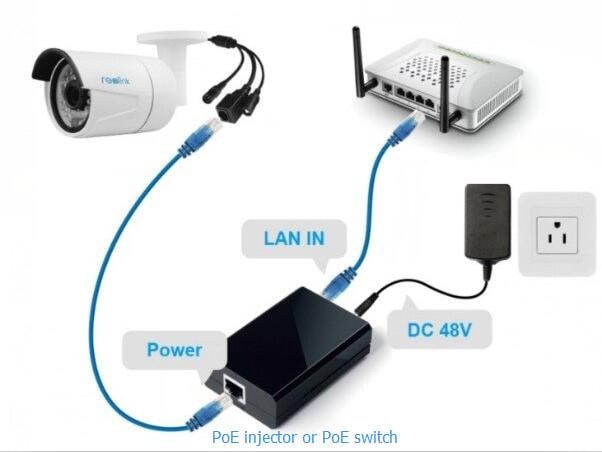
Step 2. Open Reolink Client & add the camera directly
You can now open Reolink Client on your computer, add the camera and watch live view directly. If you need to see the IP camera from another computer that is not in the same network, you need to input the camera's UID into the software to remotely access the camera.
Important: Once you connect the PoE IP camera to the PoE injector or switch which is connected to a router via Ethernet cables, you've successfully connected the camera to the network. For a wireless IP camera, you need to use a network cable to connect it to the router if you haven't set up the WiFi network configuration. And then the wireless IP camera is in the network. You can set up the WiFi configuration later to make the wireless IP camera connect wirelessly.
How to Connect CCTV Camera to PC without NVR?
Here's how to connect your security IP camera directly to a PC/laptop without an NVR or DVR, without a router network, without WiFi, and without any costs or complicated configurations. You need to prepare the camera's power adapter and a network cable.
1. Get your security camera charged.
A WiFi camera connecting to PC must be fully charged. Use the power adapter to get the camera plugged-in and charged. Normally, when you buy a WiFi IP camera, it comes with a power adapter. For a battery-powered camera, you can recharge the built-in battery using a power outlet or a compatible solar panel. If you don’t have a solar panel, contact the supplier to get one that works with your camera.
2. Use the network cable to connect to the camera and the computer.
Normally there would be a 2-in-1 or 3-in-1 cable attached from the camera. Find the network connector from that cable and use the network cable to connect to it. Then connect the other end of the network cable to the computer. If your computer has a network already, disable it - make sure your computer is offline. 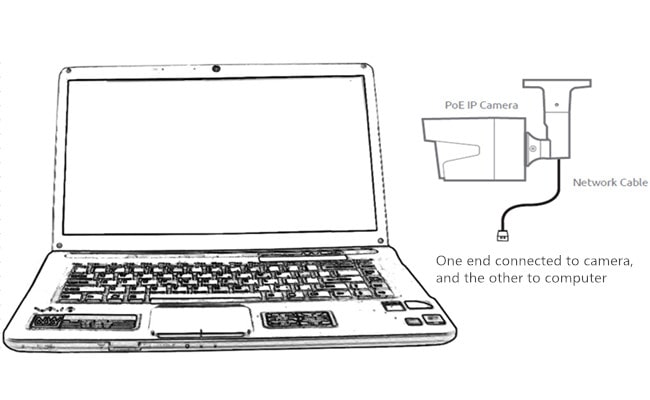
3. Scan and find out the security camera's IP address on the computer.
Now the security camera is connecting to your computer basically and physically. But you still can't view the camera on the computer. What you need to do now is to scan and find out the camera's IP address. There should be surveillance software from the same supplier with the camera. Take our test as an example. We have Reolink Client on the computer. Launch it and it will automatically scan all the cameras in the same local LAN and show the default IP address (every camera has a default and unique IP address when it leaves the factory). Easy peasy!
4. Change the computer's IP address to the same network prefix of the IP camera.
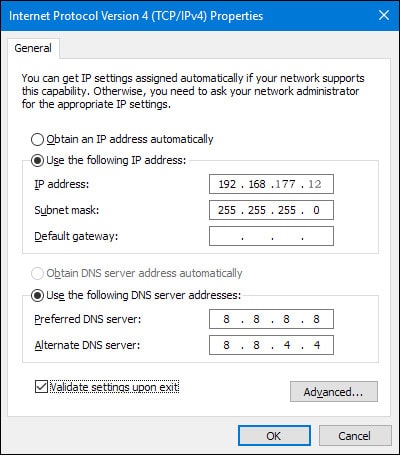
So in Step 3, you get your security camera's default IP address. In our test, the default IP address of the camera we use is 192.168.177.100, and now you need to change your computer's IP address to 192.168.177.x, where x identifies the node/host and is the number between 2 and 254. So let's say the computer's IP address is 192.168.177.12.
IP address 101: An IP address consists of two parts - one belongs to the network address and one belongs to the node address. All nodes on a given network share the same network prefix but have a unique host number.
Now to change the computer's IP address (we take Windows 10 as an example):
-
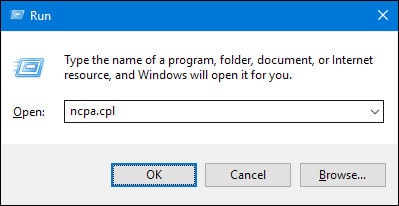
Press the Windows + R keyboard shortcut to bring out the Run box.
-
Enter "ncpa.cpl" and open the "Network Connections" window.
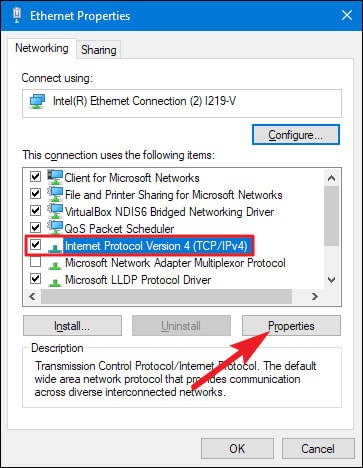
- Right-click your computer' network adapter and select "Properties".

- Select your computer's Internet Protocol Version and click "Properties".
- Select "Use the following IP address" and change the IP address into 192.168.177.12.
And done. Now your IP camera is connecting directly and communicating with your PC, because they are now in the same little LAN. You can watch your IP camera with Reolink Client on your computer.
Important: Since there is no router network, the IP camera would not transmit data or send alarms to your phone. Still, you can record and save all the footage onto your computer.
If you're gonna use your IP camera with the computer all the time like this (without router network), you'd better change the default status of your IP camera's IP address to the static to keep it the same all the time, because each time you reboot the IP camera, its IP address will be changed and you will need to do all the steps above again. To keep the IP camera's IP address the same all the time, head to "Device Settings" and "Network General" on the Client (Reolink Client in our test), and choose "Static" for "Network Access". And done. 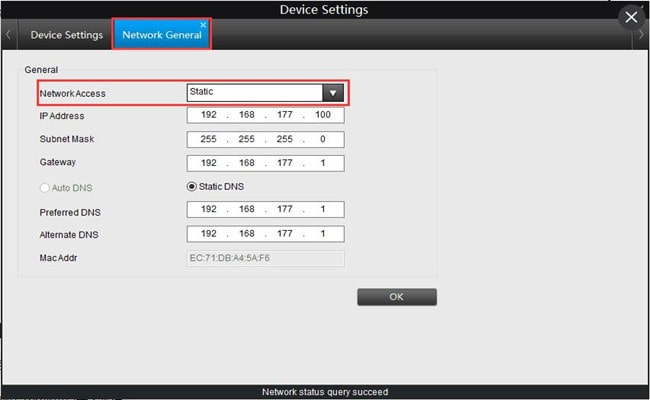
How to Connect CCTV Camera System to PC with or without Internet?
If you are using a CCTV camera system, instead of standalone security camera, you may need the following tutorial. A CCTV camera system often have their own proprietary networks, and can work with and without your router network.
1. How to connect a CCTV security camera system to a computer without router network
- Connect all the cameras to the NVR: When you receive the new IP camera system you bought, connect all the devices you got - connect the NVR to your computer's monitor and the mouse, use the power adapters to charge the NVR and cameras, etc. For a WiFi system, once the WiFi NVR and the WiFi cameras are charged, they connected to each other automatically and would start to communicate. For a PoE system, connect the PoE cameras to the NVR via the network cables provided.
- Start watching the IP cameras: The startup and setup wizard will pop up to guide you to watch your cameras and do other configurations.
Now you can see all the IP cameras on your monitor and start recording.
2. How to connect a CCTV security camera system to a computer with router network
- Do the step 1 shown above again.
- Connect the NVR to your router via the network cable provided.
- Start watching the IP cameras.
The startup and setup wizard will pop up to guide you to watch your cameras and do other configurations. If you need to see the IP cameras from another computer that is not in the same network, you need to input the NVR's UID into the software to remotely access the cameras.
How to Connect IP Camera to PC via Network Software?
To connect an IP camera to a PC using network software, both devices must be on the same local network. Once connected, you can use dedicated camera software to detect, add, and manage the device from your computer.
1. Ensure the IP Camera and PC Are on the Same Network
Make sure your IP camera and PC are connected to the same router. You can use either Wi-Fi or an Ethernet cable. A stable network connection is important for the camera to be detected properly and to ensure smooth live streaming.
2. Install the IP Camera Network Software on Your PC
Download and install the official software provided by your camera brand or a compatible network camera management tool. For Reolink cameras, you should download Reolink App on Google Play or Apple App store. This software allows you to search for, add, and control IP cameras directly from your computer.
3. Launch the Software and Search for the Camera
Open the installed software and use the “Search Device” or “Add Camera” option. The system will automatically scan your local network and display available IP cameras connected to it. You can also scan the QR code on Reolink cameras.
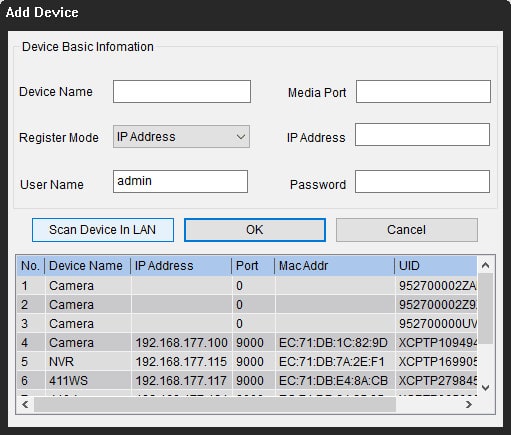
4. Add the Camera Manually if Needed
If the camera is not detected automatically, you can add it manually by entering its IP address. You may also need to input the camera’s username and password to complete the setup and verify access.
5. Access the Live View and Configure Settings
Once added successfully, you can view the live video feed directly from the software dashboard. From here, you can adjust settings such as resolution, motion detection, recording schedule, and storage options for better security control.
How to Connect CCTV Camera to PC via Third-party Software?
You can also opt for third-party software to connect and set up a security camera on the computer. Make sure the software can handle all the cameras on the network and support all the features for the cameras. Normally, the third-party software has several versions. And if you want to use full features of the camera, you need to pay for a premium version.
FAQs
1. How to connect cctv camera to laptop?
Connecting cctv camera to laptop is similar to connecting to a desktop computer steps, you can refer to the above steps.
2. How to connect CCTV camera to wifi?
-
Plug in your camera and initiate setup mode as per the manual.
-
Download the camera's app, create an account if needed, and connect your device to the camera's Wi-Fi network.
-
Within the app, select your home Wi-Fi network, enter the password, and wait for confirmation. Now, your camera is connected to Wi-Fi and ready for remote access.
3. How to view CCTV cameras on PC?
If you connect the camera to your computer as I described above, you can see the security camera on your computer.
4. Can you connect a security camera to a computer monitor?
Yes, you can connect a security camera to a computer monitor. Here's how:
-
Camera Output: Most security cameras have video output ports, such as HDMI or VGA.
-
Adapter or Cable: Depending on the camera's output and the monitor's input, you may need an adapter or cable to connect the two devices. For example, if your camera has an HDMI output and your monitor has a VGA input, you'll need an HDMI-to-VGA adapter or cable.
-
Monitor Setup: Once connected, switch your monitor to the appropriate input source (e.g., HDMI or VGA).
How do I connect an external camera to my PC?
Plug the webcam into a USB port on your computer. The operating system will automatically install the required drivers, and once setup is complete, the webcam is ready to use with your preferred video conferencing apps.
Conclusion
Knowing how to connect a CCTV camera to a computer empowers you to monitor and protect your property with greater efficiency and effectiveness. Whether you're a homeowner seeking to enhance security or a business owner striving to safeguard your premises, integrating CCTV cameras with your computer can provide invaluable peace of mind and security surveillance capabilities.
Search
Subscribe for the Latest Updates
Security insights & offers right into your inbox