5 Steps to Stream IP Cameras to YouTube/FB & Set up RTSP URLs
You can stream the IP camera to YouTube, by transmiting the video stream with the IP camera's RTSP URL.With the help of software such as OBS or Streamlabs, you can remotely watch the live feed from your security camera or share the YouTube live stream to the rest of the world, or if you have a website, you can even embed the live stream on your website.
So in this article, we will tell you how to live IP Camera streaming to YouTube/FB with RTSP
How to Make IP Camera Streaming to YouTube with RTSP
The following video tutorial shows setting up IP camera for YouTube live streaming, you can learn those steps required in this video.
Step 1. Make Sure Your IP Security Cameras Are Connected to Stable Network
Things You Need to Stream Security Cameras to YouTube:
- An IP security camera or a security camera system with NVR that supports RTSP stream
- A verified YouTube account
- Broadband Internet with fast upload speed
- A computer (Windows, Mac, or Linux)
- An encoder
To launch a security camera live streaming on YouTube, you need to check if your IP cameras are connected to the stable network first, just the same as setting up security cameras for remote viewing.
Note that a stable network connection allows you to access your CCTV cameras via smartphones or PCs and watch video live feed smoothly.
Most importantly, before adding the camera to a 3rd party software, you should check or change the port settings of your device via Reolink Client, web browser, or NVR. (See How to Set up Reolink Ports Settings via Reolink Client)
Step 2. Build the RTSP/RTMP URL of Your IP Cameras
An RTSP or RTMP URL is required to live stream an IP camera to YouTube.
To construct a correct URL, it is best to consult the staff of your security camera brands about which mode your surveillance equipment supports and the detailed URL as well.
Note: What is the RTSP URL to YouTube of my IP camera? The default URL format for RTSP to YouTube is:rtsp://(user name):(password)@(ip address):554/h264Preview_01_main For example, my user name is admin, my password is 123456, and the IP address is 192.168.0.18 by checking Reolink Client or App. In addition to the user name, password, IP address, do not change any other content. That means that the corresponding RTSP address should be: rtsp://admin:123456@192.168.0.18:554/h264Preview_01_main However, this is not absolute, at least for Reolink brand cameras. If the IP camera you bought is from another brand, you can try to see if it works first. If it doesn't work, you can check the product description of your camera, or contact their after-sales service.
For example, Reolink IP cameras support RTSP stream and the URL is as follows:
Main stream: rtsp://(user name):(password)@(ip address):554/h264Preview_01_main
Sub stream: rtsp://(user name):(password)@(ip address):554/h264Preview_01_sub
Updated, July 2021: If you are using 4K cameras with H.265 codec, like RLC-810A, the RTSP URLs are:
Main stream: rtsp://(user name):(password)@(ip address):554/h265Preview_01_main
Sub stream: rtsp://(user name):(password)@(ip address):554/h264Preview_01_sub
So, you may check out the IP address of your security camera in Reolink App or Client first, which is 192.168.1.20 in our example.
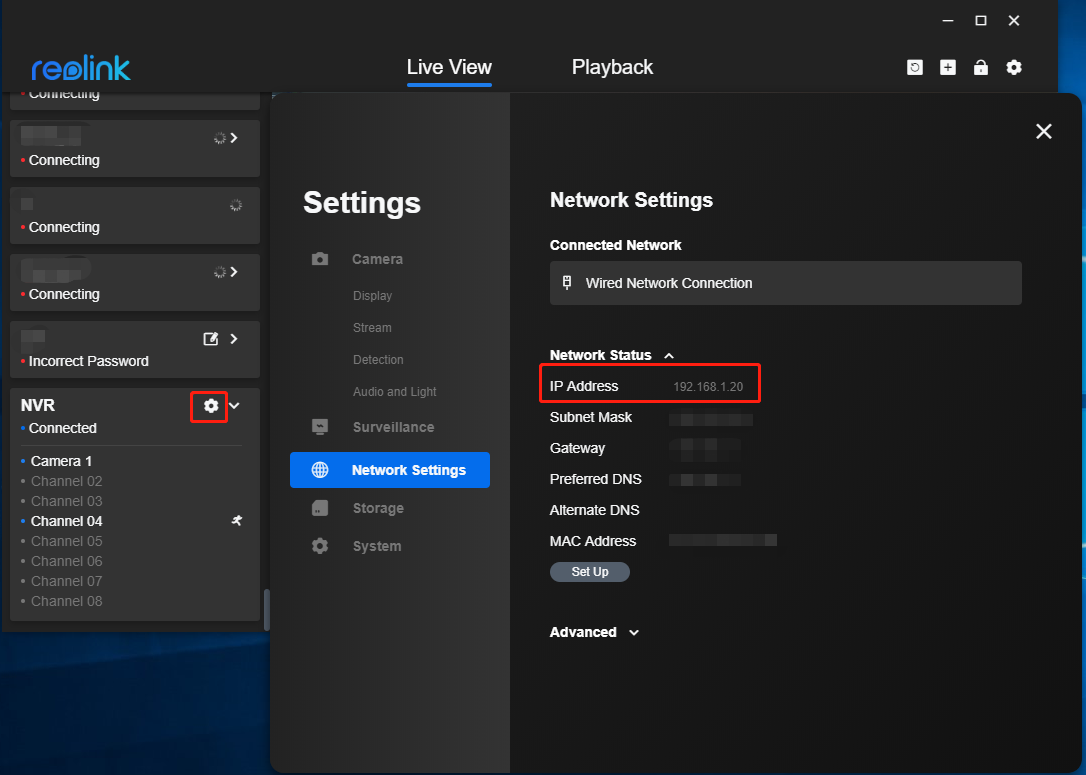
Combined with the username “admin” and password “654321”, then the RTSP URL will be:
Main Stream: rtsp://admin:654321@192.168.1.20:554/h264Preview_01_main
Sub Stream: rtsp://admin:654321@192.168.1.20:554/h264Preview_01_sub
Also, note that this applies to a security camera system with NVR as well. By changing the figure at the end of the URL, you are able to live stream the IP camera connected to any other channels of your NVR.
To illustrate: Supposed that you want to stream the Channel 3 security camera on your NVR to YouTube, then the RTSP URL will be:
Main stream: rtsp://(user name):(password)@(ip address):554/h264Preview_03_main
Sub stream: rtsp://(user name):(password)@(ip address):554/h264Preview_03_sub
Editor’s Tip: To make the live streaming setup easier, it is best to copy and paste the stream URL in a notepad or any safe locations after building one.
Step 3. Verify Your YouTube Accounts & Obtain Stream Key
Before you are able to live stream an IP camera to YouTube, you need a verified YouTube account.
If you don’t have an account, go to the homepage of YouTube and click Sign In.
Supposed that you have an unverified account, navigate to YouTube verify screen and get your account verified.
Generally speaking, it takes 24 hours for the video platform to activate your account for live streaming.
Once activated, you are able to obtain the stream key and configure the streaming setup with the following steps:
- Click Create button on the top-right menu –> Go Live. Choose to start streaming right now or later date with a built-in webcam or streaming software. For Reolink cameras, you need to choose streaming software.
- Click EDIT to enter the title and description and change Privacy settings (private, unlisted, or public).
- Scroll down and find the Stream Key in the Encoder Setup section. And the stream key is hidden in most cases. Click the eye button to see the key.
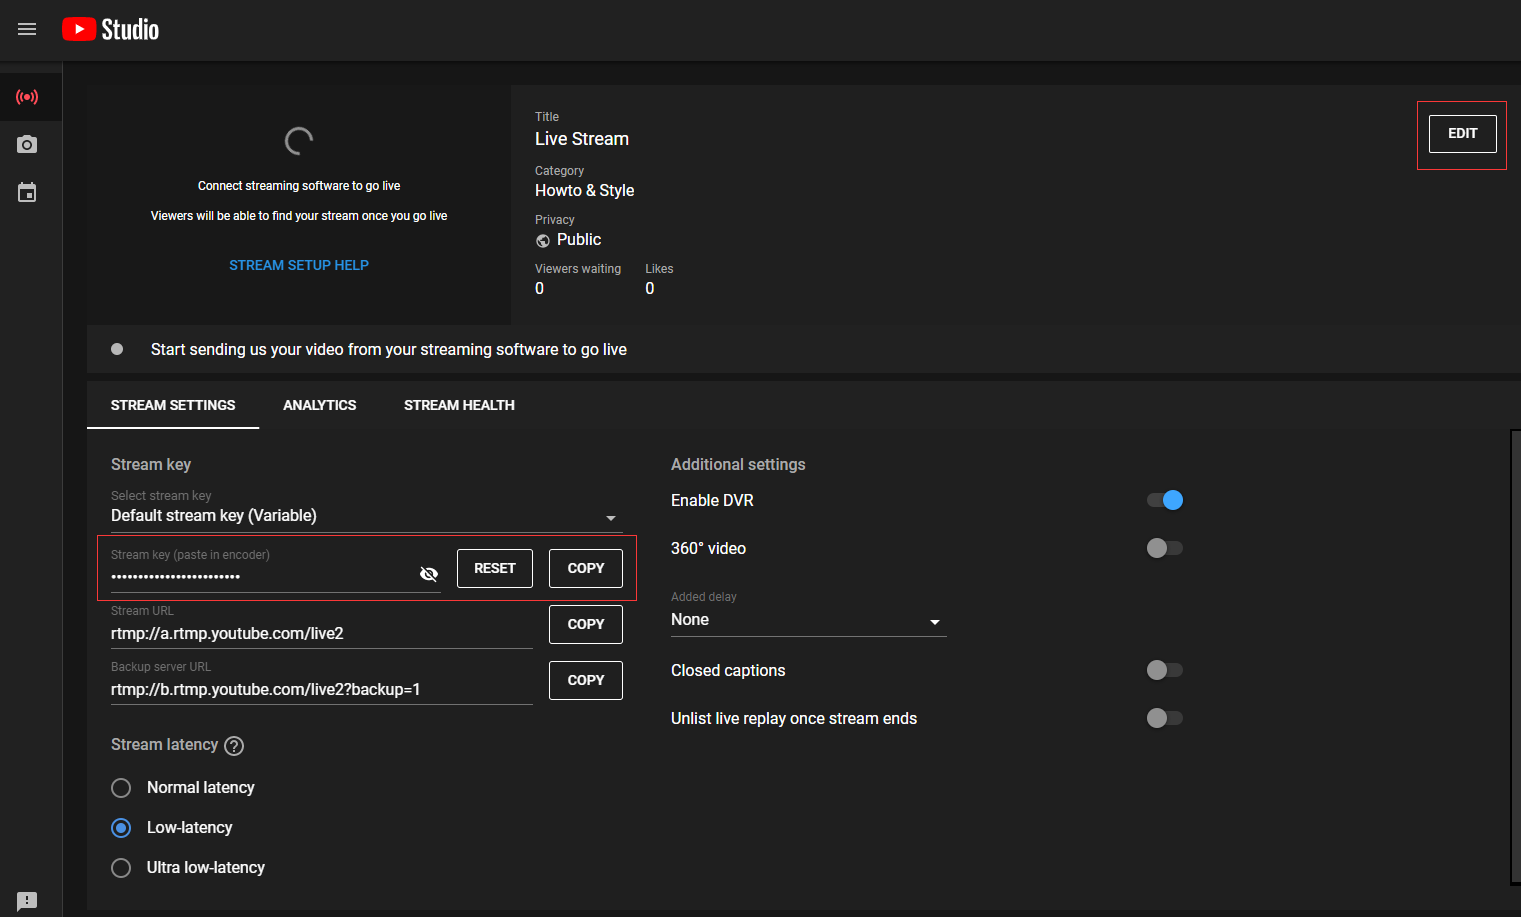
#4. Copy and paste the key to a notepad or any other safe location.
Editor’s Tip: Do not share it with someone you don’t know. Or else, others may take advantage of your account and live stream to your YouTube channel.
Step 4. Install & Set Up Encoders to Stream IP Cameras to YouTube
Important: Some security cameras that support RTMP push allow you to live stream IP cameras directly to YouTube without using any encoders. So, it is best to contact the staff of your security camera brands and ask them whether an encoder is needed for YouTube live streaming.
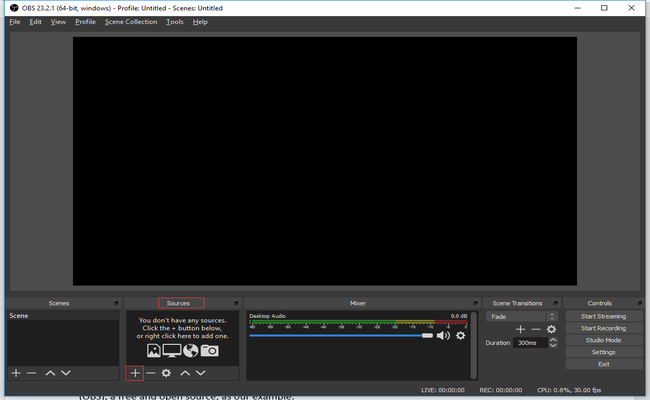
YouTube has made up a list of several reliable encoders and we will take Open Broadcast Software (OBS), a free and open-source, as our example.
- Download OBS to your PCs or laptops.
- Open the program and click + –> Media Source in the Source section to add a video source.
3. Create a new source and type in a name like “IP Camera Live Stream”. Make sure that you check the Make source visible at the bottom.
4. Uncheck all the choices and enter the RTSP URL in the Input field.
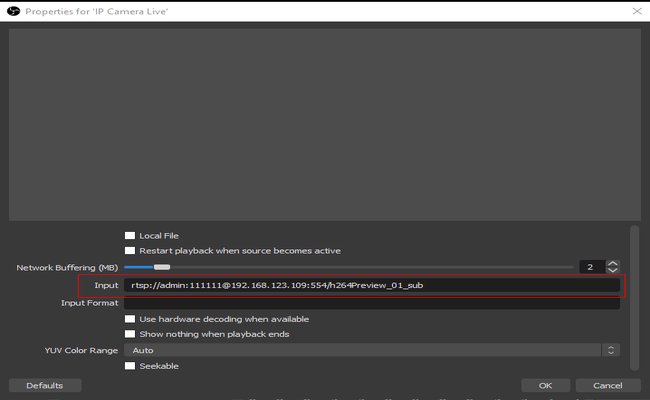
5. Then your IP camera live feed will show on the OBS screen. Right-click the live feed and click Transform –> Stretch to screen to adjust the video size.
Step 5. Configure Live Streaming Settings in the Encoders
After setting up the encoders, now you are really close to launching a successful security camera live stream on YouTube.
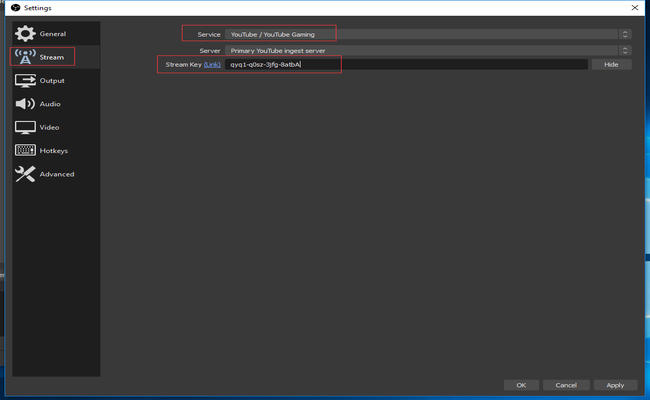
- Hit Stream in the Settings section (on the right-hand sidebar) and choose YouTube/YouTube Gaming under the Service section.
- Type in the stream key that you obtain from YouTube in the field and click OK.
3. Click Starting Streaming in OBS and navigate to your YouTube account to check if you are on live now.
4. If you want to stop IP camera live streaming on YouTube or when the event terminates, stop streaming in OBS.
And that’s it!
Before starting an IP camera live streaming on YouTube, you’d better test if the settings work.
Thinking about how to improve the performance of your YouTube live stream? Find some of the possible tips & solutions in the next part.
How to Make IP Camera Streaming to Facebook Live with RTSP
The steps to stream a security camera to Facebook live are very similar to the steps to stream that to YouTube, first you have to get the RTSP address of the security camera, and then stream the live video to Facebook Live through OBS software.
Just follow the steps below to complete it:
1. Get the RTSP live stream address of the security camera.
For Reolink camera, the URL is:
rtsp://(user name):(password)@(ip address):554/h264Preview_01_main
You can find the IP address in the Reolink Client or mobile App. Replace (username) and (password) with the username and password you set before.
For other brands of cameras, I believe you can get this information in the product manual, or at the after-sales service.
2. Install and open the OBS software.
You can download the software installation package on their official website.
3. Add a media source in OBS.
Select "+ Add" under Sources>>Select "Media Source" from the menu>> Select "Create New" and enter the name >> Select "OK">> Uncheck the "Local File" check box >> In the "Input" field, enter the RTSP feed.
4. View the camera's real-time video stream in OBS software.
If you get the above steps right, you should be able to preview the screen now.
5. Choose to stream to Facebook Live in the OBS software.
Select "Stream" from the list on the left side >> Select the "Service" in the drop-down menu.
6. Log in to Facebook in your browser and set up the connection.
Select the "Live Video" post option>>Select "Connect" at the top>> Select "Settings" on the top right>>Select "Live Video" to expand the live video settings>>Check the box "Publish this as a continuous live video".
And now you have got a Stream Key from Facebook. Copy the text from the "Stream Key" field.
7. Fill in the Stream Key in the OBS setting window
Go to OBS setting window >>Paste the Stream Key into the "Stream Key" field>>Select "Apply".
8.Go to Facebook in your browser. Add a title and description, and click “Go live”.
You can now successfully view the camera's real-time video on Facebook live.
How to Stream Multiple IP Cameras with One Single PC
Many people have more than one camera, for example 3 or 4, so they want to stream all of them through the platform, which can be done by adding multiple media sources in OBS. Then set up a stream through OBS, so that multiple cameras can be live viewed using only a single PC.
1. Record the RTSP URL list of all your cameras.
The default RTSP address for Reolink cameras is: rtsp://(user name):(password)@(ip address):554/h264Preview_01_main
For example, my user name is admin, my password is 123456, and the IP address is 192.168.0.18 by checking Reolink Client or App.
That means that the corresponding RTSP address should be: rtsp://admin:123456@192.168.0.18:554/h264Preview_01_main
So your list should look like this:
- Camera1: rtsp://admin:123456@192.168.0.18:554/h264Preview_01_main
- Camera2: rtsp://admin2:123456@192.168.0.20:554/h264Preview_01_main
- Camera3: rtsp://admin3:123456@192.168.0.55:554/h264Preview_01_main
- Camera4: rtsp://admin4:123456@192.168.0.80:554/h264Preview_01_main
2. Add the RTSP addresses of all your cameras in order in OBS.
In the source>>Click “plus”>>Click “media source”>>Click “new”>>Uncheck "local file">>In the field "input", fill in camera1's RTSP address.
Similarly, add all the cameras to the media source.
3. Scale and drag the screen to the right size and position until you are satisfied.
The camera images added later will obscure the camera images added earlier. So you need to drag and scale the image.
Click the screen you need to adjust in OBS, a red box with control points will appear around the screen, drag and drop the control points to achieve screen scaling, but this is equal scaling and cannot show screen cropping.
To crop, just press and hold the Alt key (Mac is Option key), and then drag and drop the control point on the side that needs to be cropped. At this point we will notice that the box line on the side to be cropped turns green, which indicates that the screen has been cropped.
You can adjust it until all the camera previews appear on the screen to your satisfaction.
4. Set the platform for the stream.
In the "stream" option you can set the live streaming platform as Twitch, YouTube Live, Facebook live, etc., and link the account.
5. To start live stream.
Now that all other options are set, you need to click "start streaming" and so far, all the steps are done.
Now, in the live screen, you can see all the multiple security ip camera feeds.
Security Cameras Live Streaming to YouTube: 4 Essential Tips to Improve Viewing Experience
Following the detailed guide above to stream IP cameras to YouTube is never the end of successful live streaming.
Poor image quality or slow Internet connection, are the common problems that you may encounter when going live on YouTube.
To provide a smooth viewing experience to your audience, check out the 4 useful tips as follows.
Tip 1. Choose Security Cameras with Extra Clear Image Quality & Sharp Night Vision
What would you do when finding out the security camera live streaming on YouTube comes with low image quality?
Click the settings and select the highest resolution, right?
And that is what viewers will do as well.
To deliver sharp images with great details on your channel, it is best to choose a megapixel security camera that captures images with the resolution of 1080p, 4MP and even 5MP both day and night.
Aside from the resolution, you may also check out the specifications listed below in security camera product pages:
1.Field of view: The wider the viewing angle is, the larger the monitoring area your surveillance camera can cover.
If you would like to broadcast every corner of the rooms, gardens, or construction sites on YouTube, choose a PTZ dome security camera that is able to rotate and cruise with a designated patrol path.
Hold Up: Check out the versatile PTZ IP camera Reolink RLC-823A, which can pan and tilt to capture everything around.
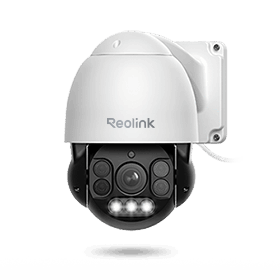
Smart PTZ PoE Camera with Spotlights
4K 8MP Ultra HD, Person/Vehicle Detection, 5X Optical Zoom, Auto Tracking, Manual Pan & Tilt, Two-Way Audio, 190ft Night Vision, Live View.
Check out this sample video below of this 4K security camera.
- IR range: This specification indicates how far your security cameras can see in ambient lighting. To ensure the quality of your YouTube live streaming at night, it is best to choose a security camera with long-range night vision like 100 feet or even farther.
- IR cut filter: Your CCTV camera won’t be able to capture images and videos in accurate colors in both day and night without an IR cut filter. So, if you are planning to stream surveillance cameras to YouTube during nighttime, it is best to choose a security camera with a qualified IR cut filter.
- 3D DNR: This feature helps reduce image noise in both static and moving images, offering clearer images and more accurate details during live streaming.
- Built-in Microphone: If you want to record sounds in your live stream as well, you’d better choose a security camera with audio.
Tip 2. Ensure the Internet Upload Speed Meets the Needs of IP Camera Live Streaming on YouTube
Another key factor to smooth live streaming is the fast Internet upload speed.
The recommended upload speed for HD live streaming on YouTube is 3 to 5 Mbps (megabits per second).
Or else, your YouTube live streaming may end up with poor image quality and jittery videos.
Also, note that going live on YouTube takes up much of the IP camera bandwidth. So, when the network connection is not stable, you may not be able to watch the security camera live feed via the Client or App.
Add-On Tip: Make sure that you are going live on YouTube via a reliable network. Otherwise, disruption of the connection may lead to live stream failures.
Tip 3. Record IP Cameras On-Site While Live Streaming
Can you save the precious moments captured by your IP security cameras when they are on live?
Of course, Yes!
Generally speaking, you are able to stream a security camera to YouTube while storing the captured images and videos at the same time.
Make sure that you have put SD cards into your security cameras or connect them to an NVR.
Read More: Click here to learn more options to record security cameras 24/7.
Even if you have forgotten to back up the recordings, you can still find them in the Video Manager since YouTube will automatically archive your live streaming for up to 12 hours when the stream is over.
Tip 4. Protect Your Own Privacy When Streaming IP Camera to YouTube Live
Aside from providing a smooth viewing experience to your viewer, it is vital to protect personal information during IP camera live stream.
Here is a YouTube live stream safety checklist for your reference:
-
Never share the stream key with others
-
Only share the admin access for your account to someone you trust
-
Avoid showing your personal information during the live stream
-
Limit access to your live streaming by setting the live stream to “private” or “unlisted”
FAQs about Streaming IP Cameras
Can You Stream IP Cameras to YouTube Without Any Software?
For Reolink IP cameras, the best way to stream live to YouTube is to use a third-party video streaming encoder software on a PC. This is one of the recommended methods by YouTube support. Also, some other security camera brands offer cameras with a built-in live streaming application. So, you can live stream IP cameras directly to YouTube and other online video platforms without a PC or any encoder.
However, it costs higher.You have to buy new cameras and one license for each camera. In other words, you may need to pay over $500 to stream an IP camera directly to YouTube without a PC.
How to Stream CCTV Cameras to Zoom, Twitch, or Other Platforms?
As the online video platforms accept live streaming using stream key or paired encoders, you can stream your IP cameras live to these platforms.
The streaming procedures on Facebook, Zoom, and Twitch are basically the same as YouTube Live. Start live streaming to Facebook Live, Zoom Live, and Twitch Live now!
Why Do I Get No Pictures in OBS Studio and YouTube?
Some users have experienced black screen with sound but no picture on the OBS studio and YouTube.If you are using a laptop, you may run into capture issues (black screen). Your laptop may be drawing one image to the power saving GPU, and another to the performance GPU. However, in order to capture efficiently, OBS itself must be running on the same GPU as the image you wish to capture.
If OBS is running on adapter A, and an image is being drawn on adapter B, you will get a black screen when trying to capture it. Unfortunately, there's nothing anyone can really do about it. This is just the way laptops are designed.
Here are solutions when you encounter OBS capture issues (black screen):
- You'll have to wait a while; it takes some time to establish the live streaming connection.
- Please double check that you have filled in the correct RTSP address.
- For Windows 10 1909 or newer: Open Settings and search for "Graphics Settings". Select "Classic App" and browse to C:\Program Files\obs-studio\bin\64bit\obs64.exe (or wherever you have installed OBS). Click "Options" (example screenshot).
- For Nvidia laptops on older Windows: Go to the Nvidia control panel in Windows control panel, and go to 3D settings on the left. Then, on the right pane, select "Program Settings" and choose OBS Studio (obs64.exe) from the drop-down list (example screenshot).
- For AMD laptop users: You can try window capture and "compatibility mode": For AMD laptops typically, you cannot set the GPU, you can try using window/monitor capture with the "compatibility mode" option enabled to force a capture. "Compatibility mode" requires a bit more CPU usage however.
Conclusion
IP camera for streaming to YouTube/FB can be a great way to share your video feed with the world or simply monitor your property remotely. By following these step-by-step instructions, you can easily set up the RTSP URL of your IP camera and stream live video.
Search
Subscribe for the Latest Updates
Security insights & offers right into your inbox