
Top 9 Tips to Fix IP Camera Not Connecting to WiFi

Some Reolink users may encounter an issue similar to this: "Why my Reolink camera not connecting to WiFi". The truth is, wireless IP camera connectivity issues are a common problem, with users reporting difficulties connecting to WiFi networks or experiencing dropped connections. Whether you're using a popular brand like Arlo, Nest, Ring, Amcrest, Foscam, Tenvis, Easyn, TP-Link, Imou camera not connecting to WiFi, or even other brands of IP camera, we have 9 effective solutions to resolve the issue in minutes.
If your Reolink cameras are not connecting to WiFi, feel free to explore these 9 tips or reach out to our support team for assistance
🎉 Limited-Time Security Camera Deals
- Explore Special Offers on Individual Cameras and Security Systems.
- Protect Your Home for Less with Bundles & Multi-Packs.
Why Won't My Security Camera Connect to My WiFi?
A wireless security camera fails to connect to Wi-Fi due to physical hardware issues, incorrect network settings, or poor signal strength between the camera and router. Inspect the common root causes below to identify and fix the connection issue.
Common Causes of Wi-Fi Connection Issues
1. Hardware & Power Issues
-
Loose Antennas: External Wi-Fi antennas may be loose or improperly threaded, preventing the camera from receiving a wireless signal.
-
No Power Supply: The camera's power adapter may be unplugged, connected to a dead outlet, or running on a drained battery.
-
Faulty Ethernet Cable: For initial setup or hybrid cameras, a damaged or improperly plugged network cable can prevent initial Wi-Fi configuration.
2. Signal Range & Wireless Interference
-
Out-of-Range Placement: The WiFi camera is installed too far from the router, or thick walls and solid obstacles are degrading the wireless signal.
-
Crowded Wi-Fi Channel: Multiple nearby devices operating on the same router channel cause network congestion and dropouts.
-
Electrical Interference: Household electronics—such as microwaves, cordless phones, or baby monitors—are disrupting the 2.4 GHz or 5 GHz signal.
3. Network Configuration & Credentials
-
Incorrect Password or SSID: Entering a typo in the Wi-Fi network name (SSID) or password prevents the camera from authenticating.
-
Unsupported Wi-Fi Frequency: The camera is attempting to connect to a 5 GHz network band when it only supports 2.4 GHz Wi-Fi (or vice versa).
-
Unconfigured Initial Setup: Newly purchased wireless cameras must be configured over an initial cable connection or via a mobile app QR code before operating wirelessly.
-
IP Address Conflict: The router failed to assign a valid local IP address to the camera, or a static IP assignment conflict occurred.
-
Outdated Firmware/Software: Running obsolete camera firmware or mobile app software causes protocol incompatibilities with modern router security standards.
How to Fix IP Camera Not Connecting to WiFi: 9 Tips
1. Check the Antennas First If IP Camera Won't Connect to WiFi
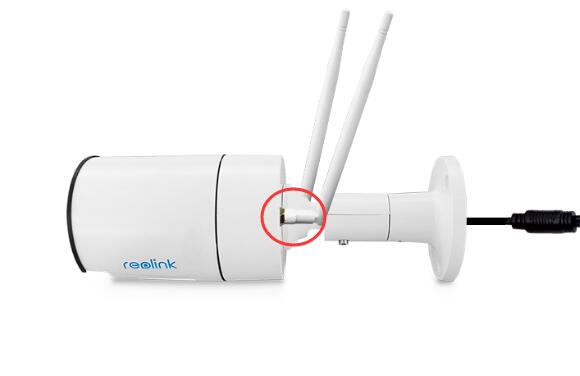
Check if the antennas are fixed well or not at the first place when you find the security cameras not connected to Internet or you camera are not showing network. Normally, when you get the product package, the antennas are not connected to the camera. You need to manually install the antennas to the wireless IP camera. Make sure you've tightened the antennas to the camera.
2. Make Sure the Wireless IP Camera Is Powered on
Check if the power supply of the wireless IP camera is working properly. Power outages can also cause that surveillance cameras won't connect to router. Make sure the power adapter is plugged into a working socket. If you get a battery-powered wireless IP camera, check if the battery is still at work. Change or charge up the battery.
You can also choose 4G/5G LTE security cameras as an alternatives because these cameras can work without Internet access.
3. Ensure the Password Is Correct
If you finish all the two steps above and still have questions like "why won't my security camera connect to my wifi", you may have to check the configuration of your cameras. For many times the Internet connection of security camera with mobile app failed only due to the password. Make sure the WiFi login password is correct. Sometimes you get many passwords and you may mix them up. Check the password list and ensure the password you enter is the right one of the WiFi.
4. Check the SSID in WiFi Settings
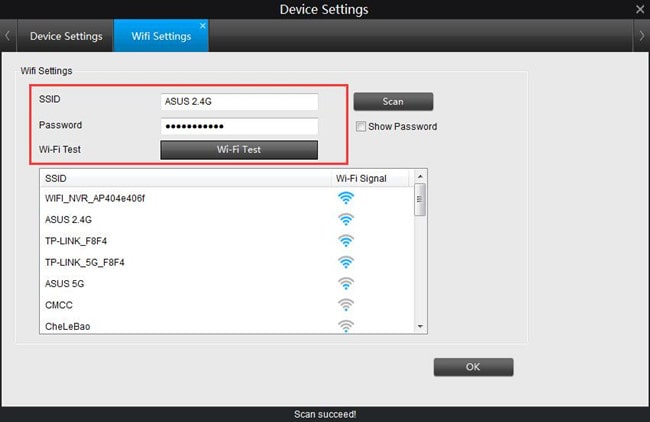
Incorrect SSID settings may make your IP camera WiFi connection fail. Normally, you need to set the SSID when the first time you set up your newly bought wireless IP camera. Please set it the same as the SSID of your router. To work it out, you need the IP camera software on computer or on your mobile phone. Here we take Reolink IP camera WiFi setup as the example.
- Connect the wireless IP camera to the router via an Ethernet cable.
- Run the free Reolink Client software on computer.
- Add the camera to the Client software.
- Go to the WiFi settings and set up the SSID and password.
And another thing that would cause "wired IP camera keeps going offline", "P2P failed to connect", or "can't setup offline camera" is your router firewall. Some routers would block security camera connections if the firewall is on.
5. Make Sure There Is No Signal Interference
If there is a bad reach, the IP camera can't find your WiFi signal, and it cannot connect to the WiFi router. The IP camera should not be too far from the router. Check the distance between the IP camera and the router. The manufacturer or the IP camera company website could have that information.
You can also check the WiFi signal yourself. Login the security camera software and head to the WiFi Settings.
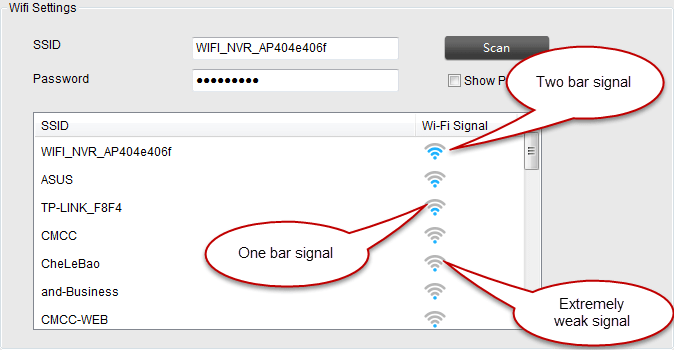
If the WiFi signal is less than one bar, it means your IP camera is too far away from the router or there might be too many barriers (such as walls) between the two. Just get the camera closer to the router. Please not that all security IP WiFi cameras need a stronger WiFi signal than laptops and cellphones.
Alternatively, you can buy a WiFi booster or extender for the router to extend the WiFi range, so that the IP camera can have a good reach to the stronger WiFi signal even it is put outdoors.
6. Check If the IP Camera Has the Correct IP Address
At some cases, when you connect via LAN cable you may get IP address (i.e., 192.168.0.99), and the wireless connection may be picking up a different IP address (i.e., 192.168.0.55). You won't see it if you set the camera for DHCP. Or you may suffer IP address conflicts. Check if the IP address of you camera has issues by using commands.
7. Change the Frequency Band of Your Router
A congested and slow wireless network could also be the reason why your IP cameras won’t connect to WiFi or keep going offline.
As the 2.4GHz frequency is widely used by a host of home appliances like phones, tablets and microwave ovens, it is more likely to suffer interference during data transmission due to overcrowding of the channels.
And that’s where the dual-band (2.4 GHz & 5 GHz) WiFi security cameras comes in (require a dual band router to work).
If you find that the 2.4 GHz band is on a heavy burden, simply switch the frequency band to 5 GHz (5.8 GHz) for higher data transmission rate and thus, reducing the chances of signal loss and interference.
8. Update Firmware/Software
Check the manufacturer or the IP camera company website to see if there is new firmware released. If yes, update to the latest firmware version for your wireless IP camera. The new firmware could fix the IP camera WiFi not working issue. Make sure you've downloaded the correct version for the camera.
And sometimes you can't find your IP camera on network or fail to connect to your phone far from home. In this case, check if the surveillance software or app is the latest version.
9. Contact the Support Team
If you've tried all the solutions but still failed, there is probably because of the hardware issues. Contact the support team of the IP camera company and explain the issue to them. Ask for a replacement. Some companies support a refund or exchange within 30 days from the purchasing date.
Note: The "Golden Rule" in IT troubleshooting is to reboot the device. You can try to reboot the IP camera to see if the WiFi not working issue is solved.
The biggest disadvantage of wireless security IP cameras is the increased risk of signal loss or connection failure. Still, you can try the solutions above to solve the wireless issues.
What To Do If Reolink Camera Not Connecting to WiFi?
A Reolink camera may fail to connect to WiFi because of incorrect network settings, weak signal strength, outdated firmware, or router compatibility issues. Before resetting your camera, try these troubleshooting steps to identify and fix the connection problem.
1. Check Your WiFi Name and Password
The most common reason a Reolink camera cannot connect to WiFi is incorrect WiFi credentials.
Check that:
- The WiFi SSID is entered correctly.
- The password is correct and case-sensitive.
- There are no extra spaces in the password.
- The camera is connected to the intended WiFi network.
If you recently changed your router password or WiFi name, you may need to reconnect your Reolink camera with the updated network information.
2. Make Sure Your Router Settings Are Compatible
Router settings can prevent a Reolink camera from connecting successfully.
Check the following:
- WiFi frequency band compatibility (such as 2.4GHz requirements for some models)
- Encryption settings
- WiFi channel settings
- Router access restrictions
If your router uses advanced settings such as band steering, device filtering, or network isolation, temporarily disable them to test the connection.
3. Update Reolink Camera Firmware
Outdated firmware may affect WiFi connection stability or compatibility.
To check for updates:
- Open the Reolink App or Client.
- Go to device settings.
- Check whether a new firmware version is available.
- Update the camera if needed.
Keeping firmware updated can improve device performance and fix potential software-related connection issues.
4. Reconnect Your Camera After Changing WiFi Password or Router
If your Reolink camera worked before but stopped connecting after changing your router or WiFi password, the camera may still be configured with the old network information.
Solutions:
- Update WiFi settings through the Reolink App if possible.
- Reconfigure the camera with the new WiFi credentials.
- Reset and set up the camera again if the previous steps do not work.
Changing WiFi information is one of the common situations where cameras lose connection.
5. Reset Your Reolink Camera as a Last Resort
If your camera still cannot connect to WiFi after checking network settings, signal strength, and firmware, a factory reset may help.
Before resetting:
- Make sure you know your WiFi credentials.
- Save important settings if possible.
- Prepare to complete the setup process again.
After resetting, reconnect the camera through the Reolink App.
How Do I Connect My Wireless Camera to My Home Wi-Fi?
1. Prepare Camera and Network
Note: Must be done before attempting pairing.
- Power on: Connect the camera to power using its adapter or battery.
- Check frequency: Ensure your phone is connected to a 2.4 GHz Wi-Fi band (most cameras do not support 5 GHz).
- Stay close: Keep the camera within 3–5 feet of your router during the initial configuration.
2. Download App and Add Device
- Install App: Download the official app (e.g., Reolink) from the App Store or Google Play.
- Create Account: Register and log into your manufacturer account.
- Add Device: Tap the + icon in the app and select your camera model or scan the QR code printed on the camera body/base.
3. Pair to Wi-Fi
- Enter Credentials: Select your home Wi-Fi SSID in the app and carefully type your Wi-Fi password.
- Scan/Pair: If prompted, show the QR code generated on your phone's screen to the camera lens until you hear a chime or voice confirmation.
- Wait: Allow 30–60 seconds for the camera to establish a solid connection with your network and register on the cloud.
4. Test and Mount
- Verify Stream: Test live viewing, two-way audio, and motion detection while still near the router.
- Mount Camera: Move the camera to its final installation spot. Ensure it retains at least 2–3 bars of Wi-Fi signal before permanently fixing it in place.
4 Best Wi-Fi IP Cameras for Reliable Network Performance
If frequent dropouts, buffering, or offline errors persist after troubleshooting, your security camera's Wi-Fi hardware may be struggling with network congestion or range limits. Modern dual-band Wi-Fi security cameras solve this problem by offering dual-frequency support (2.4 GHz for extended range through walls, and 5 GHz for faster, low-interference data streams) along with smart onboard processing to reduce bandwidth lag.
1. Best for Perimeter Lighting & Wide Outdoor Coverage: Reolink Elite Floodlight Wi-Fi
Best for: Long outdoor driveways or backyard zones often suffer from high 2.4 GHz interference from neighboring networks, leading to video lag.
The Reolink Elite Floodlight Wi-Fi features dual-band connectivity (2.4 GHz / 5 GHz), letting you switch to the 5 GHz channel to bypass local wireless congestion while streaming continuous 4K video.
Combines a 180° ultra-wide panoramic lens with motion-activated 2000-lumen floodlights and smart AI detection (person/vehicle/pet).
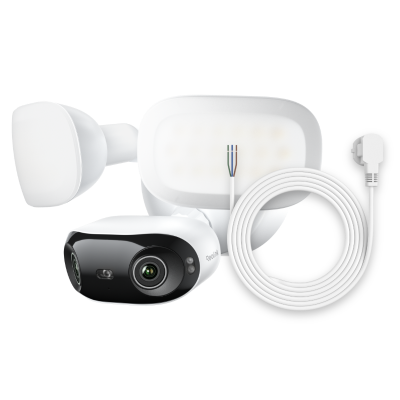
4K 180° Ultra-Wide Wired Floodlight Security Camera
3000-Lumen Dimmable Lighting, Adjustable Color Temperature, Local AI Video Search, Local Storage, Dual-Band Wi-Fi 6.
2. Best for Multi-Angle Tracking Without Network Congestion: Reolink OMVI 3i Wi-Fi
The Reolink OMVI 3i Wi-Fi uses efficient H.265 video compression and edge-based AI processing. Because object detection happens locally on the camera hardware rather than over the cloud, it drastically reduces Wi-Fi data consumption while maintaining zero-lag live feeds.
Features a triple-lens design combining a 10MP wide panoramic lens with an 8MP auto-tracking telephoto lens for detailed close-ups.
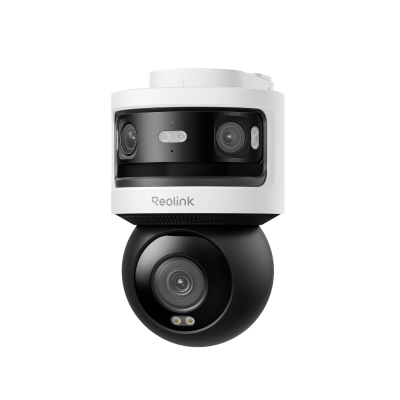
10MP+8MP Triple-Lens 360° Panoramic Pan-Tilt Camera
- 10MP Dual-Lens 180° View & 4K 360° Full Coverage
- Dual-Band WiFi 6 Connectivity & Local Storage
3. Best Wire-Free Option for Remote Placement: Reolink Altas PT Ultra
Mounting a camera far from the home router (such as a detached garage, fence line, or gate) usually drains battery life quickly as the camera struggles to maintain a weak Wi-Fi signal.
Equipped with next-generation Wi-Fi 6 technology, the Reolink Altas PT Ultra delivers improved signal penetration, lower latency, and better power efficiency over extended distances.
Powered by a high-capacity 20,000 mAh rechargeable battery, it delivers True 4K 8MP continuous recording, 360-degree coverage, and subscription-free local storage.
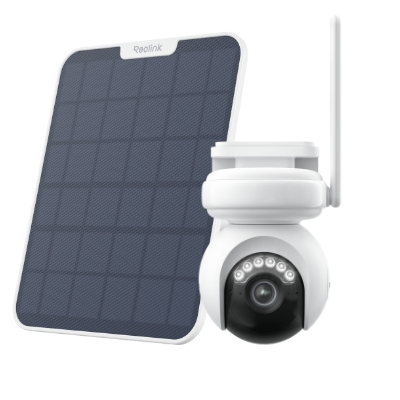
4K Battery-Powered PTZ Camera with Continuous Recording
👍 4K UHD video with continuous recording
👍 ColorX night vision in low light
👍 Pan, tilt, and automatic person tracking
👍 Local storage without monthly fees
4. Best Battery-Powered Wi-Fi 6 Camera for Dual-Lens Coverage: Reolink OMVI 2i Ultra
The Reolink OMVI 2i Ultra supports dual-band Wi-Fi 6, offering flexible connectivity for outdoor installations. Its 4K wide-angle lens and 3K auto-tracking PT lens work together to provide 360° coverage, allowing you to monitor a wider area and follow moving subjects.
With a rechargeable 10,000mAh battery and an optional 6W solar panel, it can be installed around driveways, gardens, or detached garages without nearby power outlets.
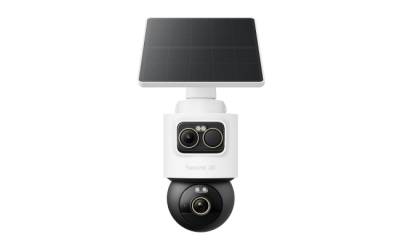
4K + 3K Dual-Lens PT & Bullet Wireless Security Camera
- 4K + 3K Dual-Lens with 360° Full Coverage
- SolarEase Endless Solar Power
- SyncTrack with Auto-Framing & Auto-Tracking
- AI Detection for Person, Vehicle & Animal
- Local Storage Up to 512GB microSD Card
FAQs
How do I connect my IP camera to WiFi?
To connect your IP camera to WiFi, first, power on the camera and ensure it's in setup mode. Then, access the camera's settings via the app or web interface, select the WiFi network, and enter the network credentials. Finally, follow the on-screen instructions to complete the connection process. The setup process can differ for each camera model, so it's essential to fllow the manufacturer's instructions when connecting your IP camera to WiFi.
Why Won't my Reolink camera not connecting to WiFi?
If your Reolink Wi-Fi camera isn’t connecting, a weak signal may be the cause. Try moving the camera closer to the router, placing it in an area with stronger reception, or using a Wi-Fi extender to boost the signal.
Can I connect IP camera directly to WiFi router?
Yes, you can typically connect an IP camera directly to a WiFi router. WiFi IP cameras are designed to connect wirelessly to WiFi networks. These wireless cameras allow you to link them directly to your router for remote access and monitoring over the network.
Why Camera Not Connecting to Your Phone?
Below are the ones that cause your P2P IP camera not connecting to your phone remotely, or your seeing "OFFLINE" status when you try to connect it.
- Neither the security IP camera or your phone connects to the network.
- The "UID" option on your P2P IP camera hasn't been enabled yet.
- You've turned on your router's firewall and it blocks the connections.
- The firmware or the software is out-of-date.
Why does it keep saying "unable to connect to WiFi"?
If your camera keeps saying “unable to connect to WiFi,” it is usually caused by a weak signal, an incorrect password, or network compatibility issues. The camera may be too far from the router or affected by interference from walls or other devices, and many cameras only support 2.4GHz networks rather than 5GHz. In some cases, router settings such as device restrictions, hidden network names, or system compatibility problems can also prevent a successful connection.
Conclusion
Troubleshooting issues with an IP camera's WiFi connectivity can be a multifaceted process. By following manufacturer instructions, considering network settings, and exploring troubleshooting steps, resolving the problem that IP camera not connecting to WiFi becomes more manageable. Remember, a stable WiFi connection is key to ensuring your IP camera functions seamlessly for reliable surveillance.
Did you ever encounter "Reolink camera not connecting to WiFi"? How did you solve it? Share your experience with us in the comment section below so that we can discuss together!
Search
Subscribe for the Latest Updates
Security insights & offers right into your inbox