
How to Connect Security Cameras to TV: Easiest Way to Go
Ever wished you could check your security cameras right from your living room TV? You could spend hours researching complex streaming workarounds and app configurations—but if you’re looking for the absolute easiest way to get the job done, you’re in the right place. Skip the deep dive and use this quick shortcut to link your cameras to your TV in minutes.
- Why You Need to Connect Your Security Camera to a TV?
- How to Check If Your Security Camera Is Compatible With Your TV?
- How to Connect Analog Cameras to TV with DVR Recorder?
- How to Connect Security Camera to TV with NVR?
- How to Connect Security Camera to TV Wirelessly?
- How to Connect Security Camera to TV without NVR or DVR?
- How to Connect a Reolink Camera to a TV?
- What to Do If Your Security Camera Can't Connect to TV?
- Best Security Camera or System that Connects to TV in Minutes
- Real-World User Feedback on Casting Security Cameras to TV
- FAQs
- Conclusion
Why You Need to Connect Your Security Camera to a TV?
Connecting your security camera to a TV gives you a larger, more convenient way to monitor your property. Whether you use an NVR, HDMI cable, smart TV app, or streaming device, displaying camera footage on a television offers several practical benefits:
-
See More Detail on a Larger Screen: A TV makes it easier to identify faces, vehicles, packages, and other important details that may be difficult to see on a phone.
-
Monitor Multiple Cameras at Once: You can display several camera feeds in a split-screen layout, making it easier to watch entrances, driveways, backyards, and indoor areas from one place.
-
Improve Real-Time Monitoring: A continuously displayed live feed allows you to quickly notice visitors, suspicious activity, or safety concerns without repeatedly opening a mobile app.
-
Review Footage More Easily: A larger screen makes recorded footage easier to search, play back, pause, and inspect, especially when reviewing an incident.
-
Create a Central Monitoring Station: Connecting cameras to a TV provides a dedicated viewing point for home, office, store, or property security.
-
Make Monitoring Accessible to Everyone: Family members, employees, or security staff can view the camera feeds without needing access to a specific phone or account.
For the most stable multi-camera viewing and local recording, an NVR is often the most practical option. However, the best connection method depends on your camera type, television, and monitoring needs.
How to Check If Your Security Camera Is Compatible With Your TV?
A security camera is compatible with a TV when both devices support the same video connection, app, or streaming method. Check the camera type, available ports, supported resolution, and network requirements before setup.
1. Check the Camera Type
Analog cameras usually connect through a DVR, while IP security cameras often require an NVR, smart TV app, web browser, or compatible streaming device. Most standalone IP cameras cannot connect directly to a TV with an HDMI cable.
2. Compare the Available Ports
Check the output ports on the camera recorder and the input ports on the TV. Common options include:
- HDMI
- VGA
- BNC or RCA
- USB, depending on the device
For most modern security systems, connecting an NVR or DVR to the TV through HDMI is the simplest option.
3. Check Smart TV App Compatibility
For wireless viewing, confirm that the camera brand offers an app for your TV platform, such as Android TV, Google TV, Apple TV, Samsung Tizen, or LG webOS. App availability varies by camera brand and TV model.
4. Confirm RTSP or ONVIF Support
Some IP cameras support RTSP or ONVIF, which may allow live video to be viewed through a compatible media player, smart TV app, NVR, or third-party device. Both the camera and viewing device must support the same protocol.
5. Match the Video Resolution
Make sure the TV, recorder, and cable can support the camera’s resolution. To view a 4K security camera in full quality, you typically need a 4K-capable NVR or DVR, HDMI cable, and television.
6. Review Network Requirements
Wireless camera viewing usually requires the camera and TV or streaming device to be connected to the same local network. Internet access may be needed for cloud-based viewing, but local NVR-to-TV monitoring can often work without it.
For a multi-camera setup, the most reliable solution is usually to connect the cameras to an NVR and then connect the NVR to the TV using HDMI.
How to Connect Analog Cameras to TV with DVR Recorder?
If you are using traditional analog CCTV cameras, the most reliable way to display their feeds on a television is through a Digital Video Recorder (DVR). The cameras send raw analog signals to the DVR, which compresses the data, saves it to a local hard drive, and outputs a clean digital feed directly to your TV screen.
Step 1: Link Each Camera to the DVR Using Coaxial BNC Cables
Run a Siamese BNC coaxial cable from each analog security camera back to the ports on the rear panel of your DVR. The term "Siamese" means the cable splits into two distinct connectors at each end: a twist-locking BNC connector for video transmission and a 2.1mm DC barrel connector for electrical power.
Step 2: Connect the DVR to Your TV with an HDMI or VGA Cable
Locate the video output panel on your DVR. For modern flat-screen televisions, connect an HDMI cable from the DVR's HDMI output to an open HDMI slot on the back of your TV. If you are using an older analog television or a dedicated surveillance spot monitor, you can use a standard 15-pin VGA cable or a composite RCA video cable instead.
Step 3: Connect Your Equipment to Regional Power Supplies
Plug the power connectors from your Siamese cables into a central multi-port power distribution box or a multi-way power splitter adapter. Then, plug the DVR’s main power supply into a nearby wall outlet.
Step 4: Turn on the TV and Select the Corresponding Input
Power on your television and grab your remote control. Press the Source or Input button (sometimes labeled as AV, Ext, or Input outside of North America) and cycle through the options until you select the exact port you plugged the DVR into (e.g., HDMI 1).
Step 5: Complete the On-Screen DVR Configuration
The first time you switch to the DVR's input channels, an automated setup wizard will appear on the TV screen. Use the USB mouse included with your DVR to set the system language, adjust the local time zone, and select your preferred display layout (such as a 4-camera grid view or a single full-screen channel).
How to Connect Security Camera to TV with NVR?
Using an NVR (Network Video Recorder) is the gold standard for connecting security cameras to a TV. By acting as the central hub for your security system, the NVR processes the raw video data and outputs a seamless, lag-free live feed directly to your television screen.
Setting up this system requires no complex networking or technical expertise. Just follow these four straightforward steps to get your system up and running in minutes:
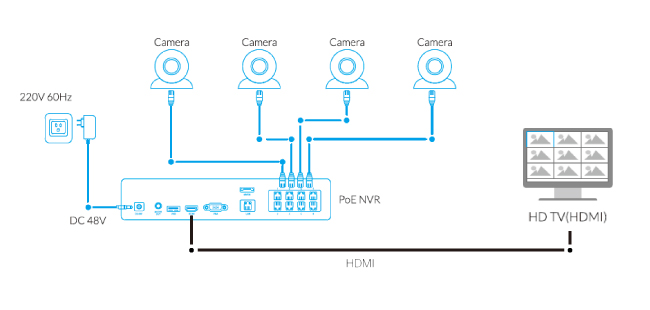
Step 1: Connect the IP Cameras to the NVR via Ethernet Cables
Begin by running a high-quality Cat5e or Cat6 Ethernet cable from each IP camera directly back to the Power over Ethernet (PoE) ports on the rear panel of your NVR. This single cable is highly efficient because it uses PoE technology to transmit both ultra-HD video data and electrical power simultaneously.
Pro Tip: If you are running cables outdoors, make sure to use weatherproof RJ45 connector covers and outdoor-rated Ethernet cables to protect the physical connection from moisture and extreme temperatures.
Step 2: Link the NVR to Your TV Using an HDMI or VGA Cable
Locate the video output ports on the back of your NVR. For the best possible picture quality, connect one end of an HDMI cable to the NVR's HDMI output port and the other end to an open HDMI input port on your TV. If you are using an older television or a dedicated spot monitor that lacks HDMI ports, you can use a standard VGA cable instead.
HDMI is highly recommended over VGA if your cameras capture video in 4K or 2K resolutions, as VGA cables cannot output ultra-high-definition video signals.
Step 3: Plug In and Power On the Entire System
With all data and video cables securely in place, connect the NVR's power supply adapter to a standard electrical outlet or surge protector. Next, plug in your TV and power it on. The NVR will automatically begin booting up its internal operating system, distributing power down the Ethernet cables to fire up each connected security camera. You will know the cameras are online when their status lights begin to blink.
Step 4: Switch the TV Input to Display the Live Feed
Grab your TV remote and press the Source or Input button. Navigate through the menu and select the specific HDMI or VGA port number that you plugged the NVR into (for example, HDMI 2). Within a few seconds, the NVR's startup screen will appear, followed immediately by a clean grid view displaying the live, real-time video feeds from all of your security cameras.
For local viewing on your living room TV, an internet connection is completely optional. The NVR and cameras create their own private closed-circuit network to stream and record video 24/7. You only need to bridge the NVR to a home router if you plan to enable remote viewing on your smartphone app, receive instant motion alerts while away, or download over-the-air firmware updates.
How to Connect Security Camera to TV Wirelessly?
If you prefer to bypass a bulky hardware NVR and want to stream your wireless security cameras to a television completely wirelessly, you have several excellent options. Going wireless gives you incredible flexibility, though it does require a stable home Wi-Fi network to prevent lag.
Depending on your current home setup, your smart TV brand, and your technical comfort level, choose one of these four proven methods:
Option 1: Use an IP-Camera-to-HDMI Converter or Decoder
An IP decoder box is the best standalone hardware solution if you want a reliable stream without an NVR. This compact device connects to your local home network (via Wi-Fi or an Ethernet cable connected to a wireless bridge) and pulls the digital streams directly from your standalone IP cameras.
How it works: You simply plug the decoder box into your TV’s HDMI port, log into the decoder's interface via a web browser, and input your cameras' RTSP (Real-Time Streaming Protocol) or ONVIF URLs. The box instantly decodes the video data and outputs a clean, multi-camera grid layout directly onto the TV screen.
Option 2: Set Up a DLNA Server on Your PC to Stream Video
If you already have a computer running on the same Wi-Fi network as your smart TV, you can transform it into a media hub using DLNA (Digital Living Network Alliance) technology. Software like Plex, Universal Media Server, or VLC can ingest your IP camera network streams and rebroadcast them across your home.
How it works: First, configure your camera management software (like Blue Iris or iSpy) on your PC to save or broadcast a continuous network stream. Next, enable DLNA sharing on your PC. Finally, open up the "Media" or "Sources" app on your Smart TV (Samsung, LG, and Sony all have built-in DLNA players), look for your PC on the network, and select the camera stream to start watching.
Option 3: Cast the Feed Using Google Chromecast or Apple TV
Using a dedicated streaming device like a Google Chromecast or an Apple TV is incredibly smooth if you already use smart home ecosystems. This bridges the gap for older televisions or smart TVs that don't natively support security apps.
How it works: For Chromecast, link your security camera (such as a Reolink or Nest camera) to your Google Home app. Once paired, you can cast the live feed from your phone or simply use a voice command like, "Hey Google, show the driveway camera on the living room TV." For Apple TV, download a third-party IP camera viewer app (like HomeCam or IP Cam Viewer) directly from the tvOS App Store, type in your camera's IP address and credentials, and view your cameras using your Apple remote.
Option 4: Install Native Streaming Apps Directly on Your Smart TV
If you own a modern Smart TV running Android TV, Google TV, Fire OS, or Roku, you can completely skip external hardware. The TV's built-in application store contains everything you need to access your cameras directly.
How it works: Search your TV's app store for your security camera manufacturer’s official app (if available) or download highly-rated, universal third-party RTSP media players like VLC Media Player or TinyCam Monitor. Once installed, add a new network stream, enter your security camera's local IP address, port number, and login credentials, and save it as a favorite channel for instant viewing anytime.
How to Connect Security Camera to TV without NVR or DVR?
You can connect a security camera to a TV without an NVR or DVR by using a direct video cable, a smart TV app, screen casting, or a compatible streaming device. The best method depends on the camera type and the inputs or software supported by your TV.
1. Connect the Camera Directly With HDMI or AV Cables
Some security cameras have an HDMI, RCA, or BNC video output that can connect directly to a TV.
To set it up:
- Connect the camera’s video output to the matching input on the TV.
- Plug the camera into a power source.
- Turn on the TV and select the correct HDMI or AV input.
This method is mainly suitable for cameras with a dedicated video output. Most modern IP cameras do not have an HDMI port and cannot connect directly to a TV this way.
2. Use a Smart TV App
If your camera manufacturer provides a compatible TV app, you may be able to view the live feed over Wi-Fi.
Install the app on the smart TV, sign in to your camera account, and select the camera you want to view. App availability depends on the TV platform, such as Android TV, Google TV, Apple TV, Samsung Tizen, or LG webOS.
3. Cast the Camera Feed From a Phone or Computer
Another option is to open the camera feed on a phone, tablet, or computer and cast or mirror the screen to the TV.
Common options include:
- Chromecast or Google Cast
- Apple AirPlay
- Miracast
- An HDMI cable from a laptop to the TV
This method is convenient for occasional viewing, but the connection may be less stable than a wired recorder setup.
4. Use RTSP With a Streaming Device
Some IP cameras support RTSP streaming. You can enter the camera’s RTSP address into a compatible media player installed on a smart TV, Android TV box, Fire TV device, or computer.
The camera and viewing device usually need to be connected to the same local network. RTSP setup may also require the camera’s IP address, username, password, and stream URL.
5. Use a Web Browser
If the camera supports browser-based live viewing, you may be able to access its IP address through a TV browser or a computer connected to the TV.
However, many smart TV browsers do not support the video formats or plug-ins required by security cameras, so compatibility can be limited.
Connecting a camera directly to a TV works best for viewing one camera at a time. For multiple cameras, continuous recording, split-screen viewing, and easier playback, an NVR or DVR is usually more practical.
How to Connect a Reolink Camera to a TV?
You can connect a Reolink camera to a TV in three main ways: through a Reolink NVR, Google Home, or Amazon Alexa. The best method depends on your camera model, TV, and whether you need continuous multi-camera monitoring or occasional voice-controlled viewing.
Method 1: Connect Through a Reolink NVR
Using an NVR is the most practical option for displaying multiple Reolink cameras and reviewing locally recorded footage.
- Add the Reolink cameras to the NVR.
- Connect the NVR to the TV with an HDMI cable.
- Power on the cameras, NVR, and TV.
- Select the corresponding HDMI input on the TV.
- Use the NVR interface to view individual cameras or a multi-camera grid.
Local live viewing through the NVR does not normally require an active internet connection. However, internet access is needed for features such as remote viewing, push notifications, and online firmware updates.
Method 2: Use Google Home
Compatible Reolink cameras can display live video on a TV through Google Home and a supported display device, such as Chromecast or a Google TV device.
First, enable smart home integration for the camera in the Reolink App, link your Reolink account in Google Home, and assign the camera to a room. You can then use a voice command such as:
“Hey Google, show the front door camera on the living room TV.”
The camera and streaming device must be properly connected to the network, and Google Home support varies by Reolink model.
Method 3: Use Amazon Alexa
Some Reolink cameras also work with Amazon Alexa. After enabling the Reolink smart home skill and linking your account, you can ask Alexa to show the camera on a compatible Fire TV, Echo Show, or Alexa-enabled television.
For example:
“Alexa, show the driveway camera.”
Alexa casting is convenient for quickly checking one camera, but it is generally better suited to temporary live viewing than continuous monitoring.
For stable 24/7 viewing, split-screen display, and local video playback, connecting a Reolink NVR directly to the TV through HDMI is usually the best choice. Google Home and Alexa are more convenient when you only need to call up a compatible camera feed occasionally.
What to Do If Your Security Camera Can't Connect to TV?
If your security camera does not appear on the TV, first check the power, cables, TV input, video resolution, and network settings. The correct solution depends on whether you are using an NVR, DVR, direct cable, smart TV app, or wireless streaming device.
1. Check the Power Supply
Make sure the camera, NVR or DVR, TV, and any signal converters are receiving power.
Check the status lights on each device and confirm that all power cables are firmly connected. For cameras with infrared night vision, cover the light sensor and check whether the IR LEDs glow faintly red.
Also verify that the power adapter supports your local voltage. North America commonly uses 120V/60Hz, while the UK, Europe, Australia, and many other regions use 220–240V/50Hz. A universal adapter labeled 100–240V is generally suitable across these regions when used with the correct plug.
2. Check the TV Input and Video Cables
Confirm that the TV is set to the correct HDMI, VGA, or AV input. For example, if the recorder is connected to HDMI 2, select HDMI 2 on the TV.
Disconnect and reconnect the cable at both ends. If the screen remains blank, try another cable or TV port. HDMI adapters, BNC converters, and extension cables can also cause signal loss if they are damaged or incompatible.
3. Match the Video Format
PAL and NTSC mismatches can cause flickering, rolling images, distorted colors, or no picture when using analog cameras, DVRs, or BNC-to-HDMI converters.
NTSC is commonly used in the United States and Canada, while PAL is widely used in the UK, Europe, Australia, and other regions. Check the DVR or converter settings and select the format supported by your camera and TV.
This issue is less common with modern HDMI-based NVR systems, which use digital video output.
4. Lower the Recorder’s Output Resolution
A “Format Not Supported,” “Out of Range,” or blank-screen message may mean the NVR or DVR output resolution is higher than the TV can display.
For example, an older 1080p TV may not accept a 4K output signal. Connect the recorder to a compatible monitor, open the display settings, and lower the output resolution to 1920 × 1080. Save the setting and reconnect the recorder to the TV.
You can also try resetting the recorder’s display resolution according to the manufacturer’s instructions.
5. Check the Local Network Connection
For smart TV apps, RTSP viewing, screen casting, or streaming devices, make sure the camera and TV are connected to the same local network.
They do not always need to use the same Wi-Fi frequency band. A camera on 2.4GHz and a TV on 5GHz can usually communicate as long as both are connected to the same router and local network.
Avoid connecting either device to a guest network. Also check the router settings and disable features such as AP isolation, client isolation, or wireless isolation, as these settings can prevent devices from communicating with each other.
6. Confirm App and Streaming Compatibility
If you are using a smart TV app, confirm that it supports your TV operating system and camera model. Some camera apps are available on Android TV or Google TV but not on Samsung Tizen, LG webOS, or Apple TV.
For RTSP viewing, confirm that RTSP is enabled on the camera and that the stream address, IP address, username, and password are correct. You may also need a compatible media player, such as VLC.
7. Restart and Update the Devices
Restart the camera, recorder, TV, router, and streaming device. Temporary software or network errors are often resolved by rebooting the equipment.
You should also check for firmware updates for the camera, NVR or DVR, smart TV, and camera app. Outdated software may cause connection or compatibility problems.
If the camera still cannot connect to the TV, test each part of the setup separately. Connect the recorder to another monitor, try a different cable, or open the camera feed on a phone or computer to identify whether the problem comes from the camera, recorder, network, or TV.
Best Security Camera or System that Connects to TV in Minutes
So if you decide to go with the security camera system method, here are the best picks for you to connect security cameras to TV in minutes. And they are highly affordable!
Option 1: PoE Security Camera System – Connect Camera to TV Using HDMI Cable
Connecting security camera to TV is super easy with a PoE security system: Connect the NVR to your TV with the provided HDMI cable and the live view will appear on your TV (Make sure all the system counterparts are powered up and connected correctly).
These steps can be applied to any Reolink NVR system, but here we use the RLK16-1200D8-A, currently on sale in the Reolink Spring Sale 2026.
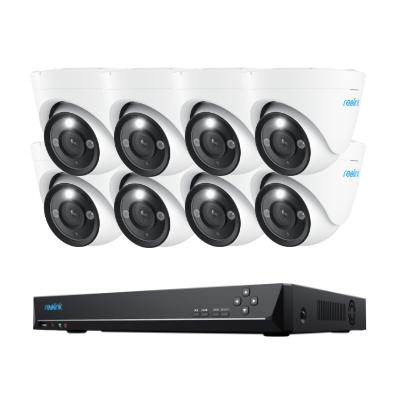
12MP PoE Security System with Color Night Vision
12MP Ultra HD, Person/Vehicle Detection, Power over Ethernet, 16-Channel NVR.
Learn more about the security camera system:
Option 2: Wireless Security Camera System – Connect CCTV Cameras to TV Wirelessly
Want to connect cameras to TV wirelessly?
Just set up a wireless system with easy-to-use WiFi cameras such as new Reolink TrackFlex Floodlight WiFi
Side note: Connecting cameras to TV wirelessly mean no wire at all. You still need an HDMI cable to connect the storage box (the NVR) to your TV monitor.
The good news is that the Reolink NVR works with both Reolink wireless and PoE cameras, so you may mix and match the different security camera types.
Want to go wireless but there is no Internet connection?
The wireless security camera system will also work!
The wireless cameras within the security system do not need WiFi to connect to and communicate with each other. They will build a private subnet between them to transmit data. Just power the NVR and cameras, and they will start to work.
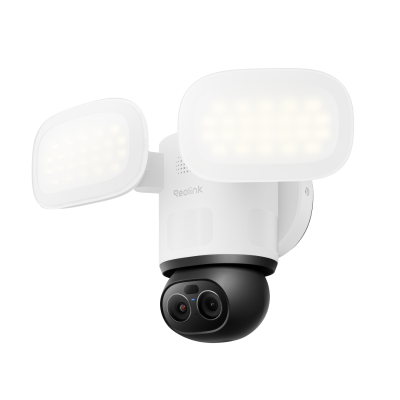
Smart 4K 360° Coverage Wi-Fi Floodlight Security Camera
Local AI Video Search, 4K 8MP Ultra HD, 360° Coverage View, 6X Hybrid Zoom, Dual-Color Floodlight.
Option 3: Wireless Battery-Powered Camera - Cast Live Stream via Google Home
You can also stream your wireless security camera footage to your TV using smart home platforms like Google Home or Amazon Alexa. For example, the Argus PT Ultra offers 4K resolution and provides fully wireless, flexible placement anywhere in your home.
You can connect the Argus PT Ultra to your Google Home app and link it to a compatible Chromecast device. Once set up, simply use voice commands or the Google Home interface to cast the live stream directly to your TV.
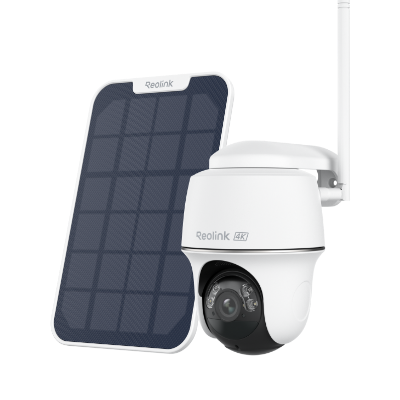
4k 100% Wire-Free PT Camera
4K 8MP Ultra HD; 5GHz/2.4GHz WiFi; Rechargeable Battery & Solar Powered; 355° Pan & 140° Tilt; IP65 Certified Weatherproof; Clear Night Vision; 2-Way Audio; 122° Wide Viewing Angle.
Option 4: Premium PoE Multi-Lens Camera - Stream 24/7 via Smart Home Voice Commands
While battery-powered cameras are highly convenient, they can might not last for extended TV viewing sessions. If you want continuous, uninterrupted streaming on your big screen without worrying about battery life, a hardwired Power over Ethernet (PoE) camera like the Reolink OMVI 3i PoE is the ultimate upgrade.
The camera is also fully compatible with Google Assistant. Simply link the camera to your Google Home app and say, "Hey Google, show me the Front Door on my TV," to instantly cast your live feed to any Chromecast-enabled screen.
The OMVI 3i PoE's advanced triple-lens system outputs a 180° panoramic view alongside a dynamic 4K tracking view simultaneously. This means there is a whole lot of detail to be captured and it is perfect to be watched on a big smart screen TV.
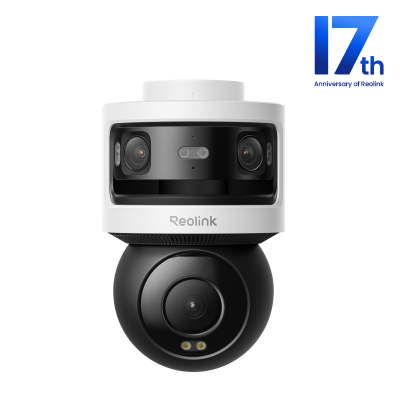
All-in-one Triple-Lens 180° Panoramic Pan-Tilt Security Camera
10MP Dual-Lens 180° View, 4K 360° Full Coverage, SyncTrack with auto framing & auto tracking, Local Storage (No Monthly Fees), Local AI Video Search.
Real-World User Feedback on Casting Security Cameras to TV
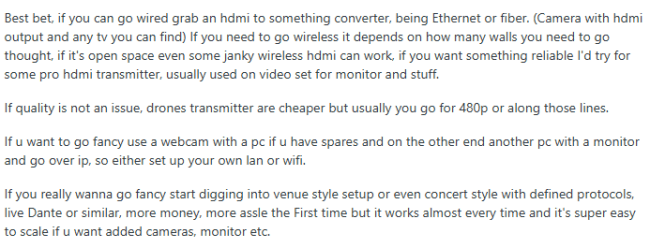
Community feedback from tech-security forums indicates that while casual app-based casting works for short distances, running continuous live video and audio requires dedicated hardware workarounds to avoid severe signal dropout.
In a recent Reddit discussion, a user needed to transmit live high-definition video and audio from a security camera to a TV located roughly 30 meters (100 feet) away without relying on a smartphone, computer, venue Wi-Fi, or an active router.
Commenters universally agreed that standard Wi-Fi casting completely fails in congested environments. Solid concrete structural walls, extended physical distance, and overcrowded local 2.4 GHz or 5 GHz wireless bands naturally degrade and choke the video stream.
To solve this without an NVR or DVR hub, users generally recommended three distinct methods:
- Use a dedicated wireless HDMI transmitter: Several commenters suggested a self-contained transmitter-and-receiver kit that connects the camera directly to the TV. This avoids venue Wi-Fi and is relatively easy to set up.
- Choose a wired HDMI extender for maximum reliability: HDMI-over-Ethernet or fiber was considered more dependable, although running and removing cables can be inconvenient for temporary installations.
- Use professional wireless video equipment for difficult environments: For venues with multiple walls or heavy wireless interference, users recommended higher-grade video transmitters rather than inexpensive casting devices.
FAQs
How can I watch my security cameras on my TV?
You can watch your security cameras on your TV by connecting them through an HDMI or AV cable, using a DVR/NVR system, or wirelessly via a smart TV app or streaming device like Chromecast or Fire Stick.
Can you use a TV as a monitor for security cameras?
The answer is yes. You can use a TV as a monitor for security cameras by connecting it through HDMI, VGA, or AV cables, or wirelessly via a compatible app or streaming device.
Can you plug a security camera into a TV?
Yes, you can plug a security camera directly into a TV if the camera supports HDMI or AV output. For IP cameras, you’ll need an NVR or streaming device to view the feed on TV.
Conclusion
Knowing how to connect security cameras to TV can greatly enhance the viewing experience of users. However, not every camera model has this functionality. If you have discovered any workable ways to connect security cameras to TV, you are very welcome to share with us by commenting below!
Search
Subscribe for the Latest Updates
Security insights & offers right into your inbox