
Blue Iris Cameras: Compatibility, Setup & Best Picks 2026
Blue Iris is video surveillance software that lets users view, record, and manage compatible security cameras from one platform. It works with many IP cameras that support standards such as ONVIF or RTSP and can provide features like live view, recording, motion detection, PTZ control, and remote access.
In this guide, you’ll learn which cameras work with Blue Iris, how to choose compatible models, how to add a camera step by step, and how to troubleshoot common connection and recording issues.
- What Is Blue Iris?
- What Cameras Work with Blue Iris?
- Does Blue Iris Use ONVIF or RTSP?
- 5 Key Features to Look for in the Best Blue Iris Cameras
- Best Reolink Blue Iris Security Cameras for Different Scenarios
- How to Add a Security Camera to Blue Iris?
- Troubleshooting for Blue Iris Cameras
- Frequently Asked Questions about Blue Iris
- Conclusion
What Is Blue Iris?
Blue Iris, or BI for short, is a popular video security and webcam software that enables people to remotely access and control their security cameras on personal computers, iPhones, or Android smartphones.
What Can Blue Iris Do with Security Cameras?
Blue Iris has many configurable options, including remote live view, playback, PTZ control, motion detection, audio recording, E-mail alerts, and many other functions.
With Blue Iris compatible cameras, you can keep tabs on your home and business, watch your kids & pets, and monitor your valuables via this professional software.
The advantages of Blue Iris mainly include:
- You can control multiple security cameras & systems simultaneously from various brands on Blue Iris.
- As an open platform, Blue Iris welcomes all companies and organizations.
- Blue Iris captures videos in various formats, including standard MP4, AVI, advanced DVR, and Windows Media.
Keep in mind that not every security camera is completely compatible with Blue Iris, you need to check the compatibility details or ask the security camera manufacturer before making a purchase.
What Cameras Work with Blue Iris?
Blue Iris works with many network cameras that provide a compatible video stream or third-party protocol. ONVIF and RTSP are two of the most important compatibility standards to check when choosing an Blue Iris IP camera.
Does Blue Iris Use ONVIF or RTSP?
Blue Iris can use ONVIF to discover and communicate with compatible IP cameras, while RTSP is commonly used to receive the camera's video stream. Depending on the camera and configuration, you may use one or both protocols when adding a camera to Blue Iris.
5 Key Features to Look for in the Best Blue Iris Cameras
Protocol Compatibility
A Blue Iris camera must support open video streaming standards—specifically ONVIF and RTSP—rather than proprietary, closed-cloud ecosystems.
-
ONVIF Support: Profile S and Profile T standards allow Blue Iris to automatically discover the camera, pull primary feeds, and handle PTZ or motion controls without custom configurations.
-
RTSP Streaming: Direct Real-Time Streaming Protocol (RTSP) access ensures the VMS can pull raw video directly from the local network without relying on third-party cloud middleman servers.
-
Compression Standards: Look for H.264 or H.265 video encoding. H.265 slashes bandwidth and storage requirements by roughly 50% compared to H.264, though it slightly increases host CPU decoding overhead.
Connection
Physical network connectivity directly impacts stream stability, latency, and overall network reliability.
- Power over Ethernet (PoE): Wired PoE IP cameras supply power and data over a single network cable. This offers stable 24/7 recording and eliminates Wi-Fi drops or wireless interference.
Resolution & Frame Rate
Higher specs do not always equal better security performance; balancing resolution and frame rate prevents storage and system bottlenecking.
-
Target Resolution: A 2K (4MP) or 4K (8MP) sensor provides sufficient pixel density to identify facial details or license plates.
-
Optimized Frame Rate: Capturing 15 to 20 frames per second (FPS) delivers smooth motion while keeping file sizes manageable. Running at a full 30 FPS consumes unnecessary bandwidth without adding meaningful security detail.
PTZ Control
Interactive pan-tilt-zoom capabilities and two-way audio broaden active coverage and immediate event response.
- ONVIF PTZ Controls: Pan-Tilt-Zoom (PTZ) models allow users to adjust the lens, pan the area, or trigger preset positions directly from the Blue Iris interface or mobile app.
Recording
Flexible recording features offload processing tasks from your main computer and provide backup safety nets.
-
Local Recording: Choose cameras whose streams write directly to local storage without re-encoding, minimizing host computer CPU utilization.
-
Onboard MicroSD Backup: Cameras with built-in SD card slots offer valuable edge redundancy. If the local network or VMS server briefly goes offline, the camera continues capturing footage locally to avoid missing critical events.
Best Reolink Blue Iris Security Cameras for Different Scenarios
Blue Iris compatibility varies by Reolink model and connection method. Many compatible wired and plug in WiFi cameras can connect through ONVIF or RTSP, while supported battery cameras may require a compatible Reolink Home Hub before they can integrate with third-party software. Check the specific camera's ONVIF/RTSP or Home Hub compatibility before setup.
Best 4K PoE Security Camera - RLC-811A
As one of the most popular and best 4K PoE cameras, RLC-811A can work seamlessly with Blue Iris software.
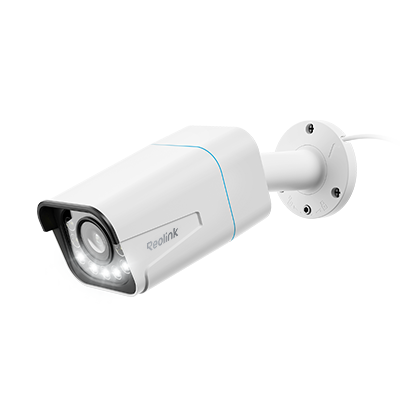
4K Smart PoE Camera with 5 Spotlights
4K 8MP Ultra HD Day & Night, Person/Vehicle Alerts, 5X Optical Zoom, Two-Way Audio, Built-in Siren, Color Night Vision, Live View Anywhere.
This camera features 4K 8MP ultra HD, enabling you to see details in the picture clearly. 5X optical zoom lets you check anything you like freely. Besides, RLC-811A can detect any person & vehicle and send instant alerts to your phone.
You can make use of almost all the functions of RLC-811A on Blue Iris software. Once you enter the IP address/port, Blue Iris can instantly pick up the camera.
This PoE camera can save you from messy hassles and bring solid security to your home. With rich features, it's at a reasonable price. If you want a 4K PoE camera for Blue Iris, give it a try.
Best Blue Iris Doorbell Camera - Reolink Video Doorbell WiFi
The Reolink Video Doorbell WiFi is a practical Blue Iris option for monitoring front doors, porches, and package-delivery areas. Its WiFi connection makes it suitable for locations where running an Ethernet cable to the door is inconvenient.
With ONVIF and RTSP support, the doorbell can be integrated with compatible third-party software such as Blue Iris for centralized live viewing and recording. Its tall field of view is also designed to capture visitors and activity around the doorstep.
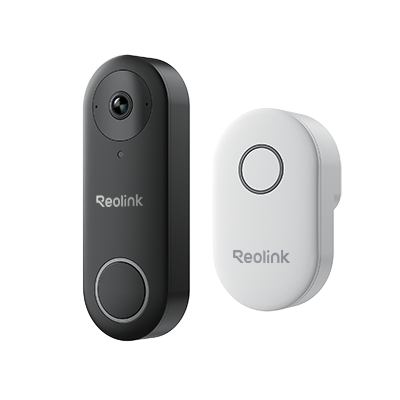
Smart 5MP Video Doorbell with Chime
5MP Super HD Day & Night, Person Detection, 2.4/5 GHz Dual-Band WiFi, 180° Diagonal Viewing Angle, Two-Way Audio, Rich Notification.
How to Add a Security Camera to Blue Iris?
Some people may have trouble adding a new security camera to Blue Iris. You can follow this step-by-step guide on adding IP cameras to Blue Iris and control your cameras like a breeze.
Here we’ll take the compatible Reolink cameras as an example, and the steps apply to other types of cameras that are compatible with Blue Iris.
Step 1. Initialize the camera settings
1). Add the camera to Reolink Client. You can add it by entering UID or IP/Domain address. Also, it will show you devices in the same LAN and you can click the “+” button to add it.
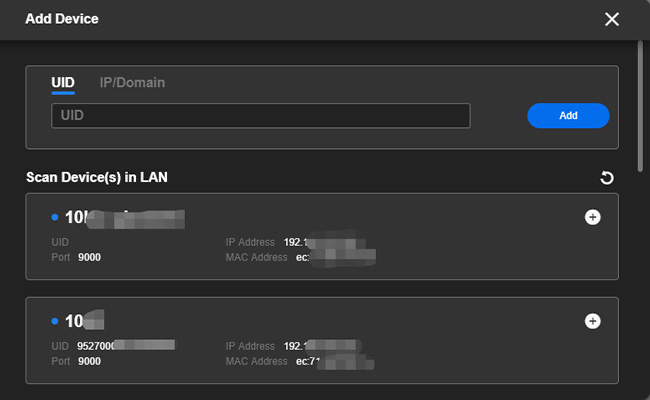
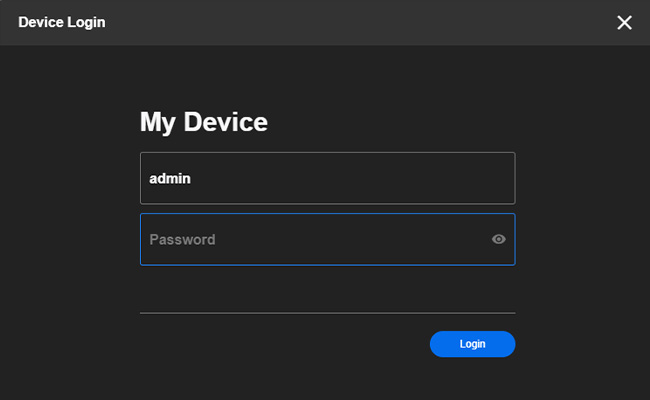
2). Set up User Name (the default user name is admin) & Password. Click Login.
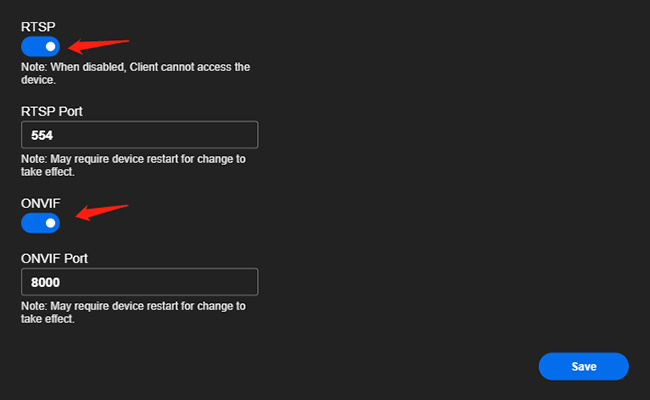
3). If you're going to use ONVIF or RTSP later on Blue Iris, you need to set the port first on Reolink Client.
Click Device Settings -> Network Settings -> Advanced. Find Port Settings and click Set Up. Enable RTSP and ONVIF, and then click Save.
Step 2. Add Reolink cameras to Blue Iris
This step is done on Blue Iris software, so you should launch Blue Iris on your PC or Mac first.
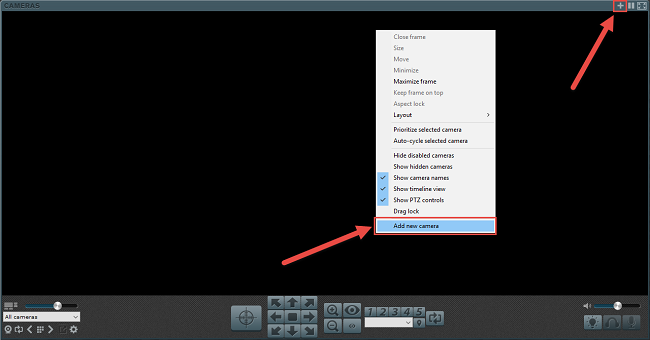
1). Click the “+” button at the top right, or right-click and select Add new camera.
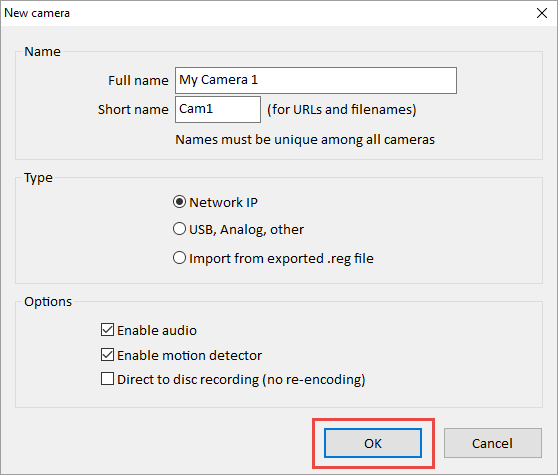
2). Input the camera name and choose Network IP as the connection type. Check Enable audio and Enable motion detector in the Options menu. Click OK to continue.
3). Input the IP address, the correct User Name, and Password. Click the Find/inspect… button to search the camera in LAN.
In the current window, you are gonna need to do several setup steps:
- Set Make to Reolink and choose the corresponding model.
- Change the Discovery/.. ort into 8000. (If you ever change RTSP or ONVIF port number, you should input the current value.)
- Click OK to finish adding the camera to Blue Iris.
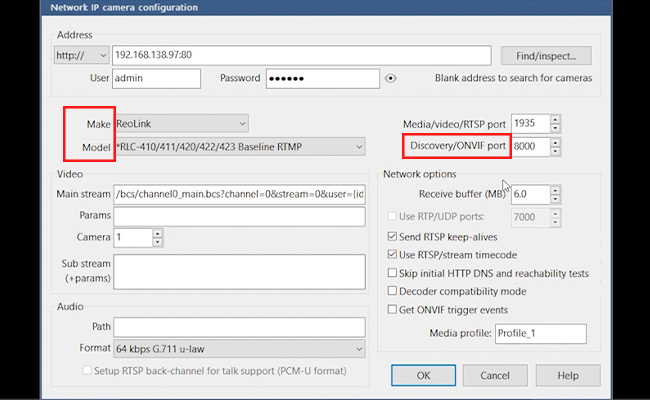
If the connection fails (there is a striped video signal), you can change the Make option to Generic/ONVIF and the Model will automatically change to RTSP H.264. Still, make sure the ONVIF port is 8000 (default number) or the current value if you ever changed it.
Here is a video to show you how to add Reolink cameras (exclude some cameras) to Blue Iris from the beginning to the end.
4). Configure PTZ security camera on Blue Iris.
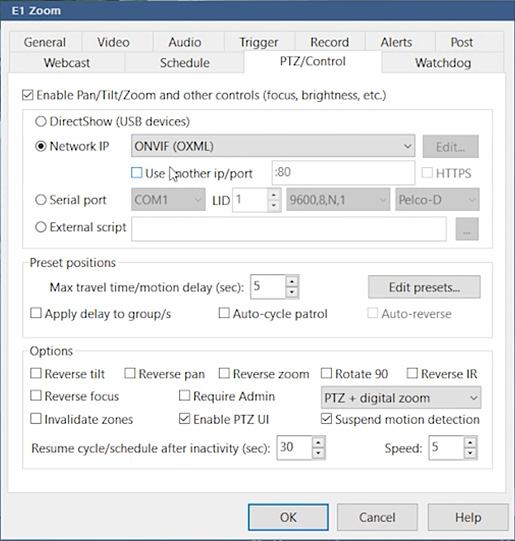
If you use Reolink PTZ security cameras, you can enable the PTZ function on Blue Iris by clicking the PTZ/Control tab and checking Enable Pan/Tilt/Zoom and other controls (focus. Brightness, etc.).
Don’t forget to set Network IP. Click OK to save settings.
Bonus tip: You can follow this step-by-step guide to call PTZ IP camera preset on Blue Iris.
Blue Iris Cameras Troubleshooting
Some of you, especially the beginners, may encounter various problems while using Blue Iris software. So we list the issues you care about most and offer the solutions that can help you use Blue Iris cameras better.
Blue Iris cameras recording issues
Here are some of the most typical recording issues that may happen to you when using Blue Iris.
- Issue 1. Blue Iris won’t record videos, both motion-triggered and continuous videos.
You can try the following methods.
-
Upgrade your Blue Iris to the latest version.
-
Make sure you’ve enabled the motion detection or 24/7 recordings on Blue Iris.
-
Turn on direct-to-disc recording.
- Issue 2. Blue Iris not creating new recordings for hours? What settings do I need to fix?
If you expect each motion-triggered video recording to be stored separately, please follow the below simple steps:
On the camera properties, please click Record tab, and then uncheck Combine or cut video each.
- Issue 3. How to record 24/7 with Blue Iris?
You can make your security camera record 24/7 on Blue Iris with the following steps.
-
Right-click the camera.
-
On the camera properties, click Record tab.
-
Select Continuous under Video.
How to set up motion detection and video recording on Blue Iris?
After you’ve added your camera to Blue Iris, you can follow the instructions below to set up motion detection.
Step 1. Click the camera icon  at the top/left of the Blue Iris window, and then click the Motion/Trigger tab.
Step 2. Check the required boxes, including Enable under Motion sensor, Object detection, Use zones and hot spot, High definition, Cancel shadows and Trigger using cameras’ digital input or motion, and then click OK.
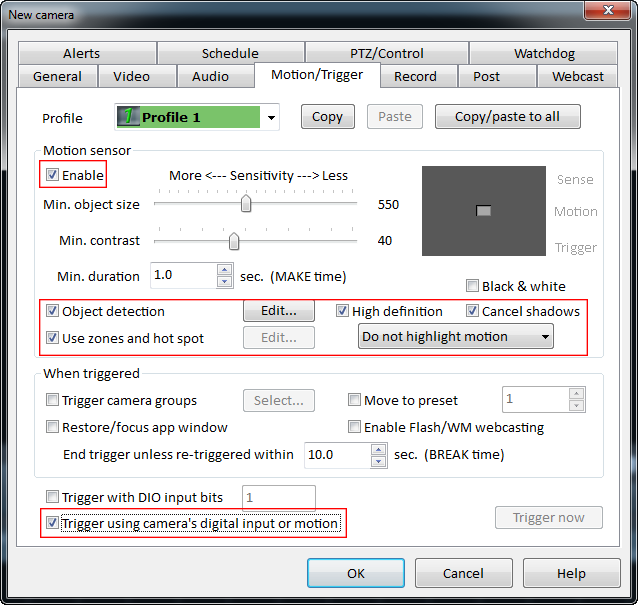
Step 3. Click the Record tab, and then check the required boxes including Video, JPEG snapshot each & Create Alert list images when triggered, and then click OK.
Now you can get motion detection recordings with the Blue Iris.
Blue Iris requirements and setup questions
According to Blue Iris’ team, the minimum requirements for your computer are:
- A dual-core or equivalent 2 GHz processor or better
- More than 2 GB RAM
- At least Microsoft XP SP3 or newer version, such as Window 7 & 10, or a server OS
- 1 or more cameras with DirectShow drivers
If you use multiple Blue Iris security cameras, such as 12, 16, 30, or even a maximum of 64 cameras, you need a much more robust computer. Recommendations include:
- Intel core i7 with QuickSync for hardware decoding
- More than 8 GB RAM
- Microsoft Windows 8.1 or 10, 64 bit
- NVIDIA graphics adapter for efficient screen display
- 7200+ RPM drives and/or SSD drive
In order to minimize your computer CPU consumption, you may set up the video frame rate to 15-20 fps.
NVR system V.S. Blue Iris + PC, which is better?
If you only need 2 or 3 IP cameras to run 24/7, and/or happen to have an extra computer, you can opt for Blue Iris + PC option.
Your computer storage space can handle several IP cameras recording continuously.
But if you want 4 or more cameras, a dedicated NVR would be the way to go.
Typically, the cameras and NVRs from the same brands can work seamlessly. All the videos will be stored on the hard disk of the NVR for your later playback.
If the storage space of the NVR is running out, it would automatically overwrite the oldest video footage, so you don’t need to delete the videos manually.
You can check more details on NVR vs PC for security camera video storage.
Frequently Asked Questions about Blue Iris
Here are some questions often asked by Blue Iris users. Now you can find the answers quickly.
How much does Blue Iris cost?
Blue Iris currently costs $99.95 for the Full license, which supports up to 128 cameras, or $39.95 for the LE license, which supports one camera. A software license includes one year of basic maintenance; optional maintenance plans are available afterward.
Can I use blue iris for free?
Yes, but only for a limited trial period. Blue Iris offers a free 15-day evaluation so you can test the software and camera compatibility before purchasing a license. Continued use after the trial requires a paid license.
How to view blue iris camera remotely?
You can view Blue Iris cameras remotely through its built-in web server (UI3) or the Blue Iris mobile app. After configuring remote access on your Blue Iris server, you can view live video, recordings, and alerts from a web-enabled device; the mobile app also supports functions such as PTZ control and two-way audio where available.
Conclusion
Blue Iris is one of the best professional software for security camera recording and monitoring. The best part of it is that it allows you to manage and control different models of various brands. Apart from that, the rich features of Blue Iris are another reason why so many homeowners love it.
If you have any problems with Blue Iris software or Blue Iris compatible cameras, feel free to discuss them in the comment below!
Search
Subscribe for the Latest Updates
Security insights & offers right into your inbox