IP Camera Network: Setup Steps, Top Picks & Network Troubleshoot

IP camera network setup can be confusing and technically demanding.
Good news is you don’t have to go through the pains of messing up with the IP camera network!
After consulting the security experts on IP camera network and a deep dive into various IP cameras’ networking process, here we’ve found the latest technology in IP camera network, which provides us the easiest way possible to set up security camera network.
Today let’s walk you through the IP camera network setup process with all the necessary steps so that you can view IP cameras outside your home network and inside, even if you have NO experience in computer networking.
It is easy and it won’t take long. I promise.
Additionally, we’ll also cover the IP camera network troubleshooting and top-rated security cameras that guarantee easy IP camera network connection, and pro tips about IP cameras on network.
Just leave a comment if there are more you want to know about the home security camera network.
- Part 1. IP Camera Network Basics (Important!)
- Part 2. How to Set up IP Camera Network for Cameras (Charts & Diagrams)
- Part 3. How to Set up Security Camera Network for Monitoring Devices (Video)
- IP camera network configuration steps
- Part 4. Top 3 PoE & WiFi CCTV Network Cameras
- Part 5. IP Camera Network Quick Troubleshooting
IP Camera Network Basics (Important!)
Actually, IP camera network setup is all about how to find IP cameras on network (WiFi or cellular network) locally and remotely via your phone, PC or tablet.
So basically, you need to deal with 2 things to set up IP camera network:
- Set up IP camera network for cameras so that they are able to send data out.
- Set up IP camera network for your devices so that they can receive data locally and remotely.
And accordingly, we’ll break the big IP camera network project down into two tasks (Part2 and Part3):
Attention: Not all phone or PC access to the network IP cameras is remote viewing. Actually, the remote or local viewing depends on whether you access the camera in the LAN or WAN.
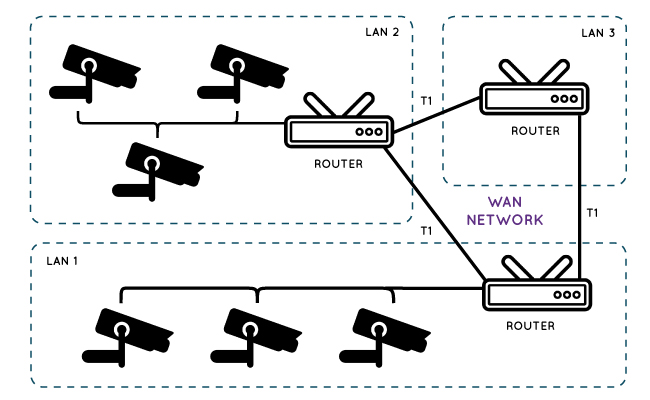
Set up IP Camera Network for Cameras (Wiring Diagram)
In fact, all IP network cameras depend on the router network, cellular network, or their own private network to send data out. And thus, IP camera network setup will differ among various cameras.
Home Router IP Camera Network Setup
You can set up the router IP camera network via either Ethernet cable connection (for traditional wireless cameras and wired cameras) or wireless connection (for wire-free cameras).
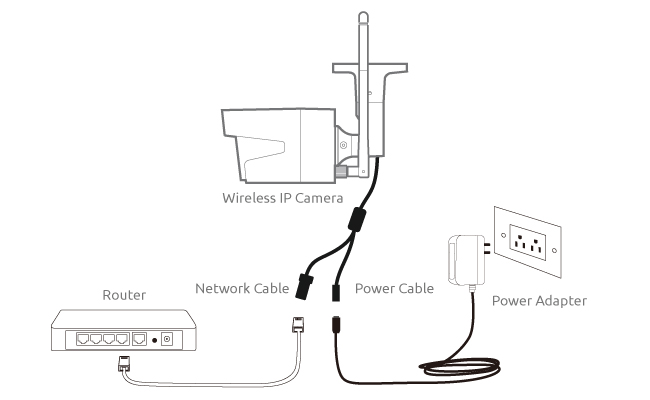 Reolink RLC-410W WiFi CCTV network diagram
(When the WiFi IP camera network setup is done, you are free to remove the Ethernet cable.)
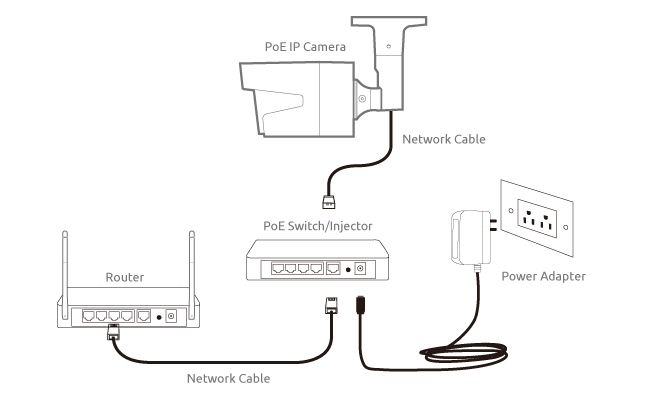 Reolink RLC-410 PoE IP camera network diagram
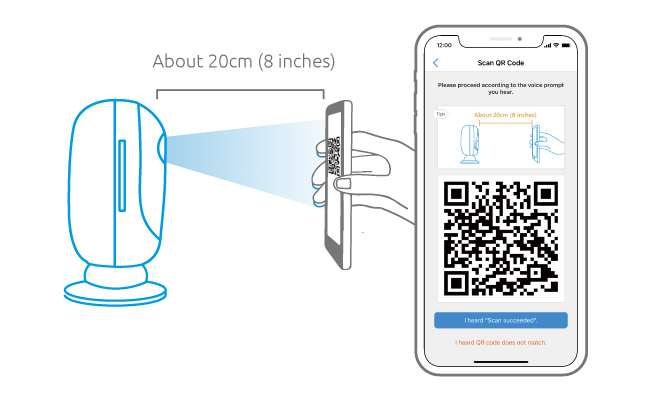 Reolink Argus 2 wire-free IP CCTV network diagram
Battery powered cameras link to the router wirelessly by scanning a QR code containing all the WiFi information. So they are highly recommended if you want no trouble at all in IP camera network.
Cellular IP Camera Network Setup
To build cellular IP camera network, you only need to prepare an SIM card, activate it and insert it into the 4G IP network camera. Then, your 4G camera is able to send out videos and images using cellular data. That’s to say, you can place it anywhere you like.
100% Wire-Free 3G/4G LTE Mobile Camera
No WiFi & Power Needed; Rechargeable Battery or Solar Powered; 1080p Full HD; Starlight Night Vision; 2-Way Audio; Live View Anytime Anywhere.
Private IP Camera Network Setup
IP network camera systems can set up their own proprietary network automatically. That’s to say, the IP network camera system (wired or wireless) will start to record and send data to the IP camera network video recorder (CCTV network DVR or NVR) once you power it up.
However, remember that you need to connect your wired or wireless network security camera system to a router if you need remote viewing, and monition detection alerts on your phone.
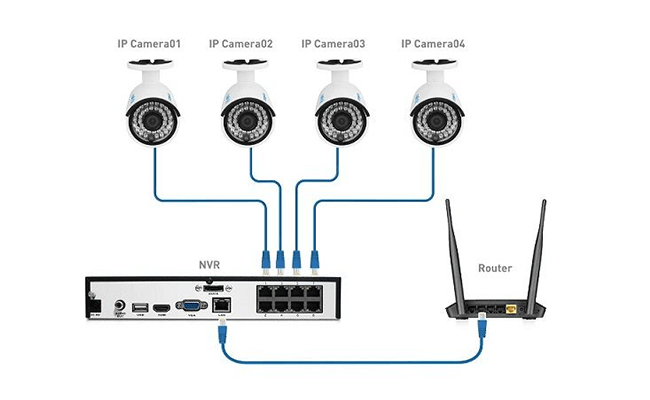 Reolink RLK8-410B4 CCTV network diagram
Set up IP Camera Network for Monitoring Devices
After you get IP cameras on network, your next step is to connect the monitoring devices to the network.
Just pay attention to the difference between the local and remote viewing (mentioned in Part 1).
And either way, the IP network camera and P2P (peer-to-peer) technology will provide you a shortcut.
Instead of managing the IP address things, you only need 3 steps to set up the IP camera network inside or outside your home by using P2P IP network cameras.
Otherwise, you have to learn to find IP cameras on network with the IP address and port forwarding.
IP Camera Network Configuration via P2P (Easiest Method)
Take the P2P camera Reolink Argus 2 as an example:
Step 1. Download the Reolink software to your phones or computers (Free download here).
Step 2. Launch the CCTV network software and enter a unique ID number (UID) to add the camera.

Step 3. Click the IP camera on network and you can view your CCTV network camera inside or outside the home network.
So that’s all for the IP camera network setup if you go with the IP network camera & P2P solution.
You can then freely access your IP camera on the local network, like watching your babies on the other room; or view IP camera outside the home network, like keeping an eye on your property when you are not home.
IP Camera Network Security Risks? No Worries!
Some of you may worry about the IP camera network safety risks with P2P technology. That’s unnecessary. Now many high-end models, like Reolink cameras, have adopted advanced encryption, such as SL encryption, WPA2-AES encryption and SSL-TLS enabled to make your surveillance camera network 100% safe!
IP Camera Network Configuration via IP Address
The IP address is only needed when you want to get the P2P IP camera network via web browsers, or your CCTV network camera is not P2P enabled.
And a correct URL is the key to it.
If you want to find IP cameras on network locally, just enter the IP address of your CCTV network camera on the web browser. Follow the video to connect the IP camera network via the browser.
If you want to view IP cameras outside home network remotely, then the right key to access the IP camera network will be “http://(wanip) : (httpport)”.
It’s just like you are going to find someone in a neighborhood, you’ll need his apartment number – that’s WAN IP, and his room number – that’s HTTP port number.
IP camera network configuration steps
1. Check the IP address of your IP network security camera.
Follow the video tutorial to get the CCTV network camera local address via software, or you may refer to the router configuration software and find a page that shows the IP addresses of attached DHCP clients.
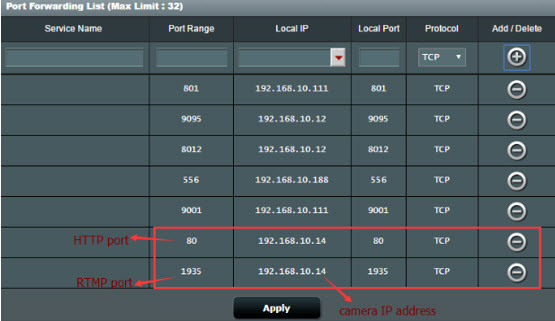
2. Find the “HTTP port” and “RTMP port” of your IP network camera.
Usually, there will be an IP camera network page on the default software displaying all the port setting information.
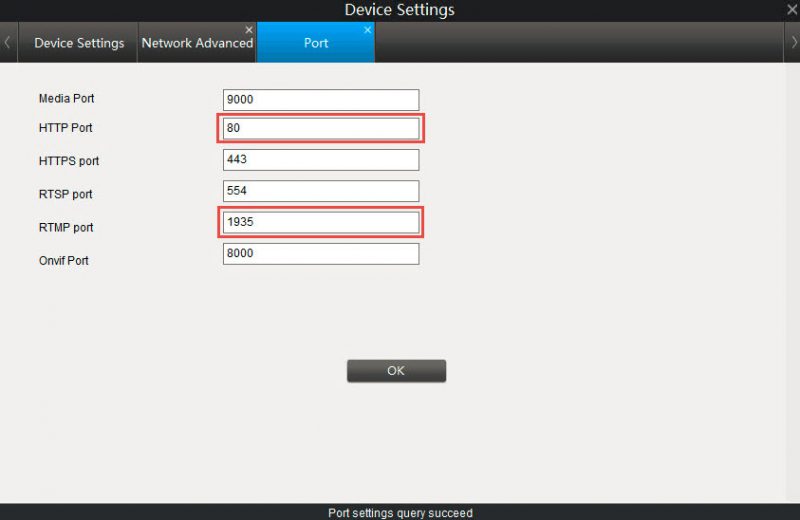
3. Forward the “HTTP port” and “RTMP port” to the camera’s IP address on the router.
You need to forward the HTTP port to find your IP network camera correctly and forward the RTMP port so that you can see the live streams wherever you are.
To set it up, just log into the web interface of your router and enter all the information required (usually the port and IP network camera IP address), like the screenshot shows.
4. Check the WAN IP address of your router.
Click here to check your current WAN IP address of your home network.
5. Enter the IP camera network URL address in the address bar.
So we collected the WAN IP and HTTP port information of your IP camera on network, just enter them on the address bar via the format “http://(wanip):(httpport)”.
For example, if your WAN IP address is 183.37.194.135, and the HTTP port is 805, the URL you enter on the web browser should be “http://183.37.194.134:805”.
Editors’ Note: The WAN IP address changes all the time. To save your trouble of checking the WAN IP address of your router every time, you may configure the DDNS (Click here for a quick setup).
Best Network Security Cameras
Apparently, the camera types make a big difference in the IP camera network configuration.
And here are 3 top selling P2P IP network cameras to serve all your security needs and avoid complex IP camera network, providing you easy remote viewing inside and outside home network.
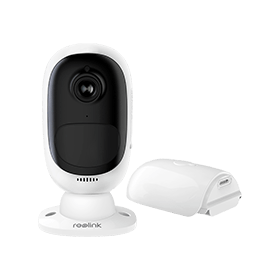
#1. Best Battery Powered IP Network CCTV Camera: Reolink Argus 2
If you want intuitively easy IP camera network in both design, configure, and remote viewing, this battery powered WiFi network surveillance camera should be your best choice. No messy cabling around your house.
100% Wire-Free Starlight Camera
Rechargeable Battery & Solar Powered; Outdoor/Indoor Protection; 1080 Full HD; Starlight Night Vision; 2-Way Audio; Live View Anytime Anywhere.
More great features you will like:
- P2P technology provides easy IP camera network setup.
- Rechargeable battery powered with 4-6 months’ battery life.
- Place & move the IP network security camera anywhere.
- Starlight night vision offers clearer night images ever, up to 33 feet.
- 1080p full HD images enable you to see plate number and face details.
- IP65 weatherproof for both indoor and outdoor monitoring.
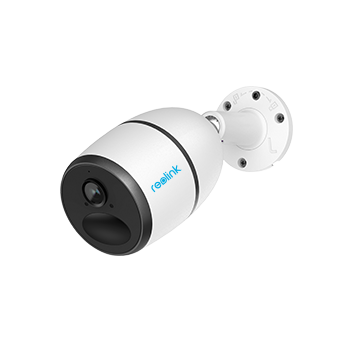
#2. Best Cellular IP Network Camera: Reolink Go
If there is NO WiFi IP camera network available in your monitoring area, and you want to keep your asset safe with remote viewing and push on your phone, then Reolink Go is a trouble free option!
It is easy to connect to IP camera network with NO wires and NO offline!
100% Wire-Free 3G/4G LTE Mobile Camera
No WiFi & Power Needed; Rechargeable Battery or Solar Powered; 1080p Full HD; Starlight Night Vision; 2-Way Audio; Live View Anytime Anywhere.
More great features you will like:
- Operates on the 4G mobile network, easy to setup & works anywhere.
- Rechargeable battery powered or solar powered.
- 100% wire-free. Works Independently with NO wire hassles.
- Up to 33 feet starlight night vision captures details in low light conditions.
- 1080p resolution provides you the clearest videos day and night.
#3. Best PoE IP Network Camera: Reolink RLC-410
If you prefer a wired IP camera network solution for 24/7 monitoring, Reolink RLC-410 is the one you can find with easiest home security camera network configuration.
More great features you will love:
- Industry-leading 4MP resolution for facial and plate number identification.
- Easy network connection, plug and play with IP camera network video recorder.
- 100 feet long range night vision keeps your home safe during the night.
- Accurate motion detection and push so you will not miss anything.
IP Camera Network Not Working Troubleshooting
Oftentimes, especially when you are using the non-p2p CCTV network cameras, you will come across the surveillance camera network not working problems, or you just can't find the IP camera on network.
And here we have summarized 6 common fixes to your IP camera network problems. Try them first and tell us if you need further help in the comment area.
#1. Check if the wireless security camera network antennas are fixed well or not.
#2. Check if the power supply of your IP camera on network is working properly.
#3. Check if the password is correct for the current IP camera network.
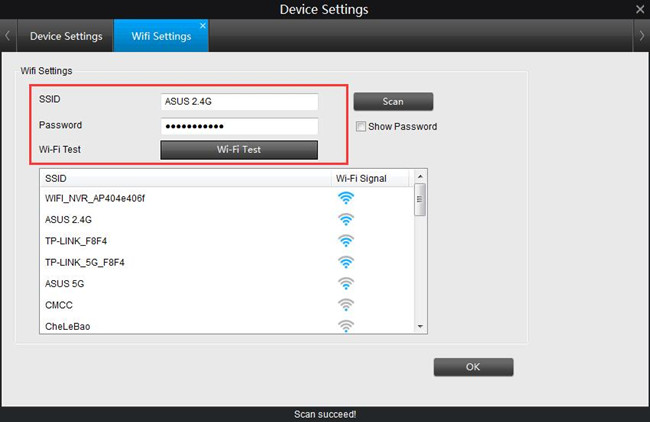
#4. Check the SSID in WiFi settings if you are using WiFi network security cameras. Make sure all the information is the same with your router.
#5. Check whether the port number of your IP network camera is unique if you are port forwarding the cameras to your router. Note that you can’t access two IP cameras from the Internet when they share the same port number.
#6. Update firmware and software for your IP camera on network.
If you have any confusion about these solutions, you may refer to our previous post for full explanations.
Search
Subscribe for the Latest Updates
Security insights & offers right into your inbox

