How to Remove a Device from Google Account: Simple Steps to Follow

Over the years and with the use of Smartphones, tablets, computers, and other Internet-enabled devices, it is not unusual for Google users to have a long list of devices associated with their account.
But for privacy, security, and overall management of the account, it is crucial to clean, or in this case, purge this list of outdated or unused devices. In this guide, we will explain step-by-step instructions on how to remove a device from my Google account and how you can remove devices from Google account via web or mobile.
- Why Need to Remove Devices from Google Account
- How to Check Your Connected Devices to Google Account
- How to Remove a Device from Google Account on Desktop
- How to Delete Device from Google Account via Mobile
- How to Remove a Google Account from a Device
- Bonus Tips: How to Remove Devices From Google Home
- FAQs
- Conclusion
Why Need to Remove Devices from Google Account
You do not want to have a lot of old and unused devices linked to your Google account because they just pose security threats and privacy issues which are not good. Here are some of the key reasons you should take the time to clean up your connected devices list:
- Prevent account hijacking – If you were logged into a device that you used to create an account and later lost or stolen, someone else will gain access to your account. This risk is minimized by deducing out-of-use devices.
- Disable synchronization – Any Google-related service such as Gmail, Drive, Chrome, etc., will in their default settings, synchronize data with connected devices. Erasing the devices halts this irrelevant syncing.
- Bolster privacy – Google may use data from the linked devices to target advertisements and services to its users. In my opinion, pruning devices give you have the ability to control your privacy.
- Eliminate connection issues – As pointed out earlier, there are instances when having many connected devices can lead to account syncing issues. To address this, the use of the option to delete devices can assist.
For both security and convenience, it is beneficial to periodically reflect and make alterations to the list of connected devices and remove those that are no longer relevant.
How to Check Your Connected Devices to Google Account
Before removing any devices, you'll first want to view your full list of connected devices. Here are the detailed steps:
- On your computer, go to the Google Account homepage by clicking on your profile icon in the top right corner of any Google page, then selecting "Manage your Google Account".
- On the left sidebar menu, click on "Security". This will open your account security settings.
- Under the "Devices you trust" section, you will see the full list of devices connected to your Google account. For each device, it will display the device name/model, last sync date, and approximate location.
- Carefully review the full list, taking note of any devices you no longer own or use. These will be devices to remove from your account.
- You can also view connected devices on mobile. Open the Google app, tap your profile icon, select "Manage your Google Account", then "Security", and finally tap "Devices you trust" to see the list.

How to Remove a Device from Google Account on Desktop
Now that you know how to view your connected devices list, it's time to actually remove the old and unused ones. Here is the process for removing devices from your Google account on a computer:
- Go to the "Security" page in your Google account settings.
- Locate the device you want to remove under "Devices you trust."
- Click on the three-dot menu icon next to the device name, then select "Remove."
- Google will ask you to confirm removal of the device. Click on "Remove" again.
- The selected device will now be removed from your Google account.
- Repeat steps 2-4 for any other devices you want to delete by removing trust.
- Once done, recheck your devices list to confirm the removed devices no longer appear.
Following these steps allows you to easily prune and declutter your connected devices list from a desktop computer.
How to Delete Device from Google Account via Mobile
You can also quickly delete devices from your Google account right from your phone or tablet. Here are the steps:
- Open the Google app and tap on your profile icon in the top right corner.
- Tap on "Manage your Google Account."
- On the menu, tap on "Security."
- Under "Devices you trust," tap on "Devices you trust" again.
- This opens your full list of connected devices. Find the device you want to remove.
- Tap on the three-dot menu icon next to the device name, then tap "Remove trust."
- Confirm removal by tapping "Remove" on the pop-up prompt.
- The device will now be deleted from your Google account.
- Repeat steps 5-7 to remove additional devices as needed.
With just a few taps, you can easily prune your connected devices list from mobile.
How to Remove a Google Account from a Device
So far this guide has focused on removing devices from your Google account. But what if you want to delete your Google account entirely from a specific device, like an old phone? Here are the steps of how to remove my Google account from a device:
- On the Android device, open "Settings."
- Tap on "Accounts."
- Tap on the Google account you want to remove.
- Tap on "Remove account."
- Confirm removal by tapping "Remove account" again.
- Enter your Google account password then tap "Remove account."
- Your Google account is now deleted from that device.
Just be aware that removing your Google account means you'll lose access to any Google apps and services synced to that device, like Gmail, Calendar, Drive, etc. But for an old device you no longer use, this account removal cleans things up.
Bonus Tips: How to Remove Devices From Google Home
Google Home smart speakers can accumulate quite a list of "linked" devices over time. Here are some quick tips for removing devices from Google Home:
- Open the Google Home app and tap your account icon to access settings.
- Select "Assistant settings" then choose "Devices."
- Tap into any device you want to remove.
- Tap the three-dot menu and select "Remove device."
- Confirm removal by tapping "Remove device."
- The device will be deleted from your Google Home app and no longer linked.
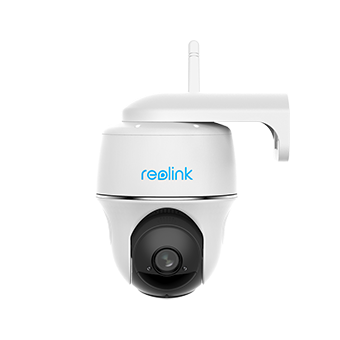
Many smart home devices, including security cameras, are compatible with Google Home Assistant. By connecting cameras to Google Home, you can enjoy hands-free control and view real-time live feeds on your Google tablets. One recommended option is the Argus PT, a 2K+ 5MP camera with pan and tilt capability that works with both Google Home and Amazon Alexa.
100% Wire-Free PT Camera
2K+ 5MP Super HD; 5GHz/2.4GHz WiFi; Rechargeable Battery & Solar Powered; 355° Pan & 140° Tilt; IP65 Certified Weatherproof; Color Night Vision; 2-Way Audio; 122° Wide Viewing Angle.
Frequently Asked Questions
How do I remove all old devices at once from my Google account?
Unfortunately, Google doesn't provide a "remove all" option for connected devices. You have to delete them one-by-one using the steps provided in this guide. So removing many devices can take some time, but it's worthwhile for account security.
What happens when I remove a device from my Google account?
When you delete a device from your account, all Google services like Gmail, Calendar, Drive, etc. will stop syncing data to that device. The device will no longer appear in your connected device list. If it's an Android device, your Google account will be removed entirely from it.
Conclusion
In general, managing Google account-associated devices, and removing unused ones from the list is a good practice, which is not given enough attention. This guide has described the steps for how to open the connected devices list and how to also remove devices that are no longer in use whether through desktop or mobile.
Spending more time organizing your account reduces the chances of exposing your personal information to the public. But, again, be careful not to delete any device you still have active use for!
Search
Be in the Know
Security insights & offers right into your inbox

