Can You Cut LED Light Strips? What to Know Before You Try
LED strip lights have gained immense popularity recently for their versatility and ability to transform any space with vibrant and customizable lighting. Whether you want to add accent lighting to your home, enhance your car's interior, or create eye-catching displays, LED strip lights offer a cost-effective and energy-efficient solution.
But can you cut LED light strips to fit specific lengths or shapes. In this article, we will provide you with essential insights on cutting them to size without causing any damage. Keep reading!
Can You Cut LED Light Strips? Where to Cut?
Yes, you can cut LED light strips, but only at the designated cut points printed on the strip. Cutting in the wrong place may damage the circuit and cause part of the strip to stop working.
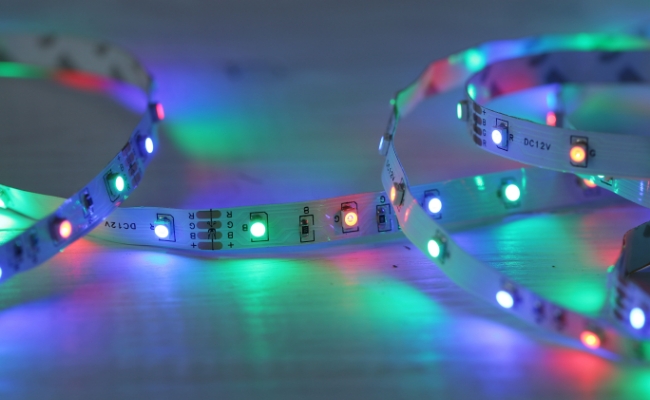
To find the correct cutting position, check the strip closely. Most LED strips include clear markings every few inches:
Scissor icon: Many LED strips print a small scissors symbol to indicate safe cutting points.
Copper pads/solder points: You will see copper oval or rectangular pads, usually connected by a line in the center.
Always cut through the middle of the copper pads. This keeps enough contact area on both sides, allowing the strip to continue working and making it easier to reconnect later with connectors or soldering.
How to Cut an LED Light Strips? Step-by-Step Guide
Before cutting the LED strip, ensure it's suitable for cutting, as doing so with an incompatible strip can ruin it. Also, remember to disconnect the power supply to avoid any hazards. First, let's discuss the necessary tools.
1. Prepare for Essential Tools
- Ruler or measuring tape
- Fine-tip marker or pencil
- Sharp scissors or LED strip-cutting tool
- Soldering iron and solder (optional, if reconnection is needed)
2. Disconnect the power
Unplug your light strips from the outlet. Always make sure they’re completely disconnected from any power source before you begin.
3. Measure the length
It's important to measure the strip light carefully to ensure precision in achieving the desired length. This precaution helps avoid the risk of over-cutting and potentially damaging the strip light.
4. Find and mark the cut points
Identify the copper section on the strip light closest to where you intend to cut. If this area has marked cut lines or features a scissor symbol, employ scissors to make a precise and careful cut along the designated line. In the absence of these markings, exercise extra caution to ensure a clean, even cut down the center, ensuring that both ends maintain an equal amount of copper.
5. Cut with a pair of scissors
The last step involves using scissors to trim any excess strips. It's crucial to cut in a straight line, as a diagonal cut can disrupt the light's functioning.
Common Mistakes to Avoid When Cutting LED Light Strips
Cutting LED light strips is simple, but a few mistakes can damage the strip or affect lighting performance. Here are the most common issues to avoid:
Cutting outside the designated points: Always cut at the marked cut lines, usually indicated by scissors icons or copper pads. Cutting elsewhere can break the circuit and stop the strip from working.
-
Damaging LEDs or circuits: Use sharp scissors and cut carefully to avoid damaging nearby LEDs, solder joints, or internal wiring.
-
Causing uneven lighting: Incorrect cuts may lead to dim sections, color inconsistencies, or non-working segments.
-
Ignoring power requirements: After cutting, each section may need its own power connection. Longer runs may also require additional power injection to maintain brightness.
LED Light Strips That Should Not Be Cut
Not all LED strips are designed to be cut.
RGBIC LED strips are the most common example. They use independent IC chips to control different sections of the strip, allowing multiple colors to appear simultaneously. Cutting these strips may damage the control circuit and cause sections to malfunction.
Similarly, some addressable LED strips with IC chips placed at intervals should not be cut unless the manufacturer specifically states they are cuttable.
How to Reconnect Cut LED Strips?
After effectively cutting your LED light strip, you can reconnect them for various purposes, such as extending the length or creating corner joints. Here, we'll outline the straightforward steps for reconnecting cut LED strips.
-
Please choose the type of connector you wish to use. You can use different types of connectors, such as Four pin connector, T connector, Connector wire, and L connector.
-
Identify the location where you cut the strip and then carefully peel back approximately 1 cm of the adhesive backing from that point on the flex. This will ensure a better fit when inserting the strip into the connector.
-
Carefully insert the cut end of the strip into the connector, ensuring that all the copper dots are fully seated.
-
Gently snap the connector shut, taking extra care if there is an LED near the connection point to avoid applying excessive force and potentially damaging the LED. If the connector's locking mechanisms do not click into place, you can use needle-nose pliers to secure them.
-
Plug in the strip and turn it on to check if it functions correctly. If the lights do not turn on, there may be an issue with the cut or how you reconnected the strips.
FAQs
If you cut led lights will it still work?
You can cut LED light strips and ensure they still work. But you need to cut at designated cutting points. It's crucial to follow the manufacturer's instructions and handle the cutting and connections carefully to avoid any issues. If you're not comfortable with DIY electrical work, it's advisable to consult a professional or follow specific installation guidelines provided with the LED strip.
What part of an LED light strip can you cut?
You’re able to cut an LED strip at its designated cut marks, which are usually placed between copper pads and clearly shown with a scissor icon.
How do I know if my LED strip is cuttable?
You can tell if an LED strip is cuttable by looking for designated cut marks, usually located between sets of copper pads. These points are often marked with a small scissor icon. If your strip has these visible cut lines, it’s safe to trim at those spots—but avoid cutting anywhere else, as it may damage the strip or prevent it from working properly.
Do LED lights affect circadian rhythm?
The proportion of N3 sleep was lower under LED light exposure (LE) compared with OLED LE. Blue light has been shown to suppress melatonin production, which may interfere with circadian rhythms and affect sleep patterns [18,19]. In a study by Brainard et al. [3], exposure to 460 nm light at an intensity of 12.1 μW/cm² for two hours reduced melatonin levels by approximately 60%.
Conclusion
Cutting LED light strips is a practical way to customize your lighting to fit your needs and design preferences. However, it's crucial to follow the guidelines and recommendations provided by the manufacturer to ensure that you do it safely and without damaging the lights.
If you like this article and find it helpful, share it with your friends. Got something to say about LED strip lights? Make sure you leave a comment below!
Search
Subscribe for the Latest Updates
Security insights & offers right into your inbox