Understanding QNAP Security Cameras: Benefits, Limitations, and Setup Guide
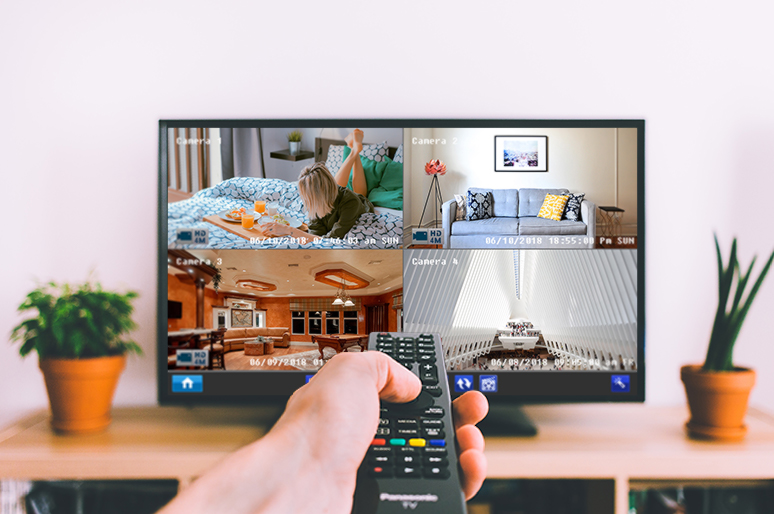
Running QNAP IP cameras means that you can integrate and record security cameras from multiple brands in a single system.
Sounds great, right?
But you may bump into these questions when you are looking for IP cameras for QNAP, like:
Which IP cameras are compatible with QNAP? How to connect IP cameras to QNAP?
This post has covered all the answers to the questions above and if you are planning to buy QNAP IP cameras, read and learn everything you need to know!
What is QNAP Security camera?
QNAP security cameras are network cameras compatible with QNAP's network-attached storage (NAS) systems. These cameras are used for surveillance and security purposes, allowing users to monitor and record video footage over an IP (Internet Protocol) network.
QNAP, primarily known for its NAS devices, provides a Surveillance Station application that can be installed on their NAS. This software allows you to connect and manage multiple IP cameras, offering features like live monitoring, recording, playback, and event management. QNAP's system supports various IP camera brands and models, allowing for flexible and scalable surveillance solutions.
In essence, a QNAP IP camera isn't a specific camera brand or model but refers to any IP camera that can be integrated with QNAP's NAS and surveillance solutions.
Benefits & Limitations of QNAP Security Cameras
Benefits for You to Apply Security Cameras for QNAP
- QNAP cameras from multiple manufacturers can work together in a single system and hence, you don’t have to worry about the security camera compatibility issues. By checking the QNAP IP camera list, you may confirm whether your security cameras are QNAP compatible or not.
- QNAP camera recordings will be stored in a dedicated storage space, which ensures no data loss and no performance interference.
- QNAP systems for IP cameras are expandable and you can develop the systems with up to 128 channels so as to run QNAP IP cameras at home, in SME or big enterprises.
Limitations that You Will Meet When Using QNAP Security Cameras
- Adding extra IP cameras for QNAP to the systems requires further fees. In general, QNAP systems offer a limited number of free security camera channels and you need to buy additional licenses for each extra camera.
- There are multiple system models for QNAP IP cameras to work with. It could be a little frustrating for beginners to pick out the right models and you may need to ask the in-house professionals to help.
How to Connect IP Cameras to QNAP?
QNAP security camera setup seems to be a headache for many of you.
Don’t be worried…
With the detailed guide below, you are able to connect IP cameras to QNAP on your own in a breeze.
Step 1. Figure Out the IP Addresses
To connect IP cameras to QNAP successfully, first off, you need to make sure that your computers, QNAP IP cameras and the NAS are connected to the same router in LAN.
Therefore, it is of vital importance for you to assign fixed IP addresses for QNAP NAS and QNAP CCTV cameras.
Here is an example:
The LAN IP of the router: 192.168.1.100
QNAP security camera 1 IP: 192.168.1.10 (fixed IP)
QNAP security camera 2 IP: 192.168.1.20 (fixed IP)
QNAP NAS IP: 192.168.1.30 (fixed IP)
Step 2. Launch QNAP Surveillance Station and Add QNAP Cameras
Download the software from QNAP APP Center and select Camera Configuration – Add to link security cameras to QNAP.
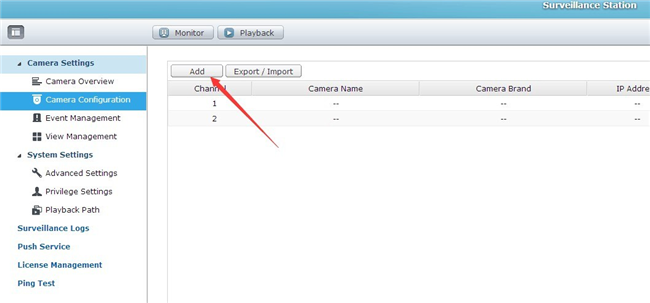
Step 3. Follow the Wizard to Finish QNAP Security Camera Video and Schedule Settings
#1. Do not click Search camera(s) automatically.
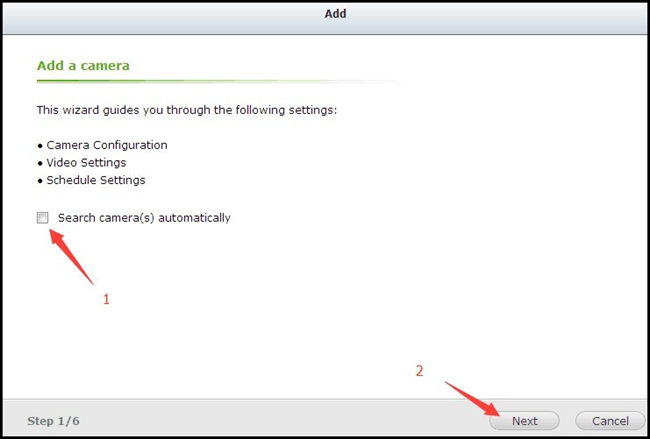
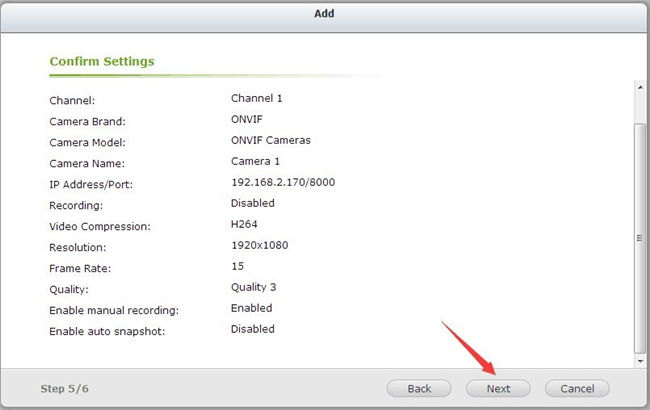
#2. Fill in the information as followed and double-check the info, especially the Port and the IP addresses of QNAP IP cameras.
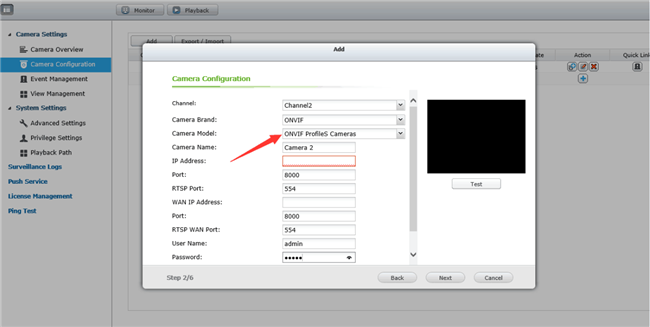
Take Note: The Port is “8000” for most of the QNAP security cameras.
#3. Select video settings in accordance with your needs.
At this step, you can adjust the resolution and frame rate (frames per second) so that the QNAP IP cameras won’t take up much bandwidth and storage space when recording.
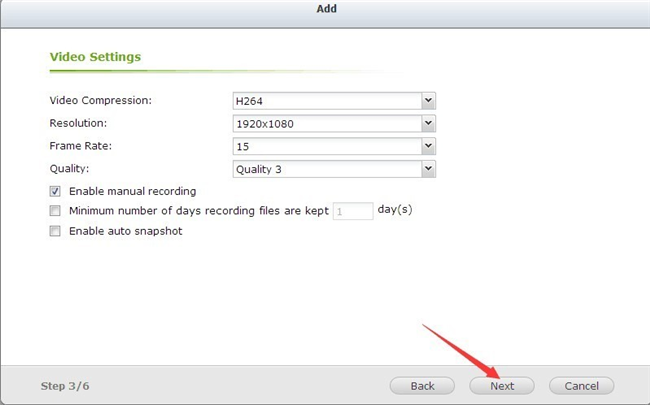
#4. Plan your own recording mode and activate it.
For example, you can set up IP cameras for QNAP to record at night only or while you are away in order to make full use of QNAP NAS storage space.
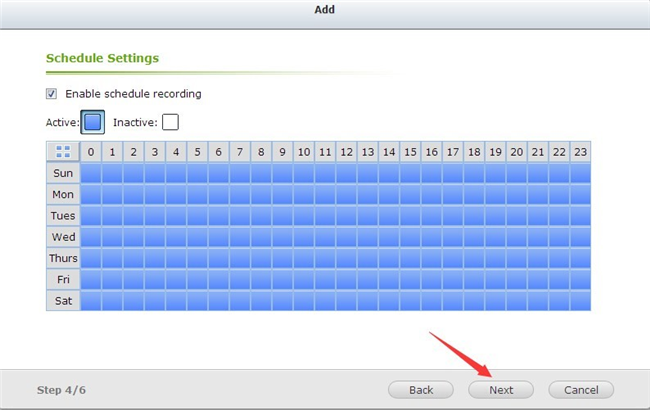
#5. Confirm all the information to finish the setting.
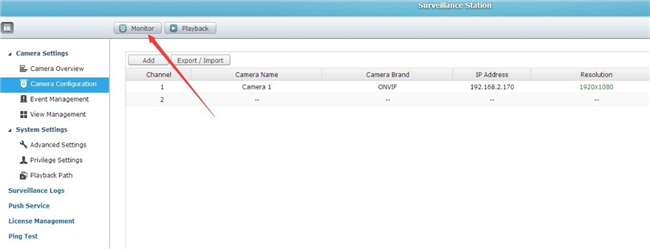
Step 4. Click Monitor to Watch Live View
If you are able to preview videos at this stage, you have connected QNAP generic IP cameras successfully.
Bonus: If you want to setup motion recording of QNAP IP cameras in the system, you may check here and learn to configure in a flash.
Top Picks of the Best QNAP Security Cameras
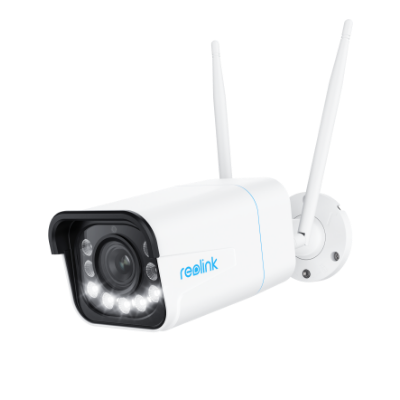
Most Versatile Outdoor PoE Camera with QNAP: Reolink CX810
Featuring sharp images, outstanding night vision and easy PoE configuration, Reolink CX810 is able to secure your home or business in a simpler way.
You may connect a number of these QNAP PoE cameras and build a more comprehensive security system to monitor your home and business with non-stop monitoring.
Innovative Outdoor WiFi Camera for QNAP: Reolink RLC-811WA
If you prefer wireless QNAP cameras, Reolink RLC-811WA will be your ideal option with dual-band WiFi operation.
4K WiFi 6 Security Camera with Night Vision
4K 8MP Ultra HD, Dual-Band WiFi 6, Color Night Vision, 5X Zoom, Smart Detection, Two-Way Audio, Built-in Siren.
Alternative Solutions for You to Run QNAP Security Cameras
In addition to running QNAP IP cameras, you can monitor your home and business with all-in-one security solutions, which may free you from configuration burdens.
Here are some of the solutions.
Apply a Set of Security Camera Systems Rather Than Single IP Camera for QNAP
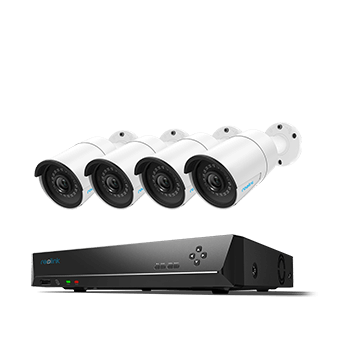
Generally speaking, a set of IP camera systems, like Reolink RLK8-410B4, come with several security cameras and an NVR of certain channels. By connecting the QNAP IP cameras to the NVR and power both on, you are able to record these security cameras to the NVR with or without the Internet.
These scalable security camera systems, with unlimited licenses, allow you to add or remove security cameras freely. Moreover, some top security system manufacturers also offer free software for you to watch live view and play back recorded videos.
Phrased differently, you don’t have to spend money on additional QNAP IP camera licenses if you have applied these security camera kits.
8-Channel PoE Security System
4 pcs 5MP/4MP Security Cameras; 2TB HDD 8-Channel NVR for 24/7 Reliable Recording; Plug & Play; 2 Network Solutions.
Save Images and Videos of QNAP Security Cameras to SD Cards, FTP servers or Cloud
Supposed that you are running a small amount of IP cameras for QNAP to monitor your renting rooms or camping sites, you may record the security cameras to SD cards locally or upload the recordings to FTP servers or Cloud.
By doing so, you don’t need to purchase QNAP NAS for IP cameras and their licenses.
FAQs
1. Can I Connect a Monitor to My QNAP NAS NVR for QNAP IP Camera Live Views?
Of course, yes.
You can directly connect the QNAP NAS NVR for IP cameras to a monitor with an HDMI or VGA cable. In this way, you are able to enjoy multiple live views of QNAP IP cameras and configure the security cameras effortlessly on a screen without accessing web browsers.
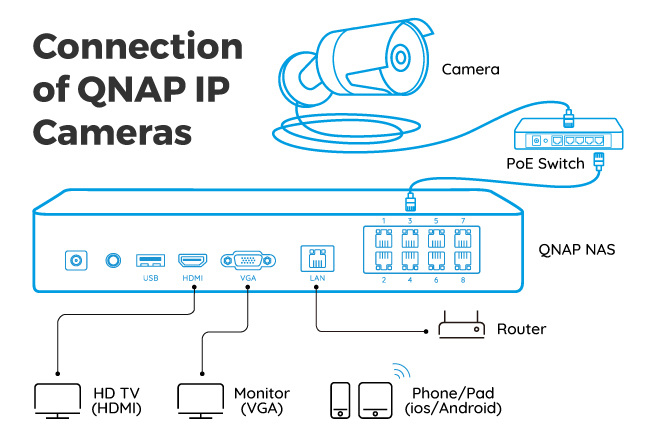
You need to confirm which type of cables, HDMI or VGA, your QNAP NAS NVR enables and also prepare a mouse first. Also remember to power on the monitor and you are ready to view the QNAP IP cameras on a local monitor.
2. How to Make the Most of QNAP NAS Storage Space?
This is quite similar to saving CCTV storage space.
Feasible solutions include applying H.264 QNAP IP cameras and adjusting their recording modes to motion recording.
Moreover, you may lower the FPS of the QNAP home security cameras so that they won’t take up much bandwidth and storage space.
Conclusion
QNAP IP cameras offer a versatile and scalable surveillance solution suitable for various environments. By understanding their compatibility, benefits, limitations, and following the step-by-step setup guidance, you can effectively integrate and maximize the potential of QNAP security cameras.
Search
Subscribe for the Latest Updates
Security insights & offers right into your inbox

