How to Remove Camera Lens Protector: Step-by-Step Guide
Protecting your camera lens from scratches, cracks, and other damages is essential for preserving the quality of your photographs. One of the most common ways to do this is by using a camera lens protector. However, there may come a time when you need to remove the protector, whether it's due to replacement or cleaning purposes.
In this article, we will provide you with a comprehensive step-by-step guide on how to remove camera lens protectors, specifically focusing on iPhone models and security cameras.
Overview of Phone Camera Lens Protector
A camera lens protector is a thin, transparent film or glass cover designed to protect your camera lens from scratches, dust, and other potential hazards. These protectors are available in various materials, such as tempered glass, plastic, or hydrogel. Some common types of camera lens protectors include:
- Tempered Glass Protectors: Highly durable and scratch-resistant, these protectors offer excellent protection for your camera lens.
- Plastic Film Protectors: Affordable and easy to apply, plastic film protectors provide basic protection against scratches and minor impacts.
- Hydrogel Protectors: These protectors are self-healing, meaning they can automatically repair minor scratches and blemishes.
How to Remove Camera Lens Protector?
Removing a camera lens protector is easier than you might think. Follow these detailed steps on how to take off camera protector. These instructions can be applied to a variety of devices.
Step 1. Clean the protector
Gently wipe the camera lens protector with a microfiber cloth to clear away dust and debris that could damage the lens during the process.
Step 2. Warm your adhesive
Set your hairdryer to low or medium heat. Hold it about 6 to 8 inches away from the lens protector and move it in a circular motion for 10–30 seconds to soften the adhesive. Remember not to use excessive heat. You can also use a heat gun, but be careful with the temperature.
Step 3. Remove the protector
Insert a plastic pry tool, guitar pick, or even your fingernail into the corner of the protector. Gently lift and peel the protector off the lens.
Step 4. Clean the lens after removal
After removing the camera lens protector, use a microfiber cloth with a small amount of isopropyl alcohol to gently clean any sticky residue from the lens.
How to Remove iPhone Camera Protector?
Removing a camera lens protector from your iPhone can be a delicate process, but with the right techniques, it can be done safely and effectively. Here is how to remove iPhone camera lens protector:
Step 1. Power Off Your iPhone
Before proceeding specific methods on how to remove camera lens protector iPhone, turn off your iPhone to avoid any accidental button presses or touchscreen interactions during the removal process.
Step 2. Use Microfiber Cloth for Cleaning
Gently wipe the surface of the lens protector with a clean, soft microfiber cloth to remove any dust or debris. This will ensure a smooth and lint-free removal. It is an essential step when it comes to how to remove individual camera lens protector iPhone.
Step 3. Use Hairdryer to Warm Up the Adhesive
Carefully warm up the adhesive on the lens protector using a hairdryer set to a low or medium heat setting. This will help loosen the adhesive and make it easier to remove the protector without damaging the lens.
Step 4. Insert a Pry Tool
Use a plastic pry tool or a thin, non-metallic object to gently lift one corner of the lens protector. Be careful not to apply too much pressure, as this could scratch the camera lens.
Step 5. Take off the Protector Slowly and Steadily
Once you've lifted a corner, continue to peel off the protector slowly and steadily. Avoid sudden movements or excessive force, as this could damage the lens or leave behind residue.
Step 6. Clean Residue of the Protector
After removing the protector, use a microfiber cloth and a small amount of lens cleaning solution to gently wipe away any remaining adhesive or residue from the camera lens. So, this is how to remove phone camera lens protector.
Note: These steps apply to most iPhone models, including the iPhone 11, 12, 13, and 14, among others.
Tips on How to Remove Camera Lens Protector iPhone 14
Using a lens protector is one of the most effective ways to safeguard the iPhone 14 lens, as it, like any smartphone camera lens, can be vulnerable to damage if not properly protected and maintained. Here is how to take off a camera protector from iPhone 14.
- Clean your hands before starting. Ensure your hands are clean and dry to prevent fingerprints or smudges on the lens.
- Turn off your iPhone 14 to avoid accidental touches.
- Identify the edge of the lens protector.
- Use a plastic card or your fingernail to lift the edge of the protector.
- Slowly peel off the protect after you've lifted the edge.
- Clean the lens after taking the camera protector off.
Tips for Protecting Camera iPhone Camera
You can also use these tips to protect your iPhone camera, so you won't have to worry about the somewhat complicated process on how to get iPhone camera protector off.
- Buy a Protective Case: If you don't want to use a professional lens protector, choose a protective case. These cases shields the entire phone, including the camera, from drops and bumps.
- Regularly Clean the Lens: Clean your phone camera lens regularly. This can keep the lens clear of fingerprints, dust, and smudges.
- Don't Place Your Phone with Sharp Objects: Put your phone away from keys, coins, or other sharp objects.
- Keep your Phone out of Direct Sunlight: Extreme hot or cold weather may also damage your iphone camera. Keep your phone out of direct sunlight and avoid leaving it in very hot or cold environments.
Bonus: Best Security Camera with Multiple Lens
Reolink, a renowned brand in the security camera industry, offers a remarkable product called the Argus Track – a 4K dual-lens Wi-Fi solar/battery camera with auto-zoom tracking capabilities.
The Argus Track boasts an impressive 4K 8MP Ultra HD resolution, ensuring crystal-clear video footage. Its pan, tilt, and 6X hybrid zoom features allow you to capture detailed close-ups of any area of interest, while the wide-angle lens provides a comprehensive overview of the entire scene.
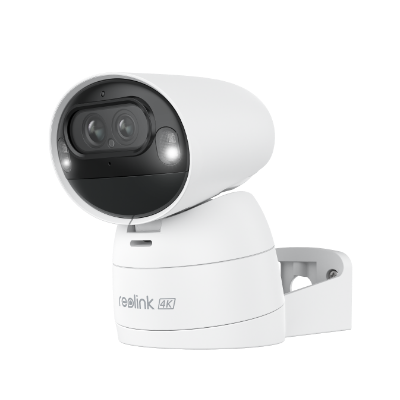
4K Dual-Lens Wi-Fi Solar/Battery Camera
4K 8MP Ultra HD, Auto-Zoom Tracking, Pan, Tilt & 6X Hybrid Zoom, Color Night Vision, Dual-Band Wi-Fi.
FAQs
Is camera lens protector removable?
Yes, most camera lens protectors are designed to be removable and replaceable. However, the process of removing a lens protector can vary depending on the specific product and the adhesive used.
Can I reuse camera lens protector?
It is generally not recommended to reuse a camera lens protector after it has been removed. The adhesive on the protector may lose its effectiveness, and the protector itself may have accumulated scratches or debris, which could potentially damage your camera lens when reapplied.
Does camera screen protector affect picture quality?
While a high-quality camera lens protector should not significantly impact picture quality, there is a potential for some minor degradation in sharpness, clarity, or color accuracy.
Conclusion
Removing a camera lens protector can be a straightforward process if done correctly. By following the step-by-step guide provided in this article, you can safely remove the protector from your iPhone or prepare your security camera for a replacement. Remember to handle the lens protector with care, use the appropriate tools, and clean the lens thoroughly after removal.
We hope this article has provided you with valuable insights and tips on how to remove camera lens protectors and choose the right security camera for your needs. Feel free to share your thoughts and experiences in the comments below.
Search
Subscribe for the Latest Updates
Security insights & offers right into your inbox