
Reolink Roof Camera Guide: Right Cam For The Right Spot

A roof camera sees over the privacy fence, the SUV parked in the driveway, and the hedge line that block a camera mounted at eye level. That extra 10 to 15 feet of height turns several blind spots into one continuous sightline. Most residential rooflines sit between 15 and 25 feet at the eave, high enough to clear a standard 6-foot fence to oversee the important sections of a home.
That being said, the real challenge isn't always height. It's routing power and picking the right camera for the spot. There are two positions that work well on a residential roof, each favoring a different camera type and power setup. Pan-tilt cameras are worth prioritizing either way, since a fixed camera at 20 feet creates a dead zone directly below it, a blind spot only a pan-tilt camera can sweep away remotely.
Let us explore further.
How the Roof Changes What Your Camera Can See

Think of what a camera sees as a beam spreading out from the mount, like a flashlight. At 8 to 10 feet, that beam hits its first obstacle within just a few feet of the camera. A 6-foot privacy fence, a parked SUV, and a mature hedgerow are all common blind spots at that height. Move the same camera up to roof height of roughly 20 feet, and the beam clears those obstacles and sweeps a much wider stretch of yard or driveway. Wide driveways, long backyards, and corner lots benefit most, since fewer cameras end up covering the same perimeter.
However, there are two tradeoffs. The first one is identification. The steeper the downward angle, the harder it gets to make out a face, and a camera pointed nearly straight down from 25 feet captures the top of a head, not a face. Roof cameras win on deterrence and overview while wall cameras at 8 to 10 feet win on identification. Reolink's own placement guidance flags the same tradeoff explaining a single camera can't frame a wide view and a recognizable face at the same time. The strongest setups tend to use a combo of a roof camera for wide coverage, and a lower camera at the front door for face-level detail.
The second tradeoff is the dead zone. A fixed camera at 20 feet, angled 20 to 30 degrees down for wide coverage, cannot see the ground directly below it. Run the math on a typical 47-degree vertical field of view, and here's what that blind spot looks like at different mount heights:
This is when a pan-tilt camera comes in, as it can close that gap by letting you angle the lens down from the app whenever needed.
Practical Roof Mounting Positions for Security Cameras
Here are the two positions that work for mounting a security camera on a residential roof.
Under the Eaves
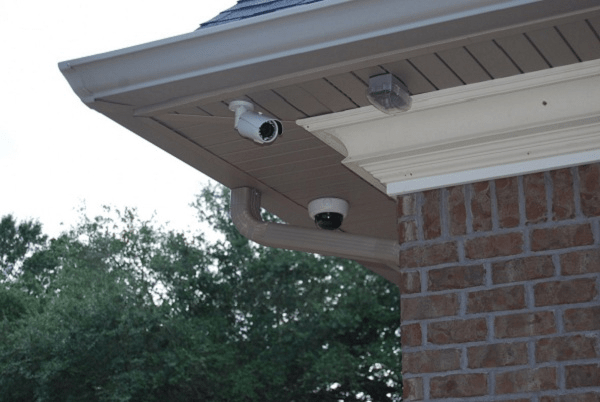
The eave, or soffit, is the most common spot. It's partially sheltered from rain and gives cable a natural path into the attic, with no exterior run needed. IP65 cameras are recommended, since a shallow eave still exposes the camera face to wind-driven rain.
One caveat for pan-tilt cameras is the standard bracket mounts flush against the soffit. It's fine for a shallow eave, but a deep overhang can let the surrounding fascia block part of the camera's rotation. In the case of Reolink cameras suited to be mounted under eaves, its Reolink PT Bracket V1 accessory fixes this by dropping the camera down and away from the surface.
The Gable End Wall

The gable end is the triangular wall at each end of a pitched roof. Gable ends sit higher than an eave mount, often 20 to 30 feet up on a two-story home, and can see down an entire side yard or watch a rear gate from maximum height. Cable access is straightforward as you can just drill through the wall, or route through an existing gable vent. No shingles are involved since this is a standard wall mount.
A solar camera is a fallback where wiring isn't practical, though the wall's fixed orientation won't always catch the sun's ideal direction. To counter this, a solar camera with a separated solar panel like Reolink's Argus PT Ultra can be set up with the panel angled toward a sunnier slope while the camera itself stays mounted on the wall.
What to Look for in a Roof Camera Before You Climb Up There
Weatherproofing
Weatherproofing is the spec most homeowners underestimate. The IP rating (short for Ingress Protection) is a two-digit code for how well a camera seals out dust and water. For an outdoor camera, the second digit is what matters since it measures water resistance.
- IP64: Handles splashing but not a sustained direct spray, so it only belongs on a deeply sheltered eave.
- IP65: The floor for any exposed spot, enough for wind-driven rain hitting the camera sideways.
- IP66: Gives more margin where wind drives rain like a jet.
Pan and Tilt Range
A fixed camera at roof height always leaves a permanent dead zone on the ground directly below it. Pan and tilt range is what corrects for it. Pan is the camera's ability to swivel side to side, while tilt is its ability to angle up and down. Both actions are controllable from an app, so you can point down into that dead zone whenever you need to check it. Look for at least 355 degrees of pan and 90 degrees or more of tilt.
Power Source
Both eave and gable mounts can run on wired power, since cable access is easy at either spot. Solar or battery power is still worth considering as a wire-free fallback, particularly on a gable wall that doesn't face the sun well or wherever running a cable just isn't practical.
Wi-Fi and Roofing Material
Roofing material affects a roof-mounted camera's Wi-Fi more than the common "does metal block Wi-Fi" advice suggests. That advice is about indoor Wi-Fi, meaning signal moving sideways between rooms inside a house. That signal never has to pass through the roof itself, which is why the effect on indoor Wi-Fi turns out to be negligible.
A roof-mounted camera faces a different problem, since its signal has to travel straight up through the roof material to reach it rather than sideways through interior walls. Asphalt shingles and clay tile let Wi-Fi through with little trouble, but metal is where that vertical signal runs into real trouble. That's not a small effect either. Independent signal measurements put metal roofing and walls at 30 to 50 dB of loss, enough to take a workable signal down to unusable. On a metal roof, a 4G LTE camera, one that connects over the cell network instead of home Wi-Fi, is the more dependable fix.
Night Vision Range
Night vision needs more reach at 20 feet than a wall-mounted camera at 8 to 10 feet requires, since infrared light weakens the farther it has to travel. Everything the camera actually needs to see sits beyond the dead zone (the blind spot directly below the mount) and that ground is farther away than anything a wall camera ever has to reach.
A short-range infrared spec that works fine on a wall camera can turn into a grainy, unusable frame at that distance. Aim for at least 30 meters (100 feet) of infrared range to keep the whole covered area visible after dark, and check any color night vision spec separately. Many cameras deliver it through a built-in spotlight rather than plain infrared and its effective range varies by model.
Installation Tips That Won't Damage Your Roof
Match Your Drilling Technique to the Roofing Material
Drilling into asphalt shingles without sealing is the number one cause of DIY roof camera leaks. Use roofing screws with rubber washers, pre-drill, and apply roofing sealant before and after driving the screw.
Clay and concrete tiles need to be lifted before drilling into the batten underneath, since drilling straight through risks cracking them.
Metal standing-seam roofing is best left unpenetrated in favor of seam clamps.
If it gets too complicated, it's still best to call a licensed roofer first.
Use the Right Mounting Hardware
Many solar camera kits ship with a strap mount sized only for the included solar panel, with the camera body needing its own separate bracket screwed into a flat surface. Check what your specific kit includes before assuming one mount covers both.
To mount the bracket, it's best to use stainless or galvanized hardware as it's more weatherproof. Standard zinc-plated screws corrode fast under sustained roof moisture, especially in coastal or humid climates. For a wired camera, seal the Ethernet entry point with silicone caulk or duct seal once it's threaded into the attic, since an unsealed hole becomes a slow drip in heavy rain.
Point the Solar Panel Toward the Sun
Solar panel angle matters more than most installers realize. Face the panel south at an angle close to your latitude to get the most out of the sun.
Winter is the real test. The "20 minutes of sun a day" spec holds up year-round in the southern US but gets harder further north, since cloud cover and shorter days cut into how much usable sun a panel actually sees. Below freezing, the problem isn't sun exposure at all, it's chemistry: Reolink's own battery cameras stop charging below about 0°C (32°F) no matter how much sun the panel gets. In cold climates, some users report pulling the camera down and recharging it indoors every 3 to 4 weeks through winter.
Rather than rely on a national average, check your exact address on NRL's PVWatts tool, a free calculator that estimates solar output for any US location, since a short winter window can mean the battery drains faster than it recharges across overcast days. A larger panel adds buffer, or you can plan on a manual charge once or twice each winter.
Do a Trial Run and Follow Roof Safety Basics
Test the position before drilling anything permanent. Run a temporary extension cable or hold the camera with adhesive and confirm coverage in the app first. Try not to use gutters as a mount, since they flex in wind and aren't rated for camera weight plus ice load. Whenever you plan to mount, it's best to wear rubber-soled footwear, and if you need to mount it above single-storey height, use a secured ladder with a harness.
Best Reolink Cameras for Roof Mounting

The right camera ultimately depends on the mounting position, whether a cable can reach it, and how much weight the surface can take. A compact wired pan-tilt camera fits eave and gable mounts better than a full-size PTZ dome camera, and a solar or battery pan-tilt camera is the better call wherever running a cable isn't an option. Reolink's lineup covers far more configurations than we can list here, but these three cover the roof-mounting scenarios most homeowners actually run into:
Reolink Argus PT Ultra: Best Wire-Free Option for Gable Mounts
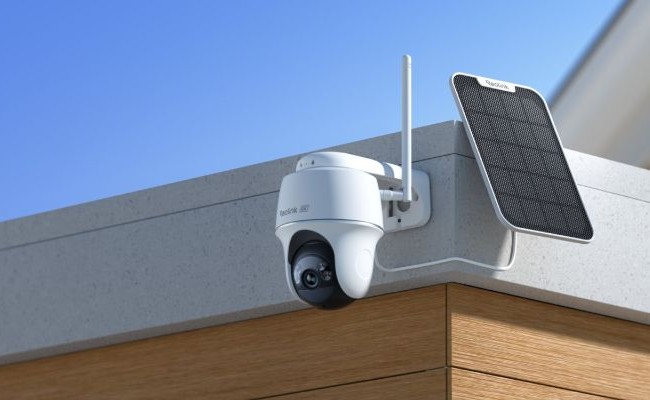
Fully wire-free and solar-charged, the Argus PT Ultra's 355-degree pan and 140-degree tilt let it sweep for dead zones and reposition coverage from the app.

Real-world durability reports on the wider Argus PT series back this up: one owner mounted an Argus PT on hurricane shutters at a Florida marina, and it survived Hurricane Milton's 120-plus mph winds, going offline for three days before returning with clean video. Another roof-mounted Argus PT held a 96 to 100 percent battery charge through heat, wind, and rain.
It shoots 4K at 15fps, which gives you footage sharp enough to zoom in on later. IP65 weatherproofing keeps wind-driven rain out, which matters most on an exposed roof mount. Its 10 meters (33 feet) of color night vision shows actual colors after dark, which is useful for picking out a specific vehicle or jacket instead of a gray blur.
A 21.6Wh battery runs on just 20 minutes of direct sun a day, keeping the camera powered year-round without ever climbing back up to recharge it, and its 3W solar panel mounts separately so it can be angled toward whichever slope gets the most sun.
Its built-in AI also tells people, vehicles, and animals apart, so alerts are about what actually matters instead of every leaf blowing past. Footage can be stored locally on a microSD card, a Reolink Home Hub, or your own NVR, with no monthly subscription needed to keep and review it.
It's a great fit for gable mounts, or anywhere running a cable simply isn't an option. In the night, instead of relying on one fixed wide frame, you can swing the lens toward whatever needs a closer look, stretching its 10 meters of infrared range further than a fixed camera could manage. Pairing it with a lower wall camera adds face-level detail at the front door, giving you wide overview from the roof and sharp identification at ground level. The included strap mount is sized for the solar panel only, so the camera body needs its own separate bracket screwed into a flat surface.
Reolink TrackMix LTE: Best for Rural Properties or Weak Wi-Fi Rooftops

IP65-rated and 4G LTE-connected, the TrackMix LTE fits an exposed rooftop with no reliable Wi-Fi. Its dual-lens design shows wide and zoomed views on one screen, and its 100 foot (30 meter) infrared range triples the Argus PT Ultra's reach.
It captures 4K 8MP with 6x hybrid zoom, so the wide lens frames the whole yard while the telephoto lens zooms in on the same scene without losing the bigger picture. A 355-degree pan and 90-degree tilt cover nearly a full circle, and auto-tracking keeps the lens locked onto a moving person or vehicle instead of leaving that to a fixed frame.
The camera also runs on a 36.72Wh battery, which is larger than the Argus PT Ultra's. For solar power, it runs on the 6W Reolink Solar Panel 2 to offset the extra power drawn by the LTE radio and tracking motor.
At nearly three times the Argus PT Ultra's weight, this camera will need a solid bracket in structural timber, not a strap, plus a monthly data plan. It's also built for upright mounting only, which points it toward a gable wall or soffit ceiling mount.
Reolink TrackMix PoE: Best for Eave or Gable Mounting with Attic Access

At 1.21kg and roughly the size of a soda can, the TrackMix PoE is the compact wired pan-tilt option where a bulkier PTZ camera would look out of place. The included bracket handles wall, ceiling, and shallow-soffit mounts. If it needs to be mounted on a deep overhang, the PT Bracket V1 covered earlier is the solution.
The camera records at 4K 8MP at 25fps. That's smooth enough to keep motion crisp, and its 6x hybrid zoom lets the wide lens hold the full scene while the telephoto lens zooms in on a specific spot at the same time. A 355-degree pan and 90-degree tilt sweep nearly the entire yard from one mount.
Its IP65 weatherproofing handles wind-driven rain, and running on PoE's widely compatible 802.3af standard means one cable delivers both power and data instead of separate runs. Its 30 meters (100 feet) of infrared covers well into a yard after dark.
As a dedicated PoE camera, it still needs a cable run to an NVR or PoE switch, so it isn't the right fit for a detached garage or barn without existing wiring. That's where a cellular option like the TrackMix LTE takes over.
FAQs
Can I put a security camera on my roof?
Yes, as long as the camera type matches the mounting position: wired for eave and gable mounts with attic cable access, or solar and battery wherever running a cable isn't practical, and IP65 or higher for any exposed spot. No permit is typically required in the US, though homeowners in an HOA should check their CC&Rs first, since some restrict street-visible cameras. See Reolink's HOA guide for details.
Will a roof camera film my neighbor's property?
Almost certainly, a direct consequence of the height advantage that makes roof mounting useful. The Reolink app's privacy masking feature blocks out neighboring property in the live view, and motion zones limit detection to your own property.
Is it legal to point a security camera at a neighbor's property?
In the US, a camera shouldn't be aimed at areas where a neighbor has a reasonable expectation of privacy, and many HOA CC&Rs explicitly prohibit sightlines into neighboring properties. In the UK, footage beyond your boundary brings UK GDPR and the Data Protection Act 2018 into play, per ICO and GOV.UK guidance.
Conclusion
The right roof camera comes down to what your roof will actually let you do.
No cable access at the gable end? Something like the Argus PT Ultra handles it, since it's solar-powered and fully wire-free. If it's outside the garage or barn where Wi-Fi doesn't reach, a camera that runs on cell service like the TrackMix LTE will be a great option, as long as it stays upright on a gable wall or soffit. And if a PoE cable already runs to the eave, a smaller-sized PoE camera like the TrackMix PoE is definitely the best pick. Reolink's battery and solar camera lineup is worth a look if you're ready to compare the wire-free options side by side.
Whichever one fits, pair it with a lower wall camera at the front door to provide you with the face-level detail a roof camera alone can't give you.
Search
Subscribe for the Latest Updates
Security insights & offers right into your inbox