Self-Hosted Security Camera: The Ultimate Guide to Cloud-Free Surveillance
In modern times, security and privacy have become an essential element for everyone. Numerous residential and commercial property owners want surveillance devices instead of cloud-based systems to retain system-level control. Users who opt for self-hosted security camera solutions gain control over storage through local footage retention; thus, they achieve enhanced privacy and system reliability.
This guide provides details about installing self-hosted security cameras and their advantages while suggesting top recommendations for selection among essential factors to consider when choosing such systems.
Overview of Self-Hosted Security Camera
A security camera system maintained by users depends on their local devices rather than cloud storage solutions for its operation. This system design grants users total data ownership and reduced dependence upon outside service providers. A self-hosted security camera system is a standalone video recording device that retains data within specific local devices.
What is a Self-Hosted Security Camera?
A security camera operated by a user through their personal server records and saves video data at local storage locations instead of cloud providers. Such systems securely store recorded videos using NVRs, local hard drives or SD cards, and network-attached storage (NAS) devices.
Components of a Self-Hosted Security System
The operation of reliable video surveillance depends on multiple necessary self-hosted security system components that function together.
- A specified IP camera functions by transforming video footage with high-resolution quality.
- The NVR or software-based record and playback system functions to control video storage operations.
- Three storage solutions exist for safe local video recordings, including SD cards, hard drives, and network-attached storage devices.
- A stable local network establishes the complete data flow between surveillance equipment and storage facilities.
What to Consider When Choosing Self-Hosted Security Cameras and Systems?
Security systems operated by users require assessment of essential parameters to guarantee their maximum performance and protection.
1. ONVIF & RTSP Support
The camera system needs ONVIF and RTSP protocol compatibility for easy connection with external software and NVR systems. These standards ensure better flexibility because they enable users to unite various camera brands while maintaining their current monitoring system.
2. Camera Quality and Features
A quality security camera demands high-resolution video output that should be 1080p or 4K to achieve sharp video details. Security cameras require nighttime vision capabilities to record footage in dim lighting conditions.
The storage capacity decreases thanks to motion detection since it records footage only during movement. Security systems backed by AI technology identify different objects through safety alerts by detecting human beings while separating them from vehicles and other entities.
3. Local Storage Options
The storage selection determines the long-term reliability and future expansion potential of a security system operated by the same organization. Network Video Recorders are centralized management tools capable of operating with numerous surveillance cameras.
Affordable storage runs through microSD cards when you operate with one security camera yet limits your file storage space. NAS devices provide flexible storage capabilities and remote features, making them suitable for bigger security control networks. External hard drives deliver flexible storage solutions that function effectively through connections to recording systems at cost-friendly prices.
4. Network Connectivity
A steady connection between network components enables clean video transfer while the system operates. The Ethernet cable delivers stable network functionality that stays consistent without major interruptions.
Wireless arrangements provide adaptable installation, yet their performance will vary due to radio wave disturbances. The system operates efficiently when dedicated bandwidth guarantees multiple video transmissions while separate networks support security equipment.
5. Security and Privacy
Security procedures serve to defend recorded footage from illegal access attempts. An encrypted video transmission system serves as a protection strategy against data breaches. Expected storage devices and camera systems work with secured passwords to keep out unauthorized users.
Network segmentation and firewalls establish independent security zones to protect security devices from cyber-attacks. Security improves significantly through scheduled firmware upgrades, which disable all remote access features that are not required.
6. Cost
A self-hosted security system produces its total price from acquiring cameras, storage components, and networking technology. Small businesses find MicroSD cards suitable because they offer cost-effective storage, but NVRs or NAS devices come at a higher investment level.
High-definition cameras that use artificial intelligence functions tend to cost more while still supplying enhanced monitoring possibilities. A security system should align its functionality with budget constraints to deliver suitable security solutions.
Best Self Hosted Security Camera & System
Properly selecting self-hosted security camera systems is essential in designing effective surveillance solutions. Numerous recommendations from Reolink can be found below.
Reolink OMVI 3i PoE – Best for Large Properties and Wide-Area Coverage
For users looking for the best self-hosted security camera system, OMVI 3i PoE is a powerful all-in-one solution. Its triple-lens design combines a 10MP dual-lens 180° panoramic view with 4K 360° full coverage, helping eliminate blind spots around your property. With SyncTrack auto framing and auto tracking, the camera intelligently follows movement in real time for smarter surveillance. It also supports local storage with no monthly fees, while Local AI Video Search makes it faster and easier to find important footage directly from your recordings.
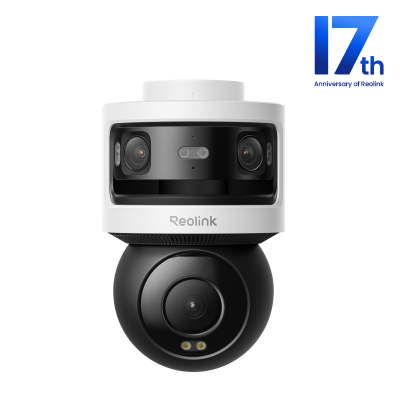
All-in-one Triple-Lens 180° Panoramic Pan-Tilt Security Camera
10MP Dual-Lens 180° View, 4K 360° Full Coverage, SyncTrack with auto framing & auto tracking, Local Storage (No Monthly Fees), Local AI Video Search.
Reolink TrackFlex Floodlight WiFi – Best for Entrances, Garages, and Backyards
The Trackflex Floodlight WiFi by Reolink delivers high-quality self-hosted security camera features, incorporating two lenses to provide 360° wide-angle panorama coverage. This security device operates at 4K resolution while its smart motion tracking system identifies between human targets, vehicle traffic, and moving animal. Users can save recorded footage on NVR devices, SD cards, and other third-party platforms.
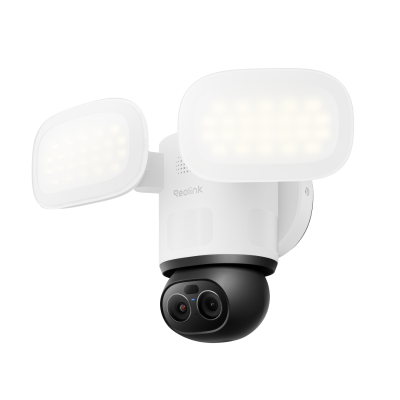
🎉 2026 Prime Day Sales Highlight: 4K 360° Wi-Fi Floodlight Security Camera
- 360° full coverage view & 4K 8MP resolution
- Dual-color floodlight & 6X hybrid zoom
Reolink Argus PT Ultra – Best for Remote and Off-Grid Locations
Users can achieve full area coverage through the pan-tilt functionality offered by the Reolink Argus PT Ultra. The device operates in 4K Ultra HD mode, which provides clear video quality at night. The solar-powered camera is an eco-friendly system that allows continuous outdoor monitoring without frequent battery charging.
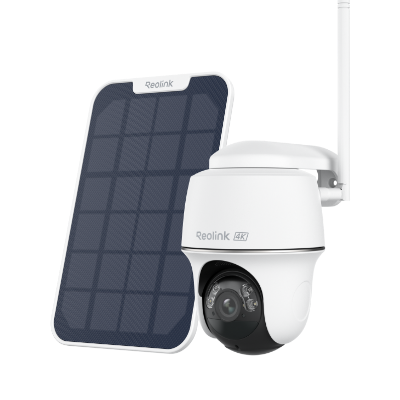
4K 100% Wire-Free PT Camera
4K 8MP Ultra HD; 5GHz/2.4GHz WiFi; Rechargeable Battery & Solar Powered; 355° Pan & 140° Tilt; IP65 Certified Weatherproof; Clear Night Vision; 2-Way Audio; 122° Wide Viewing Angle.
Reolink Argus 4 Pro Kit – Best for Whole-Home Security Coverage
The Reolink Argus 4 Pro Kit enables users to record high-definition video and leverage AI capabilities, improving their security system's performance. The camera system provides users with storage flexibility by allowing them to record their footage on an SD card or by connecting to the Reolink Home Hub for upgraded recording features with 4K 180-degree coverage.
4K UHD Wi-Fi 6 Security System with 180° Blindspot-Free View
ColorX Night Vision, 1 Year of Local Storage, Exclusive Anti-Theft Algorithms, 180° Blindspot-Free Coverage, Expandable System Up to 8 Reolink Cams.
How to Set Up a Self-Hosting Security Camera System?
Step 1: Map and Position Your Cameras
Before running cables or configuring software, you need a physical layout strategy.
- Identify Critical Zones: Focus on primary entry points (front/back doors, garage doors), vulnerable windows, and high-traffic pathways.
- Consider Lighting: Avoid pointing cameras directly at the sun or reflective surfaces (like glass or light-colored walls) to prevent glare and washed-out night vision.
- Determine Power Access: Group your camera locations based on how they will receive power (via Ethernet cables from a central switch or near a power outlet if using local WiFi).
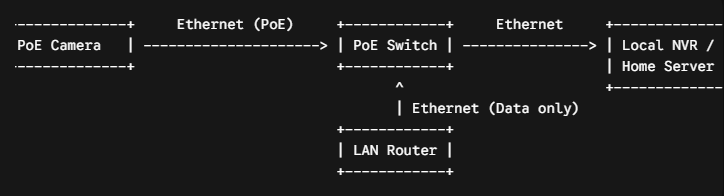
Step 2: Establish Your Network (PoE vs. WiFi)
Your local storage needs a reliable, high-bandwidth pipeline to ingest constant video streams.
- The PoE Setup (Recommended): Run Cat5e or Cat6 Ethernet cables from each camera location back to a central PoE (Power over Ethernet) Switch. This single cable provides both the data connection and electrical power, ensuring a secure connection that cannot be wirelessly jammed.
- The WiFi Setup: If running cables isn't feasible, mount your wireless cameras within strong range of your access points. Ensure your router can handle the continuous local bandwidth requirement of multiple high-definition streams.
Step 3: Configure Your Local Storage Server
You need a central destination to process and store your video feeds. Choose the infrastructure path that best matches your technical comfort level:
Option A: Hardware NVR (Plug-and-Play)
- Install a surveillance-rated hard drive (such as a Western Digital Purple or Seagate SkyHawk) into your standalone NVR box.
- Connect the NVR to your PoE switch or main router via an Ethernet cable.
- Power on the NVR and follow the on-screen wizard to initialize the hard drive and set up an administrator account.
Option B: Custom Software NVR (Advanced Tech Enthusiasts)
- Prepare a local machine (a dedicated PC, a NAS device like Synology, or a mini-PC running Proxmox/Linux).
- Install your chosen self-hosted NVR software (popular options include Frigate AI, Blue Iris, ZoneMinder, or Scrypted).
- If using AI-driven person/object detection like Frigate, plug in a hardware accelerator (like a Google Coral USB TPU) to offload the heavy processing from your main CPU.
Step 4: Add and Configure the Cameras
Once the infrastructure is live, it’s time to link the hardware to your recording platform.
- Assign Static IPs: Log into your router or use the camera manufacturer's desktop tool to assign a permanent, static IP address to each camera. This ensures your storage server never loses track of the cameras if the network reboots.
- Enable ONVIF and RTSP: Dig into each camera's internal web settings and toggle ONVIF and RTSP protocols to "On." Create a dedicated, secure username and password just for these streams.
- Adopt the Streams: Open your NVR software or hardware dashboard, search the local network for new devices, and input the camera's IP address along with the RTSP credentials to start recording.
Step 5: Secure and Harden the System (Crucial)
Self-hosting keeps corporate cloud breaches at bay, but it shifts the responsibility of cybersecurity onto you.
- Isolate via VLANs: If your network router supports it, put all your IP cameras and your NVR onto a separate Virtual Local Area Network (VLAN). Block this VLAN from accessing the wider internet entirely. This ensures that even if a camera has a hidden firmware vulnerability, it cannot communicate with external servers or access your personal computers.
- Disable UPnP and P2P: Turn off Universal Plug and Play (UPnP) and any proprietary "cloud peer-to-peer" remote access options in your camera and NVR menus.
Step 6: Configure Storage and Smart Alerts
Optimize how your data is handled to balance disk space with reliable security.
- Set Recording Schedules: Choose between continuous 24/7 recording (best for main entry points) or motion-triggered recording (best for low-traffic areas to maximize hard drive space).
- Tune AI Alerts: Define your detection zones to ignore public sidewalks or swaying trees. Program your system to only send a push notification to your phone when a human or vehicle crosses your perimeter lines.
Step 7: Set Up Secure Remote Access
To check your cameras securely when you are away from home, never open ports on your router. Instead, use encrypted tunnels:
- Deploy a Local VPN: Set up a lightweight, self-hosted VPN like WireGuard or Tailscale on your home network. When you are away from home, turning on the VPN app on your phone will securely tunnel you back into your private home network, allowing you to view your local NVR feed as if you were sitting on your living room couch.
Why Choose a Self-Hosted Home Security Camera?
Self-hosted security cameras provide various benefits that establish them as an ideal solution for residential and commercial users.
- Users keep total control over their data storage as they do not depend on third-party cloud-based systems.
- Users avoid subscription payments because the system operates on a one-time fee basis.
- Continuous recording remains possible through local storage systems even without internet connection.
- Security features that have been enhanced minimize the chances of hacking attempts and unauthorized access.
- Users can adjust their surveillance systems based on their surveillance requirements.
FAQs
What is the best home security camera system DIY?
The optimum self-installable home security camera setup depends on personal requirements. Users can access versatile self-hosted camera systems from Reolink, which includes the Duo 3 WiFi alongside the Argus PT Ultra Kit, which combines high-definition video and security capabilities.
Does a self-hosted security camera require WiFi?
A security camera set up by the user does not need to operate through WiFi connections. These cameras provide flexibility through WiFi, but wired options deliver uninterrupted recording because of their secure network connection.
Conclusion
People and businesses interested in managing their security apparatus without surrendering privacy or wanting to reduce expenses should consider self-hosted security cameras as an exceptional solution. The systems that do not use cloud storage provide users with better security protection and system reliability.
All users can achieve complete surveillance security by choosing between Reolink Duo 3 WiFi, Argus PT Ultra Kit, or Argus 4 Pro Kit systems that operate independently of third-party control. A Share of your opinions about surveillance systems appears in the comments section.
Search
Subscribe for the Latest Updates
Security insights & offers right into your inbox