
Reolink Solar Floodlight Cam Review
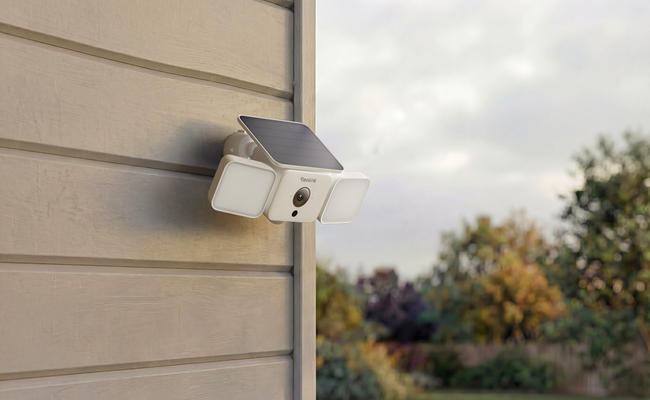
Reolink has proudly introduced the new Solar Floodlight Cam at CES, a security camera that bridges lighting and security while running on battery/solar power. It illuminates the area and captures every moment, even in the darkest conditions, and most importantly, there is no wiring needed.
In this article, we will give you a review of the Reolink Solar Floodlight Cam. We will discuss its advanced features, pros & cons, applications, and everything you need to know before buying.
- What is Reolink Solar Floodlight Cam?
- Reolink Solar Floodlight Cam Review: Advanced features
- How to Install and Set up Reolink Solar Floodlight Cam?
- Using Scenarios of Solar Floodlight Cam
- Real User & Media Feedback on the Solar Floodlight Cam
- Solar Floodlight Cam vs. Other Reolink Floodlight Cameras
- FAQs
- Verdict: Should You Buy Reolink Solar Floodlight Cam?
What is Reolink Solar Floodlight Cam?
The Reolink Solar Floodlight Cam is a 2K (4MP) floodlight camera with AI-based adaptive lighting modes. It has an elegant rectangular shape with a lens in the center. There are two rectangular floodlights on both sides, while there is a fixed solar panel at the top. The camera has a distinct yet elegant shape. The placement of the floodlight on both sides allows it to cover a wider area.
The box contains a Solar Floodlight Cam, mounting bracket, mounting template, USB-C cable, mounting wrench, pack of screws, surveillance sticker, and operational instructions.
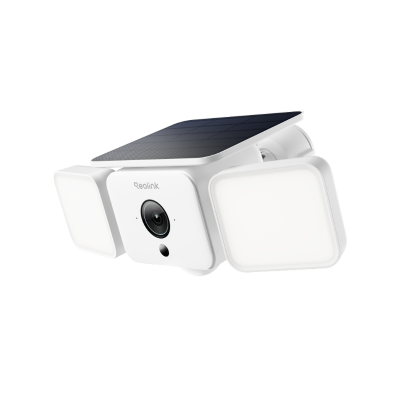
Smart 2K Solar Floodlight Security Camera
150° Ultra-Wide View, 2K 4MP HD Resolution, AI-Based Adaptive Floodlight, Endless Power with Reolink SolarEase™.
Pros and Cons of Solar Floodlight Cam
Pros:
- It smartly detects people, vehicles, and animals and distinguishes between them with the help of AI.
- Users can easily control the camera through the Reolink app remotely. They can view the live feed from any location and use two-way audio.
- The 1,000-lumen floodlights, along with a 110dB siren, deter intruders. When an intruder is detected, they turn on automatically.
- Users can adjust the color temperature and brightness as they like. For optimal security, they can use daylight white, while for ambiance, they can go with warm white.
- When a person or vehicle is detected, the camera sends real-time alerts to the connected devices. You are notified instantly.
- It uses dual-band Wi-Fi 6 to deliver fast, reliable performance. You can view the live feed remotely with no lag.
Cons:
- No Apple HomeKit support at launch
Best for: Large driveways, front yards, backyards, and other dark outdoor areas that need bright security lighting, instant alerts, and active intruder deterrence.
Reolink Solar Floodlight Cam Review: Advanced features
The Solar Floodlight Cam is equipped with some advanced features that make it an incredible option for outdoor surveillance and security.
Endless Solar-Power with Reolink SolarEase
The camera supports a 3W Reolink solar panel that can automatically recharge its battery. With as little as one hour of sunlight, it can generate enough power to keep the camera running throughout the night. It also features a 7,800mAh rechargeable battery that can last up to 90 days on a full charge without solar input. Together, these power options provide long-lasting operation with minimal maintenance.
See Clearly in the Dark
The 1,000-lumen floodlight illuminates a large area. It makes everything visible on the property, even in the darkest conditions. The camera clearly captures videos in 2K (4MP) resolution, which ensures optimal clarity and details. It has a 150⁰ wide view to cover a wider area with a single camera.
AI-based Adaptive Floodlight Modes
The camera uses AI-based floodlight modes. It quickly turns on when a person or vehicle is detected. And it remains off when an animal passes by to conserve energy. When the camera is triggered, the floodlight turns on at maximum brightness and automatically turns off after a customized duration once the event ends. It also supports switching on at the selected brightness, and will turn completely off after the target leaves.
Key Specifications
In addition, the Reolink Solar Floodlight Cam is currently included in the 2026 Prime Day Sales, offering a limited-time discount for users looking to upgrade to a fully wire-free outdoor security solution.
🎉 Limited-Time Security Camera Prime Deals
- Explore Special Offers on Individual Cameras and Security Systems.
- Protect Your Home for Less with Bundles & Multi-Packs.
How to Install and Set up Reolink Solar Floodlight Cam?
1. Connect the Camera to Wi-Fi
Turn on the camera and add it through the Reolink App by scanning its QR code. Follow the on-screen instructions to connect it to your 2.4GHz or 5GHz Wi-Fi network, then check the live view before installation.
2. Choose a Sunny Installation Position
Mount the camera about 2–3 m (7–10 ft) above the ground where the built-in solar panel can receive at least 1 hour of direct sunlight per day. Avoid locations heavily shaded by roofs, trees, or walls, and angle the solar panel toward stronger sunlight for more effective charging.
3. Position It for Better PIR Detection
Don't point the camera directly down a path where people normally walk straight toward it. PIR detection works better when a person or vehicle moves across the camera's detection area, so entrances, driveways, and garden paths should be covered from an appropriate side angle.
4. Secure the Camera to the Wall
Use the mounting template to mark the screw holes, drill the holes, insert the anchors, and screw the mounting base firmly to the wall. Attach the Solar Floodlight Cam to the mount and tighten it so the camera remains stable outdoors.
5. Adjust the Camera and Floodlights
Use the live view to adjust the camera until the main monitoring area is clearly visible. Then angle the floodlights toward the driveway, entrance, yard, or other target area rather than directly toward neighbouring properties or reflective surfaces.
6. Set Detection and Floodlight Modes
In the Reolink App, configure person, vehicle, and animal detection, detection zones, sensitivity, and instant alerts. You can also adjust the floodlight's brightness and colour temperature and choose the lighting behaviour that suits the area.
Watch the unboxing and installation video below for the complete setup process:
Using Scenarios of Solar Floodlight Cam
Reolink Solar Floodlight Cam can be used at any location where you want to flexibly install the camera without any wires. Its self-sustainability makes it a versatile option.
Driveways: The camera is perfect for driveways. It illuminates the area to clearly capture people and vehicles at night. It alerts when someone is around the driveway and keeps intruders away.
Entrances: For better visibility of the entrance area and capturing every visitor at night, the Solar Floodlight Cam is excellent. It keeps you updated on who entered or left your house and keeps thieves and intruders away at night.
Backyard: The backyard area needs light for security purposes. The Solar Floodlight Cam not only illuminates at night but also ensures security.
Rural Properties: These locations lack power sources, so you can easily install the Solar Floodlight Cam. It delivers incredible performance both during the day and at night.
Construction Sites: For monitoring construction sites and visitors, you can install the Solar Floodlight Cam outdoors. It helps you keep an eye on the valuable items at night.
Real User & Media Feedback on the Solar Floodlight Cam
Media opinions
Reviewers highlight its strong value-for-money design, especially for users wanting affordable smart security without ongoing cloud costs. - Digital Review Network
Tech coverage notes the bright 1000-lumen floodlight, reliable motion detection, and flexible local storage options (microSD / NVR / Home Hub) as key strengths. - TechRadar
User Feedback
Several users were impressed by the SolarEase™ charging performance, reporting that the battery remained stable and recovered charge even during overcast weather or with limited direct sunlight. This makes the solar design particularly useful in areas where sunny conditions aren't consistent. - Reddit

Solar Floodlight Cam vs. Other Reolink Floodlight Cameras
The biggest difference between these three Reolink floodlight cameras is how they are powered and how they cover an area. The Solar Floodlight Cam uses battery and solar power for wire-free installation, the Elite Floodlight WiFi provides a fixed 180° panoramic view, while the TrackFlex Floodlight WiFi uses pan-and-tilt tracking with zoom for more flexible coverage.
FAQs
1. Does Reolink Solar Floodlight Cam Work at Night?
Yes. The camera supports IR night vision up to 33 ft (10 m) and color night vision using its floodlights, allowing it to capture footage even in dark outdoor areas.
2. How Much Sunlight Does Reolink Solar Floodlight Cam Need?
Reolink states that its SolarEase™ system is designed to maintain operation with around one hour of sunlight per day under suitable conditions. Actual charging performance can vary with weather, installation angle, camera activity, and sunlight intensity.
3. Can Reolink Solar Floodlight Cam Record 24/7?
No. The Solar Floodlight Cam is a battery-powered model designed for motion-triggered recording, rather than 24/7 continuous recording.
Verdict: Should You Buy Reolink Solar Floodlight Cam?
Yes, Reolink Solar Floodlight Cam saves you from the hassle of wires and combines the functionality of a camera and floodlight into a single device. It allows you to monitor areas at night with extreme clarity. Because of the solar panel, it recharges on its own, and the 90-day battery life makes it maintenance-free. It illuminates a wider area with its powerful floodlight and keeps intruders and thieves away from your property. You can use it for ensuring security and monitoring your property day and night.
Search
Subscribe for the Latest Updates
Security insights & offers right into your inbox