
How to Conduct a Physical Security Risk Assessment

Small businesses are burglarized more often than large corporations because of well, their sizes. Criminals look for loopholes created by poor lighting, unlocked rear exits, or no visible cameras.
A physical security risk assessment is how you find those gaps before someone else does. It's a structured walk-through of your premises, access points, and security systems that any business owner can run themselves without hiring a consultant or spending a full day on it.
The best thing is you don't need a security background. Just a few hours and the willingness to look at your business the way an opportunist would.
Why Small Businesses Can't Afford to Skip Physical Security Risk Assessments
The numbers make the case. 90% of small business retailers have been victims of theft, including shoplifting, employee theft, and organized retail crime. In 2023 alone, over 42,000 commercial properties and office buildings were burglarized in the U.S., with restaurants, construction sites, and convenience stores among the hardest hit. Shoplifting rose 24% in the first half of 2024 compared to the same period in 2023.
The good news is that visible security works. 60% of convicted burglars say they actively avoid premises with cameras, alarms, and security signage. A well-placed business security camera visible from the entrance deters more incidents than four hidden cameras that go unnoticed.
For most SMB owners handling security themselves alongside everything else, an assessment isn't about a perfect posture. It's about knowing where you're exposed and what to fix first.
What a Physical Security Risk Assessment Actually Covers

A physical security risk assessment is a structured review of your premises, access points, and security systems to identify vulnerabilities before they become incidents. It is not a cybersecurity review, and it's not a compliance audit. The scope is physical and this covers important questions such as who can get in, what they can access when they do, and whether your current systems would detect or deter them.
Most small businesses operate reactively. A lock gets replaced after it's picked, a camera gets installed after a break-in. An assessment flips that. You're looking at the system as a whole, asking not just whether each lock works but whether someone could bypass them all through a propped exit and walk out undetected.
For an SMB, a thorough first-pass assessment covers five areas:
- Perimeter and entry points
- Surveillance and alarm coverage
- Internal access controls
- Asset exposure
- Documentation practices
You're building a prioritized list of what's vulnerable and what to fix, not a security operations playbook.
How to Run Your Own Physical Security Assessment
A solid first-pass assessment takes two to four hours. Work through each step in order, as each one builds on what came before.
Step 1: Define What You're Protecting

You can't assess risk without knowing what's at risk. Start by listing your high-value assets. These cam include physical inventory, cash handling areas, equipment, customer data stored on local hardware, and vehicles. Then map who has access to each of those things and whether that access is formally controlled or simply assumed.
Think in terms of time windows as well as locations. When is your business most vulnerable? Is it after closing or during delivery windows when rear doors are propped open? Could it be during shift changes when attention is split?
The more specific you go, the more loopholes you can cover. Here are some examples to a good start.
- Retail store: You can note where the highest-value items sit relative to exits.
- For an office: You can determine who has unsupervised access to the server room or petty cash.
- For a warehouse: Check who's on the loading dock and whether it's monitored.
Step 2: Inspect Your Perimeter and Entry Points

Most unauthorized entries happen through the most obvious places such as front doors, rear exits, ground-floor windows, or delivery access points. Walk the full exterior at two different times of day. An alleyway visible in daylight can become a concealment spot after dark, and lighting gaps around entry points only show up at night.
At each entry point, here are some question s you can ask:
- Does it lock properly?
- Is there a camera gap nearby?
- Could someone wait there undetected?
Rear exits and delivery bays are the most overlooked entry points in small business assessments, and the ones that get exploited most often.
Pro Tip: Motion-activated spotlight cameras such as the Reolink Lumus can be installed at secondary entry points for approximately $30–$80 per unit, delivering some of the highest security deterrence value for the investment.
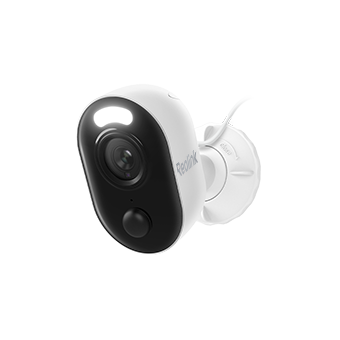 Reolink Lumus
Outdoor WiFi Security Camera with Motion Spotlight
Bright, Motion-Activated LED Spotlight, Instant Siren Alarm, and Remote 2-Way Audio; 2K 4MP and Full Color Night Vision.
Use the checklist at the end of this guide as you walk. Mark each item Done and assign a priority rating on the spot.
Step 3: Audit Your Surveillance and Alarm Coverage

Cameras with blind spots and alarms that notify no one are false confidence. This step finds the gaps in what you already have, and if you have nothing yet, it becomes your camera placement plan.
Walk your premises as if you were an intruder. What areas could you move through without being recorded? Common blind spots: stockrooms, stairwells, parking areas, side entrances, and loading docks.
For cameras you do have, check two things:
- Are they angled in a way to capture usable faces rather than the tops of heads
- Are footage actually being stored somewhere retrievable? A camera that overwrites every 48 hours provides less protection than it appears to.
On alarms:
- Verify coverage extends to every entry point, including secondary doors and windows
- Confirm notifications reach a real person at all hours. Test it out.
If this step surfaces multiple gaps, see the best security camera systems for small business for options suited to different premises sizes and budgets.
Step 4: Review Access Control and Internal Risks

Unauthorized access isn't always forced entry. Most security breaches stem from basic access-control oversights rather than forced entry.
Map which staff have access to which areas, and ask whether that access reflects operational need or simply accumulated over time. Remember not to leave out offboarding. Check when an employee leaves and is physical access revoked promptly? Are key card deactivation, alarm code changes, and key copies accounted for. For small teams, this step gets skipped more than any other, and it's one of the most common sources of internal theft.
Next, review informal day‑to‑day habits. Check for propped doors, shared alarm codes, and any unsupervised access to inventory or cash. Visitor policies also matter. External contractors, delivery personnel, and guests introduce unvetted access and should not move through non‑public areas without escort.
Step 5: Prioritize What to Fix First

Truth is, it's impractical to fix everything at once as it compromises the quality of the assessment. This step ranks your findings so that limited time and budget go to the highest-risk vulnerabilities first.
The best way is to use a two-axis approach:
- How likely is this vulnerability to be exploited
- How damaging would the outcome be?
Likelihood and impact is high: Fix immediately. An unsecured rear entry with no camera and no alarm is a priority regardless of cost.
Likelihood and impact is low: Schedule for later.
Document findings you can't fix immediately. A written record protects you if something happens and helps build the case for budget.
How to Document and Act on Your Findings

An assessment that doesn't lead to action is just a walk-through. Documentation is what turns findings into a plan.
Create a simple log with four columns: the vulnerability, its severity (High, Medium, or Low), the proposed fix, and a target date. "This quarter" or "Next budget cycle" is enough. What matters is that each finding has an owner and a timeline.
Share the summary with anyone who needs it. Documented assessments can support insurance claims and in some cases reduce premiums. If the assessment surfaces serious gaps across multiple entry points or asset areas, a professional physical security consultant is worth engaging for a second pass.
Set a date for the next assessment before you close this one. Annually is the minimum but it's good to move it forward after any relocation, renovation, significant staff turnover, or major asset acquisition.
Your Physical Security Assessment Checklist
This checklist includes all the important points to check on a step-by-step basis, so that you don't have to prepare it yourself.
Pro Tip: To use in Excel: select and copy the table, paste into a spreadsheet, then fill in the Done and Priority columns as you work through each item. Start copying from the start to the end of the italic texts.
Note your high-value assets, who has access to them, and your most vulnerable time windows before you start: _______________
Surveillance & Alarms
Access Control & Internal Risks
Rate H (High), M (Medium), or L (Low) based on likelihood and impact. Your H items are the fix-first list. To use in Excel: select and copy the table, paste into a spreadsheet, then fill in the Done and Priority columns as you work through each item.
FAQs
1. What is the difference between a physical security assessment and a security audit?
A security audit evaluates whether existing systems comply with defined regulatory, contractual, or internal policy standards. A physical security risk assessment is more diagnostic. You're identifying what's missing or weak, and whether it requires it. For most SMBs, a self-directed assessment is the right starting point. Audits become more relevant in regulated industries or when insurance requirements apply.
2. Can I do a physical security risk assessment without any prior experience?
Yes. A first-pass assessment requires observation, not credentials. Your familiarity with your own premises is an advantage: you know which doors stick, which areas are unsupervised, and which shortcuts staff have turned into habits. For complex premises or regulated industries, a consultant adds value, but a DIY assessment surfaces the most actionable items regardless.
3. How much does it cost to fix the gaps found in a physical security assessment?
Many high‑impact security improvements are inexpensive. Motion‑activated lighting typically costs $30–$80 per unit, while door reinforcement hardware runs $20–$60 per door. Replacing lock cylinders after staff turnover generally costs $50–$150 per lock. A basic four‑camera system with local NVR storage can be deployed for $300–$800 with no ongoing subscription. Prioritize fixes that address high‑severity risks at low cost.
4. How do you test physical security at the workplace?
Testing follows assessment and focuses on verifying that controls you expect to work actually do. Simple checks any SMB can run include attempting entry through a secondary door during off‑peak hours, triggering motion alerts to confirm they fire, validating that camera footage is stored and retrievable, and asking a new employee to explain the emergency procedure.
Some gaps only appear through live testing. A tailgating test can reveal access‑control weaknesses that camera reviews miss, such as whether someone can follow an authorized employee through a key‑access door without badging in. Alarms should also be triggered intentionally, with prior notice to the monitoring provider, so response times can be measured. Failed tests should be treated like walk‑through findings: assign severity, define a fix, and set a deadline.
5. What is a security threat assessment?
A security threat assessment evaluates the likelihood and impact of specific threats to your business. It answers "what could go wrong and how bad would it be," whereas a physical security risk assessment answers "where are we exposed." The two are complementary.
For a small business, a threat assessment typically covers local crime environment, business-specific risk factors (cash handling, high-value inventory, late-night operations), insider risk, and environmental risks. For each threat, rate likelihood and potential impact on a High/Medium/Low scale. High on both means prioritize immediately. Low on both means monitor. A plain spreadsheet handles this and no specialist software is mandatory.
Start With One Section This Week
You have everything you need to run your own physical security risk assessment. The most common reason businesses skip it is the belief that it's a big project. In reality, a 45-minute walk around your building with a checklist can already tell you more about your actual exposure than any security product can.
Once you know your gaps, fixing them is a practical question of priority and budget. If the assessment surfaces camera blind spots or coverage gaps, Reolink's business security systems offer self-managed, no-subscription options built for small businesses. Start with the assessment and the rest will follow from what you find.
Search
Subscribe for the Latest Updates
Security insights & offers right into your inbox